一篇文章弄懂Android自定义viewgroup的相关难点
本文的目的
目的在于教会大家到底如何自定义viewgroup,自定义布局和自定义测量到底如何写。很多网上随便搜搜的概念和流程图
这里不再过多描述了,建议大家看本文之前,先看看基本的自定义viewgroup流程,心中有个大概即可。本文注重于实践
viewgroup 的测量布局流程基本梳理
稍微回顾下,基本的viewgroup绘制和布局流程中的重点:
1.view 在onMeasure()方法中进行自我测量和保存,也就是说对于view(不是viewgroup噢)来说一定在onMeasure方法中计算出自己的尺寸并且保存下来
2.viewgroup实际上最终也是循环从上大小来调用子view的measure方法,注意子view的measure其实最终调用的是子view的onMeasure 方法。所以我们理解这个过程为:
viewgroup循环遍历调用所有子view的onmeasure方法,利用onmeasure方法计算出来的大小,来确定这些子view最终可以占用的大小和所处的布局的位置。
3.measure方法是一个final方法,可以理解为做测量工作准备工作的,既然是final方法所以我们无法重写它,不需要过多
关注他,因为measure最终要调用onmeasure ,这个onmeasure我们是可以重写的。要关注这个。layout和onlayout是一样的关系。
4.父view调用子view的layout方法的时候会把之前measure阶段确定的位置和大小都传递给子view。
5.对于自定义view/viewgroup来说 我们几乎只需要关注下面三种需求:
- 对于已有的android自带的view,我们只需要重写他的onMeasure方法即可。修改一下这个尺寸即可完成需求。
- 对于android系统没有的,属于我们自定义的view,比上面那个要复杂一点,要完全重写onMeasure方法。
- 第三种最复杂,需要重写onmeasure和onlayout2个方法,来完成一个复杂viewgroup的测量和布局。
6.onMeasure方法的特殊说明:

7.如何理解父view对子view的限制?
onMeasure的两个参数既然是父view对子view的限制,那么这个限制的值到底是哪来的呢?
实际上,父view对子view的限制绝大多数就来自于我们开发者所设置的layout开头的这些属性
比方说我们给一个imageview设置了他的layout_width和layout_height 这2个属性,那这2个属性其实就是我们开发者
所期望的宽高属性,但是要注意了,
设置的这2个属性是给父view看的,实际上对于绝大多数的layout开头的属性这些属性都是设置给父view看的
为什么要给父view看?因为父view要知道这些属性以后才知道要对子view的测量加以什么限制?
到底是不限制(UNSPECIFIED)?还是限制个最大值(AT_MOST),让子view不超过这个值?还是直接限制死,我让你是多少就得是多少(EXACTLY)。
自定义一个BannerImageView 修改onMeasure方法
所谓bannerImageview,就是很多电商其实都会放广告图,这个广告图的宽高比都是可变的,我们在日常开发过程中
也会经常接触到这种需求:imageview的宽高比 在高保真中都标注出来,但是考虑到很多手机的屏幕宽度或者高度都不确定
所以我们通常都要手动来计算出这个imageview高度或者宽度,然后动态改变width或者height的值。这种方法可用但是很麻烦
这里给出一个自定义的imageview,通过设置一个ratio的属性即可动态的设置iv的高度。很是方便

看下效果

最后看下代码,重要的部分都写在注释里了,不再过多讲了。
public class BannerImageView extends ImageView {
//宽高比
float ratio;
public BannerImageView(Context context) {
super(context);
}
public BannerImageView(Context context, AttributeSet attrs) {
super(context, attrs);
TypedArray typedArray = context.obtainStyledAttributes(attrs, R.styleable.BannerImageView);
ratio = typedArray.getFloat(R.styleable.BannerImageView_ratio, 1.0f);
typedArray.recycle();
}
public BannerImageView(Context context, AttributeSet attrs, int defStyleAttr) {
super(context, attrs, defStyleAttr);
}
@Override
protected void onMeasure(int widthMeasureSpec, int heightMeasureSpec) {
//人家自己的测量还是要自己走一遍的,因为这个方法内部会调用setMeasuredDimension方法来保存测量结果了
//只有保存了以后 我们才能取得这个测量结果 否则你下面是取不到的
super.onMeasure(widthMeasureSpec, heightMeasureSpec);
//取测量结果
int mWidth = getMeasuredWidth();
int mHeight = (int) (mWidth * ratio);
//保存了以后,父view就可以拿到这个测量的宽高了。不保存是拿不到的噢。
setMeasuredDimension(mWidth, mHeight);
}
}
自定义view,完全自己写onMeasure方法
首先明确一个结论:
对于完全自定义的view,完全自己写的onMeasure方法来说,你保存的宽高必须要符合父view的限制,否则会发生bug,
保存父view对子view的限制的方法也很简单直接调用resolveSize方法即可。


所以对于完全自定义的view onMeasure方法也不难写了,
- 先算自己想要的宽高,比如你画了个圆,那么宽高就肯定是半径的两倍大小, 要是圆下面还有字,
- 那么高度肯定除了半径的两倍还要有字体的大小。对吧。很简单。这个纯看你自定义view是啥样的
- 算完自己想要的宽高以后 直接拿resolveSize 方法处理一下 即可。
- 最后setMeasuredDimension 保存。
范例:
public class LoadingView extends View {
//圆形的半径
int radius;
//圆形外部矩形rect的起点
int left = 10, top = 30;
Paint mPaint = new Paint();
public LoadingView(Context context) {
super(context);
}
public LoadingView(Context context, AttributeSet attrs) {
super(context, attrs);
TypedArray typedArray = context.obtainStyledAttributes(attrs, R.styleable.LoadingView);
radius = typedArray.getInt(R.styleable.LoadingView_radius, 0);
}
public LoadingView(Context context, AttributeSet attrs, int defStyleAttr) {
super(context, attrs, defStyleAttr);
}
@Override
protected void onMeasure(int widthMeasureSpec, int heightMeasureSpec) {
super.onMeasure(widthMeasureSpec, heightMeasureSpec);
int width = left + radius * 2;
int height = top + radius * 2;
//一定要用resolveSize方法来格式化一下你的view宽高噢,否则遇到某些layout的时候一定会出现奇怪的bug的。
//因为不用这个 你就完全没有父view的感受了 最后强调一遍
width = resolveSize(width, widthMeasureSpec);
height = resolveSize(height, heightMeasureSpec);
setMeasuredDimension(width, height);
}
@Override
protected void onDraw(Canvas canvas) {
super.onDraw(canvas);
RectF oval = new RectF(left, top,
left + radius * 2, top + radius * 2);
mPaint.setColor(Color.BLUE);
canvas.drawRect(oval, mPaint);
//先画圆弧
mPaint.setColor(Color.RED);
mPaint.setStyle(Paint.Style.STROKE);
mPaint.setStrokeWidth(2);
canvas.drawArc(oval, -90, 360, false, mPaint);
}
}
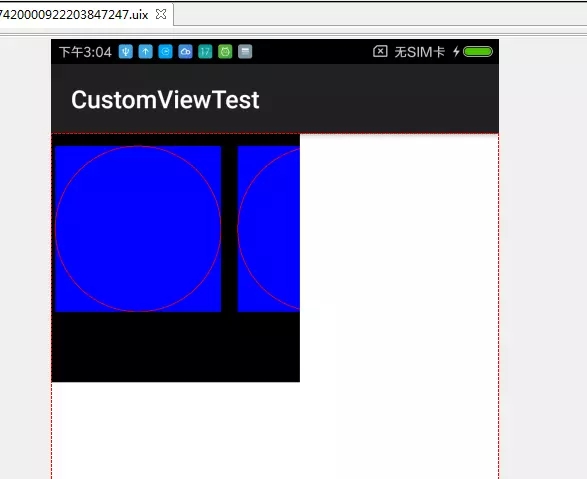
布局文件:
<LinearLayout
android:layout_width="200dp"
android:layout_height="200dp"
android:background="#000000"
android:orientation="horizontal">
<com.example.a16040657.customviewtest.LoadingView
android:layout_width="wrap_content"
android:layout_height="wrap_content"
android:src="@mipmap/dly"
app:radius="200"></com.example.a16040657.customviewtest.LoadingView>
<com.example.a16040657.customviewtest.LoadingView
android:layout_marginLeft="10dp"
android:layout_width="wrap_content"
android:layout_height="wrap_content"
android:src="@mipmap/dly"
app:radius="200"></com.example.a16040657.customviewtest.LoadingView>
</LinearLayout>
最后效果:
自定义一个viewgroup
这个其实也就是稍微复杂了一点,但是还是有迹可循的,只是稍微需要一点额外的耐心。
自定义一个viewgroup 需要注意的点如下:
- 一定是先重写onMeasure确定子view的宽高和自己的宽高以后 才可以继续写onlayout 对这些子view进行布局噢~~
- viewgroup 的onMeasure其实就是遍历自己的view 对自己的每一个子view进行measure,绝大多数时候对子view的measure都可以直接用 measureChild()这个方法来替代,简化我们的写法,如果你的viewgroup很复杂的话无法就是自己写一遍measureChild 而不是调用measureChild 罢了。
- 计算出viewgroup自己的尺寸并且保存,保存的方法还是哪个setMeasuredDimension 不要忘记了
- 逼不得已要重写measureChild方法的时候,其实也不难无非就是对父view的测量和子view的测量 做一个取舍关系而已,你看懂了基础的measureChild方法,以后就肯定会写自己的复杂的measureChild方法了。
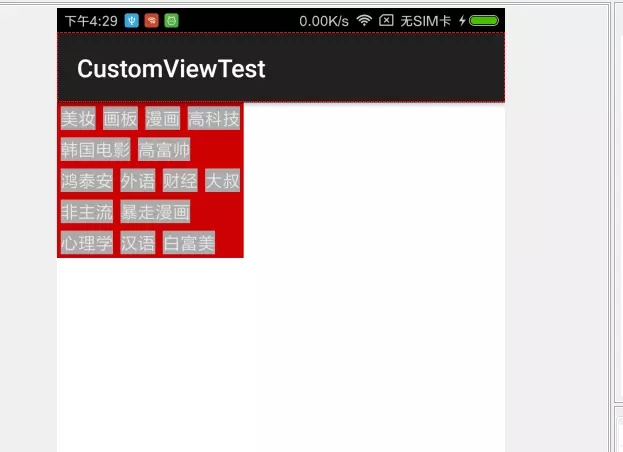
下面是一个极简的例子,一个很简单的flowlayout的实现,没有对margin paddding做处理,也假设了每一个tag的高度
是固定的,可以说是极为简单了,但是麻雀虽小 五脏俱全,足够你们好好理解自定义viewgroup的关键点了。
/**
* 写一个简单的flowlayout 从左到右的简单layout,如果宽度不够放 就直接另起一行layout
* 这个类似的开源控件有很多,有很多写的出色的,我这里只仅仅实现一个初级的flowlayout
* 也是最简单的,目的是为了理解自定义viewgroup的关键核心点。
* <p>
* 比方说这里并没有对padding或者margin做特殊处理,你们自己写viewgroup的时候 记得把这些属性的处理都加上
* 否则一旦有人用了这些属性 发现没有生效就比较难看了。。。。。。
*/
public class SimpleFlowLayout extends ViewGroup {
public SimpleFlowLayout(Context context) {
super(context);
}
public SimpleFlowLayout(Context context, AttributeSet attrs) {
super(context, attrs);
}
public SimpleFlowLayout(Context context, AttributeSet attrs, int defStyleAttr) {
super(context, attrs, defStyleAttr);
}
/**
* layout的算法 其实就是 不够放剩下一行 那另外放一行 这个过程一定要自己写一遍才能体会,
* 个人有个人的写法,说不定你的写法比开源的项目还要好
* 其实也没什么夸张的,无法就是前面onMeasure结束以后 你可以拿到所有子view和自己的 测量宽高 然后就算呗
*
* @param changed
* @param l
* @param t
* @param r
* @param b
*/
@Override
protected void onLayout(boolean changed, int l, int t, int r, int b) {
int childTop = 0;
int childLeft = 0;
int childRight = 0;
int childBottom = 0;
//已使用 width
int usedWidth = 0;
//customlayout 自己可使用的宽度
int layoutWidth = getMeasuredWidth();
Log.v("wuyue", "layoutWidth==" + layoutWidth);
for (int i = 0; i < getChildCount(); i++) {
View childView = getChildAt(i);
//取得这个子view要求的宽度和高度
int childWidth = childView.getMeasuredWidth();
int childHeight = childView.getMeasuredHeight();
//如果宽度不够了 就另外启动一行
if (layoutWidth - usedWidth < childWidth) {
childLeft = 0;
usedWidth = 0;
childTop += childHeight;
childRight = childWidth;
childBottom = childTop + childHeight;
childView.layout(0, childTop, childRight, childBottom);
usedWidth = usedWidth + childWidth;
childLeft = childWidth;
continue;
}
childRight = childLeft + childWidth;
childBottom = childTop + childHeight;
childView.layout(childLeft, childTop, childRight, childBottom);
childLeft = childLeft + childWidth;
usedWidth = usedWidth + childWidth;
}
}
@Override
protected void onMeasure(int widthMeasureSpec, int heightMeasureSpec) {
//先取出SimpleFlowLayout的父view 对SimpleFlowLayout 的测量限制 这一步很重要噢。
//你只有知道自己的宽高 才能限制你子view的宽高
int widthMode = MeasureSpec.getMode(widthMeasureSpec);
int heightMode = MeasureSpec.getMode(heightMeasureSpec);
int widthSize = MeasureSpec.getSize(widthMeasureSpec);
int heightSize = MeasureSpec.getSize(heightMeasureSpec);
int usedWidth = 0; //已使用的宽度
int remaining = 0; //剩余可用宽度
int totalHeight = 0; //总高度
int lineHeight = 0; //当前行高
for (int i = 0; i < getChildCount(); i++) {
View childView = getChildAt(i);
LayoutParams lp = childView.getLayoutParams();
//先测量子view
measureChild(childView, widthMeasureSpec, heightMeasureSpec);
//然后计算一下宽度里面 还有多少是可用的 也就是剩余可用宽度
remaining = widthSize - usedWidth;
//如果一行不够放了,也就是说这个子view测量的宽度 大于 这一行 剩下的宽度的时候 我们就要另外启一行了
if (childView.getMeasuredWidth() > remaining) {
//另外启动一行的时候,使用过的宽度 当然要设置为0
usedWidth = 0;
//另外启动一行了 我们的总高度也要加一下,不然高度就不对了
totalHeight = totalHeight + lineHeight;
}
//已使用 width 进行 累加
usedWidth = usedWidth + childView.getMeasuredWidth();
//当前 view 的高度
lineHeight = childView.getMeasuredHeight();
}
//如果SimpleFlowLayout 的高度 为wrap cotent的时候 才用我们叠加的高度,否则,我们当然用父view对如果SimpleFlowLayout 限制的高度
if (heightMode == MeasureSpec.AT_MOST) {
heightSize = totalHeight;
}
setMeasuredDimension(widthSize, heightSize);
}
}
最后看下效果
总结
以上就是这篇文章的全部内容了,希望本文的内容对大家的学习或者工作具有一定的参考学习价值,如果有疑问大家可以留言交流,谢谢大家对的支持。
以上是 一篇文章弄懂Android自定义viewgroup的相关难点 的全部内容, 来源链接: utcz.com/p/240690.html

