Android显示系统SurfaceFlinger详解
一、Android系统启动
Android设备从按下开机键到桌面显示画面,大致过程如下图流程:

开机显示桌面、从桌面点击 App 图标到 Activity显示在屏幕上的过程又是怎样的呢?下面介绍Android系统中的“画家” - SurfaceFlinger.
SurfaceFlinger 启动过程:

二、SurfaceFlinger代码剖析[Android 11]
代码路径:/frameworks/native/services/surfaceflinger/
SurfaceFlinger二进制分成surfaceflinger可执行文件(main入口)和libsurfaceflinger.so库文件(功能实现),由main_surfaceflinger.cpp文件编译而成,Android.bp代码模块编译配置如下:
1.【执行文件-surfaceflinger】
...cc_binary {
name: "surfaceflinger",
defaults: ["surfaceflinger_defaults"],
init_rc: ["surfaceflinger.rc"],
srcs: ["main_surfaceflinger.cpp"],
whole_static_libs: [
"libsigchain",
],
shared_libs: [
"android.frameworks.displayservice@1.0",
"android.hardware.configstore-utils",
"android.hardware.configstore@1.0",
"android.hardware.graphics.allocator@2.0",
"libbinder",
"libcutils",
"libdisplayservicehidl",
"libhidlbase",
"libhidltransport",
"liblayers_proto",
"liblog",
"libsurfaceflinger",
"libtimestats_proto",
"libutils",
],
static_libs: [
"libserviceutils",
"libtrace_proto",
],
ldflags: ["-Wl,--export-dynamic"],
// TODO(b/71715793): These version-scripts are required due to the use of
// whole_static_libs to pull in libsigchain. To work, the files had to be
// locally duplicated from their original location
// $ANDROID_ROOT/art/sigchainlib/
multilib: {
lib32: {
version_script: "version-script32.txt",
},
lib64: {
version_script: "version-script64.txt",
},
},
}...
SurfaceFlinger可执行二进制文件surfaceflinger由main_surfaceflinger.cpp文件独立编译而成,主要负责搭建进程启动环境:
int main(int, char**) {
signal(SIGPIPE, SIG_IGN);
// 从8.0开始,Android提供了hidl机制,将原先直接由JNI->Native->HAL的接口调用形式,统一规范成hidl service/client交互形式。
// 该方式从一方面规范和统一了Android Framework和HAL的调用机制,但实际从项目维度,这种调用方式对性能上开销,将比直接调用的方式要花费更多的时间。
hardware::configureRpcThreadpool(1 /* maxThreads */,
false /* callerWillJoin */);
startGraphicsAllocatorService();
// When SF is launched in its own process, limit the number of
// binder threads to 4.
ProcessState::self()->setThreadPoolMaxThreadCount(4);
// start the thread pool
sp<ProcessState> ps(ProcessState::self());
ps->startThreadPool();
// 创建SurfaceFlinger对象,由强指针指向。
// SurfaceFlinger继承RefBase类,所以此处一旦new出对象赋给sp指针后,将立刻出发SurfaceFlinger类的onFirstRef方法的调用。
// instantiate surfaceflinger
sp<SurfaceFlinger> flinger = surfaceflinger::createSurfaceFlinger();
setpriority(PRIO_PROCESS, 0, PRIORITY_URGENT_DISPLAY);
set_sched_policy(0, SP_FOREGROUND);
// Put most SurfaceFlinger threads in the system-background cpuset
// Keeps us from unnecessarily using big cores
// Do this after the binder thread pool init
if (cpusets_enabled()) set_cpuset_policy(0, SP_SYSTEM);
// SurfaceFlinger类正式初始化
// initialize before clients can connect
flinger->init();
// SurfaceFlinger向ServiceManager注册Binder服务,
// 这样在其他进程中可以通过getService+SERVICE_NAME来获取SurfaceFlinger服务,继而可以和SurfaceFlinger类进行Binder通信。
// publish surface flinger
sp<IServiceManager> sm(defaultServiceManager());
sm->addService(String16(SurfaceFlinger::getServiceName()), flinger, false,
IServiceManager::DUMP_FLAG_PRIORITY_CRITICAL | IServiceManager::DUMP_FLAG_PROTO);
//里面的new DisplayService()方法调用HIDL定义接口 Return<sp<IDisplayEventReceiver >> getEventReceiver() override;
startDisplayService(); // dependency on SF getting registered above
if (SurfaceFlinger::setSchedFifo(true) != NO_ERROR) {
ALOGW("Couldn't set to SCHED_FIFO: %s", strerror(errno));
}
// SurfaceFlinger类进入主循环(此处注意SurfaceFlinger类未继承Threads类,不遵循Threads类的接口执行顺序)
// run surface flinger in this thread
flinger->run();
return 0;
}
HIDL接口介绍可以参考:https://source.android.google.cn/reference/hidl/
2.【动态库-libsurfaceflinger.so】
Android.bp代码模块编译配置如下:
...cc_library_shared {
name: "libsurfaceflinger",
defaults: ["libsurfaceflinger_defaults"],
cflags: [
"-fvisibility=hidden",
"-Werror=format",
"-DREDUCE_VIDEO_WORKLOAD",
"-DUSE_AML_HW_ACTIVE_MODE",
],
srcs: [
":libsurfaceflinger_sources",
],
logtags: ["EventLog/EventLogTags.logtags"],
include_dirs: [
"frameworks/native/vulkan/vkjson",
"frameworks/native/vulkan/include",
"hardware/amlogic/gralloc/amlogic",
"hardware/amlogic/hwcomposer/tvp",
"hardware/amlogic/gralloc",
],
static_libs: [
"libomxutils_static@2",
"libamgralloc_ext_static@2",
],
cppflags: [
"-fwhole-program-vtables", // requires ThinLTO
],
lto: {
thin: true,
},
}...
上面提到的createSurfaceFlinger()中会调用new SurfaceFlinger(),然后会执行到:onFirstRef():
void SurfaceFlinger::onFirstRef()
{
mEventQueue.init(this);
}
onFirstRef() 中会创建 Handler 并初始化: /frameworks/native/services/surfaceflinger/Scheduler/MessageQueue.cpp
//MessageQueue.cpp
void MessageQueue::init(const sp<SurfaceFlinger>& flinger)
{
mFlinger = flinger;
mLooper = new Looper(true);
mHandler = new Handler(*this);
}
然后会执行到 SurfaceFlinger::init(),该方法主要功能是:
- 初始化 EGL
- 创建 HWComposer
- 初始化非虚拟显示屏
- 启动 EventThread 线程
- 启动开机动画
// Do not call property_set on main thread which will be blocked by init
// Use StartPropertySetThread instead.
void SurfaceFlinger::init() {
ALOGI( "SurfaceFlinger's main thread ready to run. "
"Initializing graphics H/W...");
Mutex::Autolock _l(mStateLock);
// 对于CompositionEngine 属性进行设置, 创建RenderEngine对象
// Get a RenderEngine for the given display / config (can't fail)
// TODO(b/77156734): We need to stop casting and use HAL types when possible.
// Sending maxFrameBufferAcquiredBuffers as the cache size is tightly tuned to single-display.
mCompositionEngine->setRenderEngine(renderengine::RenderEngine::create(
renderengine::RenderEngineCreationArgs::Builder()
.setPixelFormat(static_cast<int32_t>(defaultCompositionPixelFormat))
.setImageCacheSize(maxFrameBufferAcquiredBuffers)
.setUseColorManagerment(useColorManagement)
.setEnableProtectedContext(enable_protected_contents(false))
.setPrecacheToneMapperShaderOnly(false)
.setSupportsBackgroundBlur(mSupportsBlur)
.setContextPriority(useContextPriority
? renderengine::RenderEngine::ContextPriority::HIGH
: renderengine::RenderEngine::ContextPriority::MEDIUM)
.build()));
mCompositionEngine->setTimeStats(mTimeStats);
LOG_ALWAYS_FATAL_IF(mVrFlingerRequestsDisplay,
"Starting with vr flinger active is not currently supported."); //创建HWComposer对象并传入一个name属性,再通过mCompositionEngine->setHwComposer设置对象属性。
mCompositionEngine->setHwComposer(getFactory().createHWComposer(getBE().mHwcServiceName));
mCompositionEngine->getHwComposer().setConfiguration(this, getBE().mComposerSequenceId); //processDisplayHotplugEventsLocked(); 处理 任何初始热插拔和显示更改的结果 //在此方法中主要有调用 initScheduler(displayId);
// Process any initial hotplug and resulting display changes.
processDisplayHotplugEventsLocked();
const auto display = getDefaultDisplayDeviceLocked();
LOG_ALWAYS_FATAL_IF(!display, "Missing internal display after registering composer callback.");
LOG_ALWAYS_FATAL_IF(!getHwComposer().isConnected(*display->getId()),
"Internal display is disconnected.");
if (useVrFlinger) {
auto vrFlingerRequestDisplayCallback = [this](bool requestDisplay) {
// This callback is called from the vr flinger dispatch thread. We
// need to call signalTransaction(), which requires holding
// mStateLock when we're not on the main thread. Acquiring
// mStateLock from the vr flinger dispatch thread might trigger a
// deadlock in surface flinger (see b/66916578), so post a message
// to be handled on the main thread instead.
static_cast<void>(schedule([=] {
ALOGI("VR request display mode: requestDisplay=%d", requestDisplay);
mVrFlingerRequestsDisplay = requestDisplay;
signalTransaction();
}));
};
mVrFlinger = dvr::VrFlinger::Create(getHwComposer().getComposer(),
getHwComposer()
.fromPhysicalDisplayId(*display->getId())
.value_or(0),
vrFlingerRequestDisplayCallback);
if (!mVrFlinger) {
ALOGE("Failed to start vrflinger");
}
}
// initialize our drawing state
mDrawingState = mCurrentState;
// set initial conditions (e.g. unblank default device)
initializeDisplays();
char primeShaderCache[PROPERTY_VALUE_MAX];
property_get("service.sf.prime_shader_cache", primeShaderCache, "1");
if (atoi(primeShaderCache)) {
getRenderEngine().primeCache();
}
// Inform native graphics APIs whether the present timestamp is supported:
const bool presentFenceReliable =
!getHwComposer().hasCapability(hal::Capability::PRESENT_FENCE_IS_NOT_RELIABLE);
mStartPropertySetThread = getFactory().createStartPropertySetThread(presentFenceReliable);
if (mStartPropertySetThread->Start() != NO_ERROR) {
ALOGE("Run StartPropertySetThread failed!");
}
ALOGV("Done initializing");
}
首先看下如何创建 HWComposer:frameworks/native/services/surfaceflinger/SurfaceFlingerDefaultFactory.cpp
//make_unique 相当于 new,(能够取代new 而且无需 delete pointer,有助于代码管理)。
std::unique_ptr<HWComposer> DefaultFactory::createHWComposer(const std::string& serviceName) {
return std::make_unique<android::impl::HWComposer>(serviceName);
}
对于CompositionEngine进行初始化:
std::unique_ptr<compositionengine::CompositionEngine> DefaultFactory::createCompositionEngine() {
return compositionengine::impl::createCompositionEngine();
}
同样是通过make_unique创建了 CompositionEngine对象:
std::unique_ptr<compositionengine::CompositionEngine> createCompositionEngine() {
return std::make_unique<CompositionEngine>();
}
再回到flinger->init()中processDisplayHotplugEventsLocked(); 处理任何初始热插拔和显示更改的结果,在此方法中主要有调用 initScheduler(displayId):
void SurfaceFlinger::initScheduler(DisplayId primaryDisplayId) {
if (mScheduler) {
// In practice it's not allowed to hotplug in/out the primary display once it's been
// connected during startup, but some tests do it, so just warn and return.
ALOGW("Can't re-init scheduler");
return;
}
auto currentConfig = HwcConfigIndexType(getHwComposer().getActiveConfigIndex(primaryDisplayId));
mRefreshRateConfigs =
std::make_unique<scheduler::RefreshRateConfigs>(getHwComposer().getConfigs(
primaryDisplayId),
currentConfig);
mRefreshRateStats =
std::make_unique<scheduler::RefreshRateStats>(*mRefreshRateConfigs, *mTimeStats,
currentConfig, hal::PowerMode::OFF);
mRefreshRateStats->setConfigMode(currentConfig);
mPhaseConfiguration = getFactory().createPhaseConfiguration(*mRefreshRateConfigs);
// 处创建Scheduler对象
// start the EventThread
mScheduler =
getFactory().createScheduler([this](bool enabled) { setPrimaryVsyncEnabled(enabled); },
*mRefreshRateConfigs, *this);
//创建app链接 和 sf链接 mAppConnectionHandle =
mScheduler->createConnection("app", mPhaseConfiguration->getCurrentOffsets().late.app,
impl::EventThread::InterceptVSyncsCallback());
mSfConnectionHandle =
mScheduler->createConnection("sf", mPhaseConfiguration->getCurrentOffsets().late.sf,
[this](nsecs_t timestamp) {
mInterceptor->saveVSyncEvent(timestamp);
});
mEventQueue->setEventConnection(mScheduler->getEventConnection(mSfConnectionHandle));
mVSyncModulator.emplace(*mScheduler, mAppConnectionHandle, mSfConnectionHandle,
mPhaseConfiguration->getCurrentOffsets());
mRegionSamplingThread =
new RegionSamplingThread(*this, *mScheduler,
RegionSamplingThread::EnvironmentTimingTunables());
// Dispatch a config change request for the primary display on scheduler
// initialization, so that the EventThreads always contain a reference to a
// prior configuration.
//
// This is a bit hacky, but this avoids a back-pointer into the main SF
// classes from EventThread, and there should be no run-time binder cost
// anyway since there are no connected apps at this point.
const nsecs_t vsyncPeriod =
mRefreshRateConfigs->getRefreshRateFromConfigId(currentConfig).getVsyncPeriod();
mScheduler->onPrimaryDisplayConfigChanged(mAppConnectionHandle, primaryDisplayId.value,
currentConfig, vsyncPeriod);
}
详细看下app、sf的链接:
Scheduler::ConnectionHandle Scheduler::createConnection(
const char* connectionName, nsecs_t phaseOffsetNs,
impl::EventThread::InterceptVSyncsCallback interceptCallback) {
auto vsyncSource = makePrimaryDispSyncSource(connectionName, phaseOffsetNs);
auto eventThread = std::make_unique<impl::EventThread>(std::move(vsyncSource), std::move(interceptCallback));
return createConnection(std::move(eventThread));
}
可以看到创建了DispSyncSource对象,且构造方法传入了四个值,dispSync对象,phaseOffset偏移量,traceVsync为true,name就是 app或 sf
DispSyncSource::DispSyncSource(DispSync* dispSync, nsecs_t phaseOffset, bool traceVsync,
const char* name)
: mName(name),
mValue(base::StringPrintf("VSYNC-%s", name), 0), //对mValue进行了赋值,systrace上我们看到的 VSYNC-app VSYNC-sf 标签就是它
mTraceVsync(traceVsync), //mTraceVsync为true,在onDispSyncEvent方法中
mVsyncOnLabel(base::StringPrintf("VsyncOn-%s", name)),
mDispSync(dispSync),
mPhaseOffset(base::StringPrintf("VsyncOffset-%s", name), phaseOffset) //对mPhaseOffset进行初始化 vsync信号到来时候,sf、app的偏移量
所以我们在systrace上面看到的 VSYNC-app/VSYNC-sf 驼峰 0 1变化,来源于这个。

创建EventThread对象,传入sf 或 app 相关联的vsyncSource对象:
auto eventThread = std::make_unique<impl::EventThread>(std::move(vsyncSource), std::move(interceptCallback));
说明:
- 1)每个ConnectionHandle 对象里有个 id,作为 Scheduler 对象中 mConnections 属性(map<id, Connection>)的键值,Connection 对象中又包含 ConnectionHandle、EventThreadConnection、EventThread 3个属性。
- 2)mScheduler->getEventConnection(mSfConnectionHandle) 中,以 mSfConnectionHandle 的 id 为键值,在 Scheduler 的 mConnections(unordered_map<int64_t, Connection>)中找到对应的Connection,并返回其 EventThreadConnection 成员属性。
- 3)getHwComposer().registerCallback() 中,依次调用 HwComposer、Device 的registerCallback() 方法,并在 Device 中 将 SurfaceFlinger 对象封装到 ComposerCallbackBridge 中;对于封装后的对象,依次调用 Composer、IComposerClient 的 registerCallback() 方法,注入到 IComposerClient 的实现类中。
相关问题:
- ① 屏幕刷新速率比系统帧速率快:
此时,在前缓冲区内容全部映射到屏幕上之后,后缓冲区尚未准备好下一帧,屏幕将无法读取下一帧,所以只能继续显示当前一帧的图形,造成一帧显示多次,也就是卡顿。
- ② 系统帧速率比屏幕刷新率快
此时,屏幕未完全把前缓冲区的一帧映射到屏幕,而系统已经在后缓冲区准备好了下一帧,并要求读取下一帧到屏幕,将会导致屏幕上半部分是上一帧的图形,而下半部分是下一帧的图形,造成屏幕上显示多帧,也就是屏幕撕裂。
为了解决上述问题,Android显示系统一般会有多级缓冲,即在屏幕刷新的同时在另外一个buffer准备下一帧数据,以此提高性能:

- 前缓冲区:用来显示内容到屏幕的帧缓冲区
- 后缓冲区:用于后台合成下一帧图形的帧缓冲区
- 垂直同步(VSync):当屏幕从缓冲区扫描完一帧到屏幕上之后,开始扫描下一帧之前,发出的一个同步信号,该信号用来切换前缓冲区和后缓冲区。
- 屏幕刷新率(HZ):代表屏幕在一秒内刷新屏幕的次数,Android手机一般为60HZ(也就是1秒刷新60帧,大约16.67毫秒刷新1帧)
- 系统帧速率(FPS):代表了系统在一秒内合成的帧数,该值的大小由系统算法和硬件决定。
3. 服务启动配置文件:/frameworks/native/services/surfaceflinger/surfaceflinger.rc
上面发现服务配置文件也在Android.mk中被加载:LOCAL_INIT_RC := surfaceflinger.rc
service surfaceflinger /system/bin/surfaceflinger
class core animation
user system
group graphics drmrpc readproc
onrestart restart zygote
writepid /dev/stune/foreground/tasks
socket pdx/system/vr/display/client stream 0666 system graphics u:object_r:pdx_display_client_endpoint_socket:s0
socket pdx/system/vr/display/manager stream 0666 system graphics u:object_r:pdx_display_manager_endpoint_socket:s0
socket pdx/system/vr/display/vsync stream 0666 system graphics u:object_r:pdx_display_vsync_endpoint_socket:s0
4. Surface 创建过程

Surface 创建的过程就是 Activity 显示的过程,在 ActivityThread.handleResumeActivity() 中调用了 Activity.makeVisible()具体实现:
void makeVisible() {
if (!mWindowAdded) {
ViewManager wm = getWindowManager();//此处 getWindowManager 获取的是 WindowManagerImpl 对象
wm.addView(mDecor, getWindow().getAttributes());
mWindowAdded = true;
}
mDecor.setVisibility(View.VISIBLE);
}
WindowManagerImpl.java:
public void addView(@NonNull View view, @NonNull ViewGroup.LayoutParams params) {
applyDefaultToken(params);
mGlobal.addView(view, params, mDisplay, mParentWindow);
}
WindowManagerGlobal.java:
public void addView(View view, ViewGroup.LayoutParams params, Display display, Window parentWindow) {
...
final WindowManager.LayoutParams wparams = (WindowManager.LayoutParams) params;
//创建 ViewRootImpl
ViewRootImpl root = new ViewRootImpl(view.getContext(), display);
view.setLayoutParams(wparams);
mViews.add(view);
mRoots.add(root);
mParams.add(wparams);
//设置 View
root.setView(view, wparams, panelParentView);
...
}
创建 ViewRootImpl:
public ViewRootImpl(Context context, Display display) {
//获取 IWindowSession的代理类
this(context, display, WindowManagerGlobal.getWindowSession(),
false /* useSfChoreographer */);
}
WindowManagerGlobal.java:
@UnsupportedAppUsage
public static IWindowSession getWindowSession() {
synchronized (WindowManagerGlobal.class) {
if (sWindowSession == null) {
try {
// Emulate the legacy behavior. The global instance of InputMethodManager
// was instantiated here.
// TODO(b/116157766): Remove this hack after cleaning up @UnsupportedAppUsage
//获取 IMS 的代理类
InputMethodManager.ensureDefaultInstanceForDefaultDisplayIfNecessary();
IWindowManager windowManager = getWindowManagerService();
//经过 Binder 调用,最终调用 WMS
sWindowSession = windowManager.openSession(
new IWindowSessionCallback.Stub() {
@Override
public void onAnimatorScaleChanged(float scale) {
ValueAnimator.setDurationScale(scale);
}
});
} catch (RemoteException e) {
throw e.rethrowFromSystemServer();
}
}
return sWindowSession;
}
}
WindowManagerService.openSession:
// -------------------------------------------------------------
// IWindowManager API
// -------------------------------------------------------------
@Override
public IWindowSession openSession(IWindowSessionCallback callback) {
//创建session对象
return new Session(this, callback);
}
再次经过 Binder 将数据写回 app 进程,则获取的便是 Session 的代理对象 IWindowSession。
创建完 ViewRootImpl 对象后,接下来调用该对象的 setView() 方法:
ViewRootImpl:
public void setView(View view, WindowManager.LayoutParams attrs, View panelParentView) {
synchronized (this) {
requestLayout(); //详见下面分析
...
//通过 Binder调用,进入 system 进程的 Session
res = mWindowSession.addToDisplayAsUser(mWindow, mSeq, mWindowAttributes, getHostVisibility(), mDisplay.getDisplayId(), userId, mTmpFrame, mAttachInfo.mContentInsets, mAttachInfo.mStableInsets, mAttachInfo.mDisplayCutout, inputChannel, mTempInsets, mTempControls);
...
}
}
Session.java
@Override
public int addToDisplayAsUser(IWindow window, int seq, WindowManager.LayoutParams attrs,
int viewVisibility, int displayId, int userId, Rect outFrame,
Rect outContentInsets, Rect outStableInsets,
DisplayCutout.ParcelableWrapper outDisplayCutout, InputChannel outInputChannel,
InsetsState outInsetsState, InsetsSourceControl[] outActiveControls) {
//调用WMS的addWindow方法
return mService.addWindow(this, window, seq, attrs, viewVisibility, displayId, outFrame,
outContentInsets, outStableInsets, outDisplayCutout, outInputChannel,
outInsetsState, outActiveControls, userId);
}
WindowManagerService.java:
public int addWindow(Session session, IWindow client, int seq,
LayoutParams attrs, int viewVisibility, int displayId, Rect outFrame,
Rect outContentInsets, Rect outStableInsets,
DisplayCutout.ParcelableWrapper outDisplayCutout, InputChannel outInputChannel,
InsetsState outInsetsState, InsetsSourceControl[] outActiveControls,
int requestUserId) {
Arrays.fill(outActiveControls, null);
int[] appOp = new int[1];
final boolean isRoundedCornerOverlay = (attrs.privateFlags
& PRIVATE_FLAG_IS_ROUNDED_CORNERS_OVERLAY) != 0;
int res = mPolicy.checkAddPermission(attrs.type, isRoundedCornerOverlay, attrs.packageName,
appOp);
if (res != WindowManagerGlobal.ADD_OKAY) {
return res;
}
WindowState parentWindow = null;
final int callingUid = Binder.getCallingUid();
final int callingPid = Binder.getCallingPid();
final long origId = Binder.clearCallingIdentity();
final int type = attrs.type;
synchronized (mGlobalLock) {
if (!mDisplayReady) {
throw new IllegalStateException("Display has not been initialialized");
}
...
//创建 WindowState
final WindowState win = new WindowState(this, session, client, token, parentWindow,
appOp[0], seq, attrs, viewVisibility, session.mUid, userId,
session.mCanAddInternalSystemWindow);
if (win.mDeathRecipient == null) {
// Client has apparently died, so there is no reason to
// continue.
ProtoLog.w(WM_ERROR, "Adding window client %s"
+ " that is dead, aborting.", client.asBinder());
return WindowManagerGlobal.ADD_APP_EXITING;
}
if (win.getDisplayContent() == null) {
ProtoLog.w(WM_ERROR, "Adding window to Display that has been removed.");
return WindowManagerGlobal.ADD_INVALID_DISPLAY;
}
// 调整 WindowManager的LayoutParams 参数
final DisplayPolicy displayPolicy = displayContent.getDisplayPolicy();
displayPolicy.adjustWindowParamsLw(win, win.mAttrs, callingPid, callingUid);
res = displayPolicy.validateAddingWindowLw(attrs, callingPid, callingUid);
if (res != WindowManagerGlobal.ADD_OKAY) {
return res;
}
// 打开输入通道
final boolean openInputChannels = (outInputChannel != null
&& (attrs.inputFeatures & INPUT_FEATURE_NO_INPUT_CHANNEL) == 0);
if (openInputChannels) {
win.openInputChannel(outInputChannel);
}
...
displayContent.getInputMonitor().setUpdateInputWindowsNeededLw();
boolean focusChanged = false;
//当该窗口能接收按键事件,则更新聚焦窗口
if (win.canReceiveKeys()) {
focusChanged = updateFocusedWindowLocked(UPDATE_FOCUS_WILL_ASSIGN_LAYERS,
false /*updateInputWindows*/);
if (focusChanged) {
imMayMove = false;
}
}
if (imMayMove) {
displayContent.computeImeTarget(true /* updateImeTarget */);
}
...
}
Binder.restoreCallingIdentity(origId);
return res;
}
创建 SurfaceSession 对象,并将当前 Session 添加到 WMS.mSessions 成员变量。
Session.java:
void windowAddedLocked(String packageName) {
mPackageName = packageName;
mRelayoutTag = "relayoutWindow: " + mPackageName;
if (mSurfaceSession == null) {
if (DEBUG) {
Slog.v(TAG_WM, "First window added to " + this + ", creating SurfaceSession");
}
mSurfaceSession = new SurfaceSession();
ProtoLog.i(WM_SHOW_TRANSACTIONS, " NEW SURFACE SESSION %s", mSurfaceSession);
mService.mSessions.add(this);
if (mLastReportedAnimatorScale != mService.getCurrentAnimatorScale()) {
mService.dispatchNewAnimatorScaleLocked(this);
}
}
mNumWindow++;
}
SurfaceSession 的创建会调用 JNI,在 JNI 调用 nativeCreate()。
android_view_SurfaceSession.cpp:
static jlong nativeCreate(JNIEnv* env, jclass clazz) {
SurfaceComposerClient* client = new SurfaceComposerClient();
client->incStrong((void*)nativeCreate);
return reinterpret_cast<jlong>(client);
}
static jlong nativeCreate(JNIEnv* env, jclass clazz, jobject sessionObj,
jstring nameStr, jint w, jint h, jint format, jint flags, jlong parentObject,
jobject metadataParcel) {
ScopedUtfChars name(env, nameStr);
sp<SurfaceComposerClient> client;
if (sessionObj != NULL) {
client = android_view_SurfaceSession_getClient(env, sessionObj);
} else {
client = SurfaceComposerClient::getDefault();
}
SurfaceControl *parent = reinterpret_cast<SurfaceControl*>(parentObject);
sp<SurfaceControl> surface;
LayerMetadata metadata;
Parcel* parcel = parcelForJavaObject(env, metadataParcel);
if (parcel && !parcel->objectsCount()) {
status_t err = metadata.readFromParcel(parcel);
if (err != NO_ERROR) {
jniThrowException(env, "java/lang/IllegalArgumentException",
"Metadata parcel has wrong format");
}
}
status_t err = client->createSurfaceChecked(
String8(name.c_str()), w, h, format, &surface, flags, parent, std::move(metadata));
if (err == NAME_NOT_FOUND) {
jniThrowException(env, "java/lang/IllegalArgumentException", NULL);
return 0;
} else if (err != NO_ERROR) {
jniThrowException(env, OutOfResourcesException, NULL);
return 0;
}
surface->incStrong((void *)nativeCreate);
return reinterpret_cast<jlong>(surface.get());
}
通过以上JNI接口获取SurfaceComposerClient 对象,作为跟 SurfaceFlinger 通信的代理对象。
void SurfaceComposerClient::onFirstRef() {
//getComposerService() 将返回 SF 的 Binder 代理端的 BpSurfaceFlinger 对象
sp<ISurfaceComposer> sf(ComposerService::getComposerService());
if (sf != nullptr && mStatus == NO_INIT) {
sp<ISurfaceComposerClient> conn;
//调用 SF 的 createConnection()
conn = sf->createConnection();
if (conn != nullptr) {
mClient = conn;
mStatus = NO_ERROR;
}
}
}
比如截屏接口就会通过SurfaceControl调用到其中的capture 接口:
status_t ScreenshotClient::capture(const sp<IBinder>& display, ui::Dataspace reqDataSpace,
ui::PixelFormat reqPixelFormat, const Rect& sourceCrop,
uint32_t reqWidth, uint32_t reqHeight, bool useIdentityTransform,
ui::Rotation rotation, bool captureSecureLayers,
sp<GraphicBuffer>* outBuffer, bool& outCapturedSecureLayers) {
sp<ISurfaceComposer> s(ComposerService::getComposerService());
if (s == nullptr) return NO_INIT;
status_t ret = s->captureScreen(display, outBuffer, outCapturedSecureLayers, reqDataSpace,
reqPixelFormat, sourceCrop, reqWidth, reqHeight,
useIdentityTransform, rotation, captureSecureLayers);
if (ret != NO_ERROR) {
return ret;
}
return ret;
}
然后具体看下核心的SurfaceFlinger实现:
SurfaceFlinger.cpp:
sp<ISurfaceComposerClient> SurfaceFlinger::createConnection() {
//创建一个Client
const sp<Client> client = new Client(this);
return client->initCheck() == NO_ERROR ? client : nullptr;
}
回到之前,创建完 ViewRootImpl 对象后,接下来调用该对象的 setView() 方法。在 setView() 中调用了 requestLayout() 方法,现在具体来看下这个方法调用流程:
@Override
public void requestLayout() {
if (!mHandlingLayoutInLayoutRequest) {
checkThread();
mLayoutRequested = true;
scheduleTraversals();
}
}
@UnsupportedAppUsage
void scheduleTraversals() {
if (!mTraversalScheduled) {
mTraversalScheduled = true;
mTraversalBarrier = mHandler.getLooper().getQueue().postSyncBarrier(); //启动TraversalRunnable
mChoreographer.postCallback(
Choreographer.CALLBACK_TRAVERSAL, mTraversalRunnable, null);
notifyRendererOfFramePending();
pokeDrawLockIfNeeded();
}
}
final class TraversalRunnable implements Runnable {
@Override
public void run() {
doTraversal();
}
}
void doTraversal() {
if (mTraversalScheduled) {
mTraversalScheduled = false;
mHandler.getLooper().getQueue().removeSyncBarrier(mTraversalBarrier);
if (mProfile) {
Debug.startMethodTracing("ViewAncestor");
}
//调用performTraversals performTraversals();
if (mProfile) {
Debug.stopMethodTracing();
mProfile = false;
}
}
}
private void performTraversals() {
// cache mView since it is used so much below...
final View host = mView; //它就是 DecorView
...
if (mFirst || windowShouldResize || viewVisibilityChanged || cutoutChanged || params != null
|| mForceNextWindowRelayout) {
mForceNextWindowRelayout = false;
if (isViewVisible) {
// If this window is giving internal insets to the window
// manager, and it is being added or changing its visibility,
// then we want to first give the window manager "fake"
// insets to cause it to effectively ignore the content of
// the window during layout. This avoids it briefly causing
// other windows to resize/move based on the raw frame of the
// window, waiting until we can finish laying out this window
// and get back to the window manager with the ultimately
// computed insets.
insetsPending = computesInternalInsets && (mFirst || viewVisibilityChanged);
}
...
try {
if (DEBUG_LAYOUT) {
Log.i(mTag, "host=w:" + host.getMeasuredWidth() + ", h:" +
host.getMeasuredHeight() + ", params=" + params);
}
if (mAttachInfo.mThreadedRenderer != null) {
// relayoutWindow may decide to destroy mSurface. As that decision
// happens in WindowManager service, we need to be defensive here
// and stop using the surface in case it gets destroyed.
if (mAttachInfo.mThreadedRenderer.pause()) {
// Animations were running so we need to push a frame
// to resume them
mDirty.set(0, 0, mWidth, mHeight);
}
mChoreographer.mFrameInfo.addFlags(FrameInfo.FLAG_WINDOW_LAYOUT_CHANGED);
}
// 关键函数relayoutWindow
relayoutResult = relayoutWindow(params, viewVisibility, insetsPending);
if (DEBUG_LAYOUT) Log.v(mTag, "relayout: frame=" + frame.toShortString()
+ " cutout=" + mPendingDisplayCutout.get().toString()
+ " surface=" + mSurface);
// If the pending {@link MergedConfiguration} handed back from
// {@link #relayoutWindow} does not match the one last reported,
// WindowManagerService has reported back a frame from a configuration not yet
// handled by the client. In this case, we need to accept the configuration so we
// do not lay out and draw with the wrong configuration.
if (!mPendingMergedConfiguration.equals(mLastReportedMergedConfiguration)) {
if (DEBUG_CONFIGURATION) Log.v(mTag, "Visible with new config: "
+ mPendingMergedConfiguration.getMergedConfiguration());
performConfigurationChange(mPendingMergedConfiguration, !mFirst,
INVALID_DISPLAY /* same display */);
updatedConfiguration = true;
}
} catch (RemoteException e) {
}
...
}
boolean cancelDraw = mAttachInfo.mTreeObserver.dispatchOnPreDraw() || !isViewVisible;
if (!cancelDraw) {
if (mPendingTransitions != null && mPendingTransitions.size() > 0) {
for (int i = 0; i < mPendingTransitions.size(); ++i) {
mPendingTransitions.get(i).startChangingAnimations();
}
mPendingTransitions.clear();
}
//开始绘制,其中调用了draw(fullRedrawNeeded);
performDraw();
} else {
if (isViewVisible) {
// Try again
scheduleTraversals();
} else if (mPendingTransitions != null && mPendingTransitions.size() > 0) {
for (int i = 0; i < mPendingTransitions.size(); ++i) {
mPendingTransitions.get(i).endChangingAnimations();
}
mPendingTransitions.clear();
}
}
if (mAttachInfo.mContentCaptureEvents != null) {
notifyContentCatpureEvents();
}
mIsInTraversal = false;
}
再看下relayoutWindow的实现:
... if (mSurfaceControl.isValid()) {
if (!useBLAST()) {
//先创建一个本地Surface,然后调用copyFrom 将SurfaceControl信息拷贝到Surface中
mSurface.copyFrom(mSurfaceControl);
} else {
final Surface blastSurface = getOrCreateBLASTSurface(mSurfaceSize.x,
mSurfaceSize.y);
// If blastSurface == null that means it hasn't changed since the last time we
// called. In this situation, avoid calling transferFrom as we would then
// inc the generation ID and cause EGL resources to be recreated.
if (blastSurface != null) {
mSurface.transferFrom(blastSurface);
}
}
} else {
destroySurface();
}....
SurfaceControl 类可以看作是一个 wrapper 类,最后会执行 copyFrom() 将其返回给 App 客户端:
@UnsupportedAppUsage
public void copyFrom(SurfaceControl other) {
if (other == null) {
throw new IllegalArgumentException("other must not be null");
}
long surfaceControlPtr = other.mNativeObject;
if (surfaceControlPtr == 0) {
throw new NullPointerException(
"null SurfaceControl native object. Are you using a released SurfaceControl?");
}
//通过JNI获取源SurfaceControl
long newNativeObject = nativeGetFromSurfaceControl(mNativeObject, surfaceControlPtr);
synchronized (mLock) {
if (newNativeObject == mNativeObject) {
return;
}
if (mNativeObject != 0) {
nativeRelease(mNativeObject);
}
//保存到全局mNativeObject用于外部调用
setNativeObjectLocked(newNativeObject);
}
}
Surface 显示过程总结:
在 App 进程中创建 PhoneWindow 后会创建 ViewRoot。ViewRoot 的创建会创建一个 Surface,这个 Surface 其实是空的,通过与 WindowManagerService 通信 copyFrom() 一个NativeSurface 与 SurfaceFlinger 通信时。
关于Native Window:
Native Window是OpenGL与本地窗口系统之间搭建了桥梁。整个GUI系统至少需要两种本地窗口:
- (1)面向管理者(SurfaceFlinger)
SurfaceFlinger是系统中所有UI界面的管理者,需要直接或间接的持有“本地窗口”,此本地窗口是FramebufferNativeWindow。
- (2)面向应用程序
这类本地窗口是Surface。
正常情况按照SDK向导生成APK应用程序,是采用Skia等第三方图形库,而对于希望使用OpenGL ES来完成复杂界面渲染的应用开发者来说,Android也提供封装的GLSurfaceView(或其他方式)来实现图形显示。
①FramebufferNativeWindow
EGL需要通过本地窗口来为OpenGL/OpenGL ES创建环境。由于OpenGL/ES对多平台支持,考虑到兼容性和移植性。不同平台的本地窗口EGLNativeWindowType数据类型不同。
Android平台的数据类型是ANativeWindow,像是一份“协议”,规定了一个本地窗口的形态和功能。ANativeWindow是FramebufferNativeWindow的父类。
Android中,由于多缓冲技术,EGLNativeWindowType所管理的缓冲区最少2个,最大3个。
FramebufferNativeWindow初始化需要Golloc支持,步骤如下:
- 加载GRALLOC_HARDWARE_MODULE_ID模块,参见上节。
- 分别打开fb和gralloc设备,打开后的设备由全局变量fbDev和grDev管理。
- 根据设备的属性来给FramebufferNativeWindow赋初值。
- 根据FramebufferNativeWindow的实现来填充ANativeWindow中的“协议”
- 其他一些必要的初始化
②应用程序的本地窗口 - Surface
Surface也继承了ANativeWindow
class Surface : public ANativeObjectBase<ANativeWindow, Surface, RefBase>
Surface是面向Android系统中所有UI应用程序的,即它承担着应用进程中的UI显示需求。
需要面向上层实现(主要是Java层)提供绘制图像的画板。SurfaceFlinger需要收集系统中所有应用程序绘制的图像数据,然后集中显示到物理屏幕上。Surface需要扮演相应角色,本质上还是由SurfaceFlinger服务统一管理的,涉及到很多跨进程的通信细节。
③Surface的创建
Surface将通过mGraphicBufferProducer来获取buffer,这些缓冲区会被记录在mSlots中数据中。mGraphicBufferProducer这一核心成员的初始化流程如下:
ViewRootImpl持有一个Java层的Surface对象(mSurface)。
ViewRootImpl向WindowManagerService发起relayout请求,此时mSurface被赋予真正的有效值,将辗转生成的SurfaceControl通过Surface.copyFrom()函数复制到mSurface中。
由此,Surface由SurfaceControl管理,SurfaceControl由SurfaceComposerClient创建。SurfaceComposerClient获得的匿名Binder是ISurfaceComposer,其服务端实现是SurfaceFlinger。而Surface依赖的IGraphicBufferProducer对象在Service端的实现是BufferQueue。
class SurfaceFlinger :
public BinderService<SurfaceFlinger>, //在ServiceManager中注册为SurfaceFlinger
public BnSurfaceComposer,//实现的接口却叫ISurfaceComposer
④SurfaceFlinger服务框架:
Buffer,Consumer,Producer是“生产者-消费者”模型中的3个参与对象,如何协调好它们的工作是应用程序能否正常显示UI的关键。
Buffer是BufferQueue,Producer是应用程序,Consumer是SurfaceFlinger。

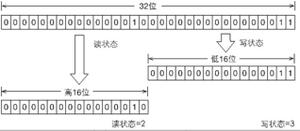
Surface内部提供一个BufferQueue,与上层和SurfaceFlinger形成一个生产者消费者模型,上层对应Producer,SurfaceFlinger对应Consumer。三者通过Buffer产生联系,每个Buffer都有四种状态:
- Free:可被上层使用;
- Dequeued:出列,正在被上层使用;
- Queued:入列,已完成上层绘制,等待SurfaceFlinger合成;
- Acquired:被获取,SurfaceFlinger正持有该Buffer进行合成;
如此循环,形成一个Buffer被循环使用的过程(FREE-> DEQUEUED->QUEUED->ACQUIRED->FREE)。
BufferQueue中的mSlots数组用于管理期内的缓冲区,最大容器是32。数据缓冲区的空间是动态分配的,应用程序与SurfaceFlinger都是使用OpenGL ES来完成UI显示。Layer类在SurfaceFlinger中表示“层”,通俗地讲就是代表了一个“画面”,最终物理屏幕上的显示结果就是通过对系统中同时存在的所有“画面”进行处理叠加而成。
到此这篇关于Android显示系统SurfaceFlinger详解的文章就介绍到这了。希望对大家的学习有所帮助,也希望大家多多支持。
以上是 Android显示系统SurfaceFlinger详解 的全部内容, 来源链接: utcz.com/p/244218.html