超全面的 .NET GDI+ 图形图像编程教程
编写图形程序时需要使用 GDI(Graphics Device Interface,图形设备接口)。
从程序设计的角度看,GDI 包括两部分:GDI 对象和 GDI 函数。GDI 对象定义了 GDI 函数使用的工具和环境变量;而GDI函数使用GDI对象绘制各种图形。
在 C# 中,进行图形程序编写时用到的是 GDI+(Graphics Device Interface Plus,图形设备接口)版本,GDI+ 是 GDI 的进一步扩展,它使我们编程更加方便。
1 GDI+ 概述
GDI+ 是微软在 Windows 2000 以后操作系统中提供的新的图形设备接口,其通过一套部署为托管代码的类来实现,这套类被称为GDI+的“托管类接口”。
GDI+主要提供了一下三类服务:
- 二维矢量图形:GDI+ 提供了存储图形基元自身信息的类(或结构体)、存储图形基元绘制方式信息的类以及实际进行绘制的类。
- 图像处理:大多数图片都难以划定为直线和曲线的集合,无法使用二维矢量图形方式进行处理。因此,GDI+ 为我们提供了 Bitmap、Image 等类,它们可用于显示、操作和奥村 BMP、JPG、GIF 等图像格式。
- 文字显示:GDI+ 支持使用各种字体、字号和样式来显示文本。
我们要进行图形编程,就必须先讲解 Graphics 类,同时我们还必须掌握Pen、Brush和Rectangle这几种类。
GDI+ 比 GDI 优越主要表现在两个方面:
- GDI+通过提供新功能(例如:渐变画笔和Alpha混合)扩展了GDI的功能;
- 修订了编程模型,是图形编程更加简易灵活。
2 Graphics 类
Graphics 类封装一个 GDI+ 绘图图面,提供将对象绘制到现实设备的方法,Graphics与特定的设备上下文关联。
画图方法都被包括在 Graphics 类中国,在画任何对象(例如:Circle Rectangle)时,我们首先要创建一个Graphics类实例,这个实例相当于建立了一块画布,有了画布才可以用各种画图方法进行绘图。
绘图程序的设计过程一般分为两个步骤:1.创建Graphics;2.使用Graphics对象的方法绘图、显示文本或处理图像。
通常我们使用下述三种方法来创建一个Graphics对象:
方法一:利用控件或窗体的Paint事件中的PaintEventArgs
在窗体或控件的 Paint 事件中接受对图形对象的引用,作为 PaintEventArgs(PaintEventArgs 指定绘制控件所用的 Graphics)的一部分,在为控件创建绘制代码时,通常会使用此方法来获取对图形对象的引用。例如:
// 窗体的Paint事件的响应方法private void Frm_Demo_Paint(object sender, PaintEventArgs e){
Graphics _Graphics = e.Graphics;
}
// 也可以直接重载控件或窗体的OnPaint方法
protected override void OnPaint(PaintEventArgs e){
Graphics _Graphics = e.Graphics;
}
创建 Graphics 对象的两种方法,Paint事件在重绘控件时发生。
方法二:调用某控件或窗体的CreateGraphics方法
调用某控件或窗体的CreateGraphics方法以获取对Graphics对象的引用,该对象表示该控件或窗体的绘图图面。
如果想在已存在的窗体或控件上绘图,通常会使用此方法,例如:
Graphics _Graphics = this.CreateGraphics(); // 在当前窗体上创建Graphics对象方法三:调用Graphics类的FromImage静态方法
由从Image集成的任何对象创建Graphics对象。在需要更改已存在的图像时,通常会使用此方法。例如:
Image img = Image.FromFile("孤影.jpg"); // 建立Image对象Graphics _Graphics = Graphics.FromImage(img); // 创建Graphics对象
使用Graphics.FromImage()方法 创建Graphics对象
2.1 Graphics 类的方法成员
有了一个Graphics的对象引用后,就可以利用该对象的成员进行各种各样图形的绘制,下面表格列出了Graphics类的常用方法成员:
| 名称 | 说明 | 名称 | 说明 |
| DrawArc | 画弧 | DrawBezier | 画立体的贝尔塞曲线 |
| DrawBeziers | 画连续立体的贝尔塞曲线 | DrawClosedCurve | 画闭合曲线 |
| DrawCurve | 画曲线 | DrawEllipse | 画椭圆 |
| DrawImage | 画图像 | DrawLine | 画线 |
| DrawPath | 通过路径画线和曲线 | DrawPie | 画饼形 |
| DrawPolygon | 画多边形 | DrawRectangle | 画矩形 |
| DrawString | 绘制文字 | FillEllipse | 填充椭圆 |
| FillPath | 填充路径 | FillPie | 填充饼图 |
| FillPolygon | 填充多边形 | FillRectangle | 填充矩形 |
| FillRectangles | 填充矩形组 | FillRegion | 填充区域 |
在.NET中,GDI+的所有绘图功能都包括在System、System.Drawimg、System.Drawimg.Imaging、
System.Drawimg.Drawimg2D和System.Drawimg.Text等命名空间中,因此开始用GDI+类之前,需要先引用相应的
命名空间。
2.2 引用命名空间
在C#应用程序中使用using命令引用给定的命名空间或类,下面是一个C#应用程序引用命名空间的例子:
using System;using System.Collections.Generic;
using System.Data;
using System.ComponentModel;
using System.Drawing;
using System.Drawing.Drawing2D;
using System.Drawing.Imaging;
引用命名空间
3 常用画图对象
在创建了Graphics对象后,就可以用它开始绘图了,可以画线、填充图形、显示文本等等,其中主要用到的对象还有:
- Pen:用来用patterns、colors或者bitmaps进行填充
- Color:用来画线和多边形,包括矩形、圆和饼形
- Font:用来给文字设置字体格式
- Brush:用来描述颜色
- Rectangle:矩形结构通常用来在窗体上画矩形
- Point:描述一对有序的x,y两个坐标值
3.1 Pen类
Pen类用来绘制指定宽度和样式的直线。使用DashStyle属性绘制几种虚线,可以使用各种各样填充样式(包括纯色和纹理)来填充Pen绘制的直线,填充模式取决于画笔或用作填充对象的纹理。
使用画笔时,需要先实例化一个画笔对象,主要有以下几种方法:
1 // 用指定的颜色实例化一只画笔 2 public Pen(Color);
3
4 // 用指定的画刷实例化一只画笔
5 public Pen(Brush);
6
7 // 用指定的画刷和宽度实例化一只画笔
8 public Pen(Brush, float);
9
10 // 用指定的颜色和宽度实例化一只画笔
11 public Pen(Color, float);
12
13 // 实例化画笔格式如下:
14 Pen pen = new Pen(Color.Blue);
15 // 或者:
16 Pen pen = new Pen(Color.Blue, 100);
实例化画笔对象
Pen常用的属性如下:
| 名称 | 说明 | 名称 | 说明 |
| Alignment | 获得或者设置画笔的对齐方式 | Brush | 获得或者设置画笔的属性 |
| Color | 获得或者设置画笔的颜色 | Width | 获得或者设置画笔的宽度 |
3.2 Color结构
在自然界中,颜色大都由透明度(A)和三基色(R,G,B)所组成。在GDI+中,通过Color结构封装对颜色的定义,Color结构中,除
了提供(A,R,G,B)以外,还提供许多系统定义的颜色,如Pink(粉色)。另外,还提供许多静态成员,用户对颜色进行操作。
Color结构的基本属性如下表:
| 名称 | 说明 |
| A | 获取此Color结构的Alpha分量值,取值(0~255) |
| R | 获取此Color结构的红色分量值,取值(0~255) |
| G | 获取此Color结构的绿色分量值,取值(0~255) |
| B | 获取此Color结构的蓝色分量值,取值(0~255) |
| Name | 获取此Color结构的名称,这将返回用户定义的颜色的名称或已知颜色的名称(如果该颜色是从某个名称创建的)。 对于自定义的颜色,这将返回RGB值。 |
Color结构的基本(静态)方法如下表:
| 名称 | 说明 |
| FromArgb | 从四个8位的ARGB分量(Alpha、红色、绿色和蓝色)值创建Color结构 |
| FromKnowColor | 从指定饿预定义颜色创建一个Color结构 |
| FromName | 从预定义颜色的指定名称创建一个Color结构。 |
Color结构变量可以通过已有颜色构造,也可以通过RGB建立,例如:
Color color1 = Color.FromArgb(96, 06, 25);Color color2 = Color.FromKnownColor(KnownColor.Blue); // KnowColor为枚举类型
Color color3 = Color.FromName("LightBlue");
创建Color构造对象
在图像处理中一般需要获取或设置像素的颜色值,获取一幅图像的某个像素颜色值得具体步骤如下:
- 定义Bitmap
Bitmap bitmap = new Bitmap(“D:\\孤影\\LonelyShadow.bmp”);
- 定义一个颜色变量,把在指定位置所取得的像素值存入颜色变量中
Color color = new Color();color = bitmap.GetPixel(10, 10); // 获取此Bitmap中指定像素的颜色
- 将颜色值分解出单色分量值
int r, g, b;r = color.R;
g = color.G;
b = color.B;
3.3 Font类
Font 类定义特定文本格式,包括字体、字号和字形属性。Font类的常用构造函数是:
- public Font(string 字体名, float 字号, FontStyle 字形){} 其中字号和字体为可选项
- public Font(string 字体名, float 字号) 其中字体名为Font的FontFamily的字符串表示形式
下面是定义一个F哦你团队相爱难过的示例代码:
FontFamily fontFamily = new FontFamily("Arial");Font font = new Font(fontFamily, 16, FontStyle.Regular, GraphicsUnit.Pixel);
字体常用属性如下表:
| 名称 | 说明 | 名称 | 说明 |
| Bold | 是否为粗体 | FontFamily | 字体成员 |
| Height | 字体高 | Italic | 是否为斜体 |
| Name | 字体名称 | Size | 字体尺寸 |
| SizeInPoints | 获取此Font对象的字号,以磅为单位 | Strikeout | 是否有删除线 |
| Style | 字体类型 | Underline | Unit |
| Unit | 字体尺寸单位 |
3.4 Brush 类
Brush类是一个抽象的基类,因此它不能被实例化,我们总是用它的派生类进行实例化一个画刷的对象,当我们对图形内部进行填充操作时就会用到画刷,关于画刷在 [1.5] 中有详细的讲解。
3.5 Rectangle 结构
存储一组整数,共四个,表示一个矩形的位置和大小。
矩形结构通常用来在窗体上画矩形,除了利用它的构造函数矩形对象外,还可以利用Rectangle结构的属性成员,其属性成员如下表:
| 名称 | 说明 | 名称 | 索命 |
| Bottom | 底端坐标 | Height | 矩形高 |
| IsEmpty | 测试矩形宽和高是否为0 | Left | 矩形左边坐标 |
| Location | 矩形的位置 | Right | 矩形右边坐标 |
| Size | 矩形尺寸 | Top | 矩形顶端坐标 |
| Width | 矩形宽 | X | 矩形左上角顶点X坐标 |
| Y | 矩形左上角顶点Y坐标 |
Rectangle结构的构造函数有以下两个:
// 用指定的位置和大小初始化Rectangle类的新实例public Rectangle(Point, Size); // Size结构存储一个有序整数对,通常为矩形的宽度和高度
public Rectangle(int, int, int, int);
Rectangle 结构的构造函数
1.3.6 Point 结构
用指定坐标初始化Point类的新实例,这个结构很像C++的Point结构,它描述了一对有序的x,y两个坐标值,其构造函数为:
public Point(int x, int y); 其中x为该点的水平位置;y为该点的垂直位置。
下面是构造Point对象的示例代码:
Point pt1 = new Point(30, 30);Point pt2 = new Point(110, 110);
4 基本图形绘制举例
4.1 画一个矩形
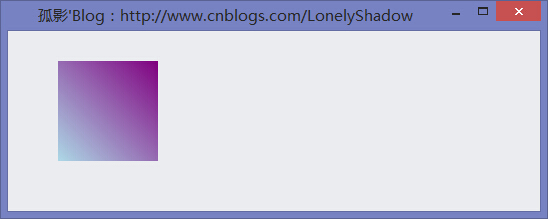
建一个C#.NET WinForms窗体应用程序,通过在窗体的OnPaint事件中绘制一个填充的渐变矩形:
填充矩形方法FillRectangle()的语法帮助定义如下:
//// 摘要:
// 填充 System.Drawing.Rectangle 结构指定的矩形的内部。
//
// 参数:
// brush:
// 确定填充特性的 System.Drawing.Brush。
//
// rect:
// System.Drawing.Rectangle 结构,它表示要填充的矩形。
//
// 异常:
// System.ArgumentNullException:
// brush 为 null。
public void FillRectangle(Brush brush, Rectangle rect);
//
// 摘要:
// 填充 System.Drawing.RectangleF 结构指定的矩形的内部。
//
// 参数:
// brush:
// 确定填充特性的 System.Drawing.Brush。
//
// rect:
// System.Drawing.RectangleF 结构,它表示要填充的矩形。
//
// 异常:
// System.ArgumentNullException:
// brush 为 null。
public void FillRectangle(Brush brush, RectangleF rect);
//
// 摘要:
// 填充由一对坐标、一个宽度和一个高度指定的矩形的内部。
//
// 参数:
// brush:
// 确定填充特性的 System.Drawing.Brush。
//
// x:
// 要填充的矩形的左上角的 x 坐标。
//
// y:
// 要填充的矩形的左上角的 y 坐标。
//
// width:
// 要填充的矩形的宽度。
//
// height:
// 要填充的矩形的高度。
//
// 异常:
// System.ArgumentNullException:
// brush 为 null。
public void FillRectangle(Brush brush, float x, float y, float width, float height);
//
// 摘要:
// 填充由一对坐标、一个宽度和一个高度指定的矩形的内部。
//
// 参数:
// brush:
// 确定填充特性的 System.Drawing.Brush。
//
// x:
// 要填充的矩形的左上角的 x 坐标。
//
// y:
// 要填充的矩形的左上角的 y 坐标。
//
// width:
// 要填充的矩形的宽度。
//
// height:
// 要填充的矩形的高度。
//
// 异常:
// System.ArgumentNullException:
// brush 为 null。
public void FillRectangle(Brush brush, int x, int y, int width, int height);
填充矩形的方法FillRectangle() 语法定义
我们在这里只使用第一种定义,演示填充矩形,示例代码如下:
/// <summary>/// 窗体的Paint事件的响应方法
/// </summary>
/// <param name="sender">当前事件触发者(当前窗体)</param>
/// <param name="e">附带的事件参数</param>
private void Frm_Demo_Paint(object sender, PaintEventArgs e){
Graphics g = e.Graphics; // 创建当前窗体的Graphics对象
Rectangle rect = new Rectangle(50, 30, 100, 100); // 创建一个矩形(x,y,width,height)
// 创建线性渐变画刷(画刷界限, 起始颜色, 结束颜色, 渐变角度)
LinearGradientBrush lBrush = new LinearGradientBrush(rect, Color.Purple, Color.LightBlue, LinearGradientMode.BackwardDiagonal);
g.FillRectangle(lBrush, rect); // 走起~
}
画一个颜色渐变的矩形
上述代码运行效果如下:
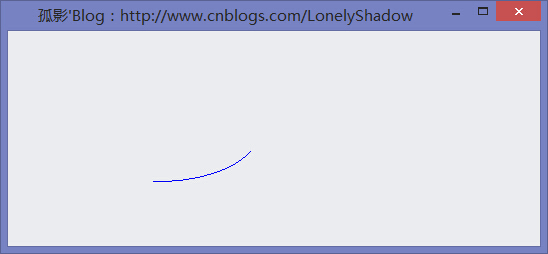
4.2 画一个弧
画弧线的语法定义如下:
//// 摘要:
// 绘制一段弧线,它表示 System.Drawing.Rectangle 结构指定的椭圆的一部分。
//
// 参数:
// pen:
// System.Drawing.Pen,它确定弧线的颜色、宽度和样式。
//
// rect:
// System.Drawing.RectangleF 结构,它定义椭圆的边界。
//
// startAngle:
// 从 x 轴到弧线的起始点沿顺时针方向度量的角(以度为单位)。
//
// sweepAngle:
// 从 startAngle 参数到弧线的结束点沿顺时针方向度量的角(以度为单位)。
//
// 异常:
// System.ArgumentNullException:
// pen 为 null。
public void DrawArc(Pen pen, Rectangle rect, float startAngle, float sweepAngle);
画弧线方法DrawArc()的定义
参照定义的帮助,可写出如下画弧线的代码:
/// <summary>/// 窗体的Paint事件的响应方法
/// </summary>
/// <param name="sender">当前事件触发者(当前窗体)</param>
/// <param name="e">附带的事件参数</param>
private void Frm_Demo_Paint(object sender, PaintEventArgs e)
{
Graphics graphics = e.Graphics;
Pen pen = new Pen(Color.Blue);
Rectangle rect = new Rectangle(50,50,200,100);
graphics.DrawArc(pen, rect, 12, 84);
}
画弧线示例代码
上述代码运行结果如下:
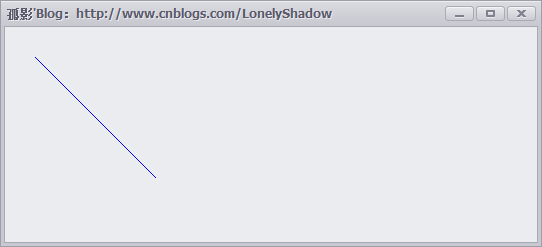
4.3 画线
画线 DrawLine() 方法的语法定义如下:
//// 摘要:
// 绘制一条连接两个 System.Drawing.Point 结构的线。
//
// 参数:
// pen:
// System.Drawing.Pen,它确定线条的颜色、宽度和样式。
//
// pt1:
// System.Drawing.Point 结构,它表示要连接的第一个点。
//
// pt2:
// System.Drawing.Point 结构,它表示要连接的第二个点。
//
// 异常:
// System.ArgumentNullException:
// pen 为 null。
public void DrawLine(Pen pen, Point pt1, Point pt2);
//
// 摘要:
// 绘制一条连接两个 System.Drawing.PointF 结构的线。
//
// 参数:
// pen:
// System.Drawing.Pen,它确定线条的颜色、宽度和样式。
//
// pt1:
// System.Drawing.PointF 结构,它表示要连接的第一个点。
//
// pt2:
// System.Drawing.PointF 结构,它表示要连接的第二个点。
//
// 异常:
// System.ArgumentNullException:
// pen 为 null。
public void DrawLine(Pen pen, PointF pt1, PointF pt2);
//
// 摘要:
// 绘制一条连接由坐标对指定的两个点的线条。
//
// 参数:
// pen:
// System.Drawing.Pen,它确定线条的颜色、宽度和样式。
//
// x1:
// 第一个点的 x 坐标。
//
// y1:
// 第一个点的 y 坐标。
//
// x2:
// 第二个点的 x 坐标。
//
// y2:
// 第二个点的 y 坐标。
//
// 异常:
// System.ArgumentNullException:
// pen 为 null。
public void DrawLine(Pen pen, float x1, float y1, float x2, float y2);
//
// 摘要:
// 绘制一条连接由坐标对指定的两个点的线条。
//
// 参数:
// pen:
// System.Drawing.Pen,它确定线条的颜色、宽度和样式。
//
// x1:
// 第一个点的 x 坐标。
//
// y1:
// 第一个点的 y 坐标。
//
// x2:
// 第二个点的 x 坐标。
//
// y2:
// 第二个点的 y 坐标。
//
// 异常:
// System.ArgumentNullException:
// pen 为 null。
public void DrawLine(Pen pen, int x1, int y1, int x2, int y2);
DrawLine()语法定义
根据定义的帮助,我们以第一种语法 可以写出如下示例代码:
/// <summary>/// 窗体的Paint事件的响应方法
/// </summary>
/// <param name="sender">当前事件触发者(当前窗体)</param>
/// <param name="e">附带的事件参数</param>
private void Frm_Demo_Paint(object sender, PaintEventArgs e)
{
Graphics graphics = e.Graphics; // 创建当前窗体的Graphics对象
Pen pen = new Pen(Color.Blue); // 创建蓝色画笔对象
Point pointStart = new Point(30, 30); // 创建起始点
Point pointEnd = new Point(150, 150); // 创建结束点
graphics.DrawLine(pen, pointStart, pointEnd); // 画线
}
画线DrawLine()函数示例代码
上述代码运行效果图如下:
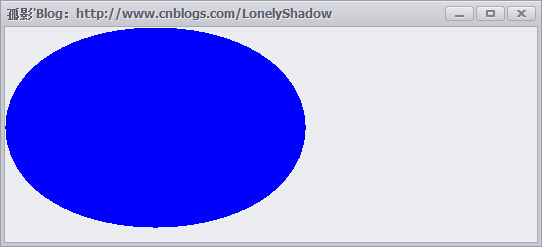
4.4 画椭圆
还是先看一下DrawEllipse()画椭圆的语法定义:
//// 摘要:
// 绘制边界 System.Drawing.Rectangle 结构指定的椭圆。
//
// 参数:
// pen:
// System.Drawing.Pen,它确定曲线的颜色、宽度和样式。
//
// rect:
// System.Drawing.Rectangle 结构,它定义椭圆的边界。
//
// 异常:
// System.ArgumentNullException:
// pen 为 null。
public void DrawEllipse(Pen pen, Rectangle rect);
//
// 摘要:
// 绘制边界 System.Drawing.RectangleF 定义的椭圆。
//
// 参数:
// pen:
// System.Drawing.Pen,它确定曲线的颜色、宽度和样式。
//
// rect:
// System.Drawing.RectangleF 结构,它定义椭圆的边界。
//
// 异常:
// System.ArgumentNullException:
// pen 为 null。
public void DrawEllipse(Pen pen, RectangleF rect);
//
// 摘要:
// 绘制一个由边框(该边框由一对坐标、高度和宽度指定)定义的椭圆。
//
// 参数:
// pen:
// System.Drawing.Pen,它确定曲线的颜色、宽度和样式。
//
// x:
// 定义椭圆的边框的左上角的 X 坐标。
//
// y:
// 定义椭圆的边框的左上角的 Y 坐标。
//
// width:
// 定义椭圆的边框的宽度。
//
// height:
// 定义椭圆的边框的高度。
//
// 异常:
// System.ArgumentNullException:
// pen 为 null。
public void DrawEllipse(Pen pen, float x, float y, float width, float height);
//
// 摘要:
// 绘制一个由边框定义的椭圆,该边框由矩形的左上角坐标、高度和宽度指定。
//
// 参数:
// pen:
// System.Drawing.Pen,它确定曲线的颜色、宽度和样式。
//
// x:
// 定义椭圆的边框的左上角的 X 坐标。
//
// y:
// 定义椭圆的边框的左上角的 Y 坐标。
//
// width:
// 定义椭圆的边框的宽度。
//
// height:
// 定义椭圆的边框的高度。
//
// 异常:
// System.ArgumentNullException:
// pen 为 null。
public void DrawEllipse(Pen pen, int x, int y, int width, int height);
画椭圆方法 DrawEllipse()语法定义
参照上面的语法定义,我们根据第一种语法,可以写出如下示例代码:
/// <summary>/// 窗体的Paint事件的响应方法
/// </summary>
/// <param name="sender">当前事件触发者(当前窗体)</param>
/// <param name="e">附带的事件参数</param>
private void Frm_Demo_Paint(object sender, PaintEventArgs e)
{
Graphics graphics = e.Graphics; // 创建当前窗体的Graphics对象
Pen pen = new Pen(Color.Blue, 100); // 创建蓝色 粗细为100的画笔对象
Rectangle rect = new Rectangle(50, 50, 200, 100); // 创建椭圆所在的矩形范围
graphics.DrawEllipse(pen, rect); // 在指定的范围内画椭圆
}
画椭圆DrawEllipse()函数示例代码
上述代码运行结果如下:
4.5 输出文本
输出文本用到的是Graphics对象的DrawString()方法,语法定义如下:
//// 摘要:
// 在指定位置并且用指定的 System.Drawing.Brush 和 System.Drawing.Font 对象绘制指定的文本字符串。
//
// 参数:
// s:
// 要绘制的字符串。
//
// font:
// System.Drawing.Font,它定义字符串的文本格式。
//
// brush:
// System.Drawing.Brush,它确定所绘制文本的颜色和纹理。
//
// point:
// System.Drawing.PointF 结构,它指定所绘制文本的左上角。
//
// 异常:
// System.ArgumentNullException:
// brush 为 null。 - 或 - s 为 null。
public void DrawString(string s, Font font, Brush brush, PointF point);
//
// 摘要:
// 在指定矩形并且用指定的 System.Drawing.Brush 和 System.Drawing.Font 对象绘制指定的文本字符串。
//
// 参数:
// s:
// 要绘制的字符串。
//
// font:
// System.Drawing.Font,它定义字符串的文本格式。
//
// brush:
// System.Drawing.Brush,它确定所绘制文本的颜色和纹理。
//
// layoutRectangle:
// System.Drawing.RectangleF 结构,它指定所绘制文本的位置。
//
// 异常:
// System.ArgumentNullException:
// brush 为 null。 - 或 - s 为 null。
public void DrawString(string s, Font font, Brush brush, RectangleF layoutRectangle);
//
// 摘要:
// 在指定位置并且用指定的 System.Drawing.Brush 和 System.Drawing.Font 对象绘制指定的文本字符串。
//
// 参数:
// s:
// 要绘制的字符串。
//
// font:
// System.Drawing.Font,它定义字符串的文本格式。
//
// brush:
// System.Drawing.Brush,它确定所绘制文本的颜色和纹理。
//
// x:
// 所绘制文本的左上角的 x 坐标。
//
// y:
// 所绘制文本的左上角的 y 坐标。
//
// 异常:
// System.ArgumentNullException:
// brush 为 null。 - 或 - s 为 null。
public void DrawString(string s, Font font, Brush brush, float x, float y);
//
// 摘要:
// 使用指定 System.Drawing.StringFormat 的格式化特性,用指定的 System.Drawing.Brush 和 System.Drawing.Font
// 对象在指定的位置绘制指定的文本字符串。
//
// 参数:
// s:
// 要绘制的字符串。
//
// font:
// System.Drawing.Font,它定义字符串的文本格式。
//
// brush:
// System.Drawing.Brush,它确定所绘制文本的颜色和纹理。
//
// point:
// System.Drawing.PointF 结构,它指定所绘制文本的左上角。
//
// format:
// System.Drawing.StringFormat,它指定应用于所绘制文本的格式化特性(如行距和对齐方式)。
//
// 异常:
// System.ArgumentNullException:
// brush 为 null。 - 或 - s 为 null。
public void DrawString(string s, Font font, Brush brush, PointF point, StringFormat format);
//
// 摘要:
// 使用指定 System.Drawing.StringFormat 的格式化特性,用指定的 System.Drawing.Brush 和 System.Drawing.Font
// 对象在指定的矩形绘制指定的文本字符串。
//
// 参数:
// s:
// 要绘制的字符串。
//
// font:
// System.Drawing.Font,它定义字符串的文本格式。
//
// brush:
// System.Drawing.Brush,它确定所绘制文本的颜色和纹理。
//
// layoutRectangle:
// System.Drawing.RectangleF 结构,它指定所绘制文本的位置。
//
// format:
// System.Drawing.StringFormat,它指定应用于所绘制文本的格式化特性(如行距和对齐方式)。
//
// 异常:
// System.ArgumentNullException:
// brush 为 null。 - 或 - s 为 null。
public void DrawString(string s, Font font, Brush brush, RectangleF layoutRectangle, StringFormat format);
//
// 摘要:
// 使用指定 System.Drawing.StringFormat 的格式化特性,用指定的 System.Drawing.Brush 和 System.Drawing.Font
// 对象在指定的位置绘制指定的文本字符串。
//
// 参数:
// s:
// 要绘制的字符串。
//
// font:
// System.Drawing.Font,它定义字符串的文本格式。
//
// brush:
// System.Drawing.Brush,它确定所绘制文本的颜色和纹理。
//
// x:
// 所绘制文本的左上角的 x 坐标。
//
// y:
// 所绘制文本的左上角的 y 坐标。
//
// format:
// System.Drawing.StringFormat,它指定应用于所绘制文本的格式化特性(如行距和对齐方式)。
//
// 异常:
// System.ArgumentNullException:
// brush 为 null。 - 或 - s 为 null。
public void DrawString(string s, Font font, Brush brush, float x, float y, StringFormat format);
输出文本DrawString()函数语法定义
根据上述定义,我们以 public void DrawString(string s, Font font, Brush brush, float x, float y); 语法可以写出如下示例代码:
/// <summary>/// 窗体的Paint事件的响应方法
/// </summary>
/// <param name="sender">当前事件触发者(当前窗体)</param>
/// <param name="e">附带的事件参数</param>
private void Frm_Demo_Paint(object sender, PaintEventArgs e)
{
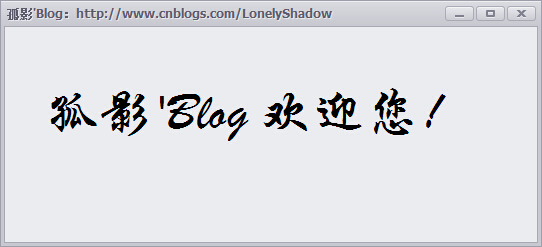
Font font = new Font("华文行楷", 40); // 创建Font字体对象
Graphics graphics = e.Graphics; // 创建当前窗体的Graphics对象
graphics.DrawString("孤影'Blog 欢迎您!", font, new SolidBrush(Color.Black), 30, 60);
}
输出文本DrawString()函数示例代码
上述代码运行结果如下:
4.6 填充路径
填充路径的语法定义如下:
//// 摘要:
// 填充 System.Drawing.Drawing2D.GraphicsPath 的内部。
//
// 参数:
// brush:
// 确定填充特性的 System.Drawing.Brush。
//
// path:
// System.Drawing.Drawing2D.GraphicsPath,它表示要填充的路径。
//
// 异常:
// System.ArgumentNullException:
// brush 为 null。 - 或 - path 为 null。
public void FillPath(Brush brush, GraphicsPath path);
填充路径FillPath()函数语法定义
根据上述语法定义,可写出如下示例代码:
/// <summary>/// 窗体的Paint事件的响应方法
/// </summary>
/// <param name="sender">当前事件触发者(当前窗体)</param>
/// <param name="e">附带的事件参数</param>
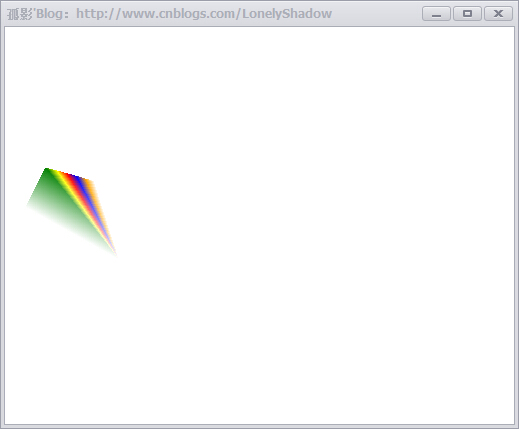
private void Frm_Demo_Paint(object sender, PaintEventArgs e)
{
Graphics graphics = e.Graphics; // 创建当前窗体的Graphics对象
graphics.FillRectangle(new SolidBrush(Color.White), this.ClientRectangle); // 以白色画刷填充当前窗体
// 创建线组
GraphicsPath path = new GraphicsPath(new Point[] {
new Point(40,140),
new Point(275,200),
new Point(105,225),
new Point(190,300),
new Point(50,350),
new Point(20,180)
}, new byte[] {
(byte)PathPointType.Start,
(byte)PathPointType.Bezier,
(byte)PathPointType.Bezier,
(byte)PathPointType.Bezier,
(byte)PathPointType.Line,
(byte)PathPointType.Line
});
// 路径笔刷
PathGradientBrush pathGradientBrush = new PathGradientBrush(path);
// 设置路径中的点对应的颜色数组
pathGradientBrush.SurroundColors = new Color[] { Color.Green, Color.Yellow, Color.Red, Color.Blue, Color.Orange, Color.White };
graphics.FillPath(pathGradientBrush, path); // 填充路径
}
填充路径示例代码
上述代码运行结果如下:
注意:GraphicsPath类位于命名空间“System.Drawimg.Drawimg2D”中,表示一系列相互连接的直线和曲线。
5 画刷和画刷类型
Brush类型是一个抽象类,所以它不能被实例化,也就是不能直接应用,但是我们可以利用他的派生类,如:HatchBrush、SolidBrush和TextureBrush等。
画刷类型一般在“System.Drawing”命名空间中,如果应用HatchBrush和GradientBrush画刷,需要在程序中引入“System.Drawing2D”命名空间。
5.1 SolidBrush(单色画刷)
它是一种一般的画刷,通常只用一种颜色去填充GDI+图形,例如如下示例代码:
/// <summary>/// 窗体的Paint事件的响应方法
/// </summary>
/// <param name="sender">当前事件触发者(当前窗体)</param>
/// <param name="e">附带的事件参数</param>
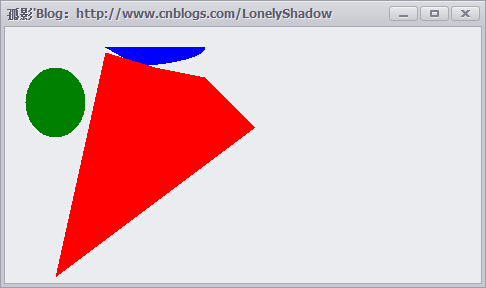
private void Frm_Demo_Paint(object sender, PaintEventArgs e)
{
Graphics graphics = e.Graphics; // 创建当前窗体的Graphics对象
SolidBrush solidBrushR = new SolidBrush(Color.Red); // 红色画刷
SolidBrush solidBrushG = new SolidBrush(Color.Green); // 绿色画刷
SolidBrush solidBrushB = new SolidBrush(Color.Blue); // 蓝色画刷
graphics.FillEllipse(solidBrushG, 20, 40, 60, 70); // 用绿色画刷填充一个椭圆
Rectangle rect = new Rectangle(0, 0, 200, 100); // 矩形
graphics.FillPie(solidBrushB, 0, 0, 200, 40, 0.0f, 30.0f); // 填充饼图
// 组成多边形的点
PointF point1 = new PointF(50.0f, 250.0f);
PointF point2 = new PointF(100.0f, 25.0f);
PointF point3 = new PointF(150.0f, 40.0f);
PointF point4 = new PointF(200.0f, 50.0f);
PointF point5 = new PointF(250.0f, 100.0f);
PointF[] curvePoints = { point1, point2, point3, point4, point5 };
graphics.FillPolygon(solidBrushR, curvePoints); // 填充多边形
}
SolidBrush单色笔刷使用示例代码
运行效果如下:
5.2 HatchBrush(阴影画刷)
HatchBrush类位于“System.Drawing.Drawing2D”命名空间中。阴影画刷有两种颜色:前景色和背景色,以及6种阴影。前景色定义线条的颜色,背景色定义线条之间间隙的颜色。
HatchBrush类有两个构造函数:
- public HatchBrush(HatchStyle, Color foreColor);
- public HatchBrush(HatchStyle, Color foreColor, Color backColor);
HatchStyle枚举值指定可用于HatchBrush对象的不同图案,主要成员如下:
| 名称 | 说明 | 名称 | 说明 |
| BackwardDiagonal | 从右上到左下的对角线的线条图案 | Cross | 指定交叉的水平线和垂直线 |
| DarkDownwardDiagonal | 指定从顶点到底点向右倾斜的对角线,其两边夹角比ForwardDiagonal小50%,宽度是其两倍。此阴影图案不是锯齿消除的 | DarkHorizontal | 指定水平线的两边夹角比Horizontal小50%,并且宽度是Horizontal的两倍 |
| DarkUpwardDiagonal | 指定从顶点到底点向左倾斜的对角线,其两边夹角比BackwardDiagonal小50%,宽度是其两倍,但这些直线不是锯齿消除的 | DarkVertical | 指定垂直线的两边夹角比Vertical小50%,并且宽度是其两倍 |
| DashedDownwardDiagonal | 指定虚线对角线,这些对角线从顶点到底点向右倾斜 | DashedHorizontal | 指定虚线水平线 |
| DashedUpwardDiagonal | 指定虚线对角线,这些对角线从顶点到底点向左倾斜 | DashedVertical | 指定虚线垂直线 |
| DiagonalBrick | 指定具有分层砖块外观的阴影,它从顶点到底点向左倾斜 | DiagonalCross | 交叉对角线的图案 |
| Divot | 指定具有草皮层外观的阴影 | ForwardDiagonal | 从坐上到右下分层砖块外观的阴影 |
| Horizontal | 水平线的图案 | HorizontalBrick | 指定具有水平分层砖块外观的阴影 |
| LargeGrid | 指定阴影样式Cross | LightHorizontal | 指定水平线,其两边夹角比Horizontal小50% |
| LightVertical | 指定垂直线的两边夹角比Vertical小50% | Max | 指定阴影样式SolidDiamond |
| Min | 指定阴影样式Horizontal | NarrowHorizontal | 指定水平线的两边夹角比阴影样式Horizontal小75%(或者比LightHorizontal小25%) |
| NarrowVertical | 指定垂直线的两边夹角比阴影样式Vertical小75%(或者比LightVertical小25%) | OutlineDiamond | 指定互相交叉的正向对角线和反向对角线,但这些对角线不是锯齿消除的 |
| Percent05 | 指定5%阴影,前景色与背景色的比例为5:100 | Percent90 | 指定90%阴影,前景色与背景色的比例为90:100 |
| Plaid | 指定具有格子花呢材料外观的阴影 | Shingle | 指定带有对角分层鹅卵石外观的阴影,它从顶点到底点向右倾斜 |
| SmallCheckerBoard | 指定带有期盼外观的阴影 | SmallDiamond | 指定具有对角放置的棋盘外观的阴影 |
| Sphere | 指定具有球体彼此相邻放置的外观的阴影 | Trellis | 指定具有格架外观的阴影 |
| Vertical | 垂直线的图案 | Wave | 指定由代字号”~”构成的水平线 |
| Weave | 指定具有织物外观的阴影 |
我们随便挑选三个样式,如下示例代码:
/// <summary>/// 窗体的Paint事件的响应方法
/// </summary>
/// <param name="sender">当前事件触发者(当前窗体)</param>
/// <param name="e">附带的事件参数</param>
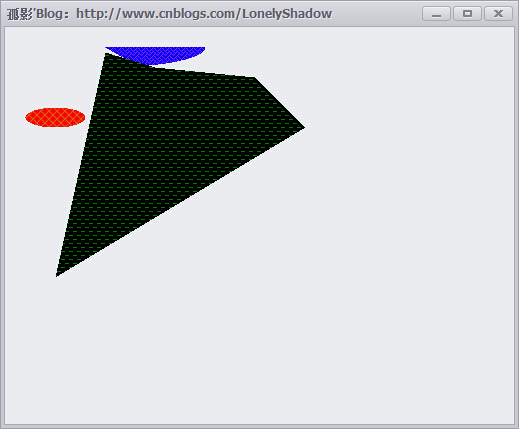
private void Frm_Demo_Paint(object sender, PaintEventArgs e){
Graphics graphics = e.Graphics; // 创建当前窗体的Graphics对象
// 创建用于画三种不同样式图形的阴影画笔
HatchBrush hatchBrushR = new HatchBrush(HatchStyle.DiagonalCross, Color.Chocolate, Color.Red);
HatchBrush hatchBrushG = new HatchBrush(HatchStyle.DashedHorizontal, Color.Green, Color.Black);
HatchBrush hatchBrushB = new HatchBrush(HatchStyle.Weave, Color.BlueViolet, Color.Blue);
graphics.FillEllipse(hatchBrushR, 20, 80, 60, 20); // 填充椭圆
// 填充饼图
Rectangle rect = new Rectangle(0, 0, 200, 100);
graphics.FillPie(hatchBrushB, 0, 0, 200, 40, 0.0f, 30.0f);
// 填充自定义图形
PointF point1 = new PointF(50.0f, 250.0f);
PointF point2 = new PointF(100.0f, 25.0f);
PointF point3 = new PointF(150.0f, 40.0f);
PointF point4 = new PointF(250.0f, 50.0f);
PointF point5 = new PointF(300.0f, 100.0f);
PointF[] curvePoints = { point1, point2, point3, point4, point5 };
graphics.FillPolygon(hatchBrushG, curvePoints);
}
HatchBrush阴影画笔的使用示例代码
上述代码运行结果如下:
5.3 TextureBrush(纹理画刷)
纹理画刷拥有图案,并且通常使用它来填充封闭的图形。为了对它初始化,可以使用一个已经存在的别人设计好了的图案,或使用常用的设计程序设计的
自己的图案,同时应该使图案存储为常用图形文件格式,如BMP格式文件,这有一个设计好的位图:“LonelyShadow.bmp”文件,纹理画刷使用
的示例代码如下:
/// <summary>/// 窗体的Paint事件的响应方法
/// </summary>
/// <param name="sender">当前事件触发者(当前窗体)</param>
/// <param name="e">附带的事件参数</param>
private void Frm_Demo_Paint(object sender, PaintEventArgs e){
Graphics graphics = e.Graphics; // 创建当前窗体的Graphics对象
Bitmap bitmap = new Bitmap("LonelyShadow.bmp"); // 根据文件创建原始大小的Bitmap对象
bitmap = new Bitmap(bitmap, this.ClientRectangle.Size); // 缩放到窗体大小
TextureBrush textureBrush = new TextureBrush(bitmap);
graphics.FillEllipse(textureBrush, this.ClientRectangle);
}
纹理笔刷使用示例代码
上述代码运行效果如下:

5.4 LinearGradientBrush 和 PathGradientBrush(渐变画刷)
渐变画刷类似于实心画刷,因为他也是基于颜色的,与实心画刷不同的是:渐变画刷使用两种颜色,它的主要特点是:在使用过程中,一种颜色在一段,而另外一种颜色在另一端,在中间,两种颜色融合产生过度或衰减的效果。
渐变画刷有两种:线性画刷和路径画刷(LinearGradientBrush 和 PathGradientBrush)。
其中LinearGradientBrush可以显示线性渐变效果,而PathGradientBrush是路径渐变的可以显示比较具有弹性的渐变效果。
5.4.1 LinearGradientBrush类
LinearGradientBrush类构造函数如下:
public LinerGradientBrush(Point point1, Point point2, Color color1, Color color2)// point1: 表示线性渐变的起始点的Point结构
// point2: 表示线性渐变的终结点的Point结构
// color1: 表示线性渐变的起始颜色的Color结构
// color2: 表示线性渐变的结束颜色的Color结构
LinearGradientBrush构造函数定义
我们可以写出如下示例代码:
/// <summary>/// 窗体的Paint事件的响应方法
/// </summary>
/// <param name="sender">当前事件触发者(当前窗体)</param>
/// <param name="e">附带的事件参数</param>
private void Frm_Demo_Paint(object sender, PaintEventArgs e)
{
Graphics graphics = e.Graphics; // 创建当前窗体的Graphics对象
LinearGradientBrush linearGradientBrush = new LinearGradientBrush(this.ClientRectangle, Color.White, Color.Blue, LinearGradientMode.Vertical);
graphics.FillRectangle(linearGradientBrush, this.ClientRectangle);
}
LinearGradientBrush线性画刷使用示例代码
上述代码运行效果如下:

5.4.2 PathGradientBrush 类
PathGradientBrush 类的构造函数如下:
public PathGradientBrush(GraphicsPath path);// path: GraphicsPath,定义此 PathGradientBrush 填充区域
PathGradientBrush 使用的示例代码如下:
/// <summary>/// 窗体的Paint事件的响应方法
/// </summary>
/// <param name="sender">当前事件触发者(当前窗体)</param>
/// <param name="e">附带的事件参数</param>
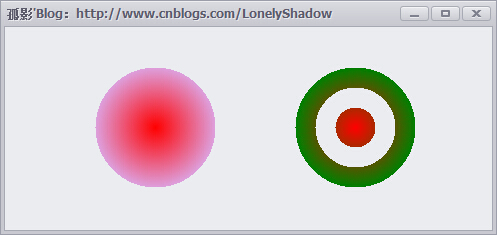
private void Frm_Demo_Paint(object sender, PaintEventArgs e)
{
Graphics graphics = e.Graphics; // 创建当前窗体的Graphics对象
Point centerPoint = new Point(150, 100);
int R = 60;
GraphicsPath path = new GraphicsPath();
path.AddEllipse(centerPoint.X - R, centerPoint.Y - R, R * 2, R * 2);
PathGradientBrush brush = new PathGradientBrush(path);
brush.CenterPoint = centerPoint; // 指定路径中心点
brush.CenterColor = Color.Red; // 指定路径中心的颜色
brush.SurroundColors = new Color[] { Color.Plum };
graphics.FillEllipse(brush, centerPoint.X - R, centerPoint.Y - R, R * 2, R * 2);
centerPoint = new Point(350, 100);
R = 20;
path = new GraphicsPath();
path.AddEllipse(centerPoint.X - R, centerPoint.Y - R, R * 2, R * 2);
path.AddEllipse(centerPoint.X - R * 2, centerPoint.Y - R * 2, R * 4, R * 4);
path.AddEllipse(centerPoint.X - R * 3, centerPoint.Y - R * 3, R * 6, R * 6);
brush = new PathGradientBrush(path);
brush.CenterPoint = centerPoint;
brush.CenterColor = Color.Red;
brush.SurroundColors = new Color[] { Color.Black, Color.Blue, Color.Green };
graphics.FillPath(brush, path);
}
PathGradientBrush 使用示例代码
上述代码运行效果图如下:
文章看似很长,其实内容主题也就是GDI+绘图编程了,只是示例代码多了一点点。
以上是 超全面的 .NET GDI+ 图形图像编程教程 的全部内容, 来源链接: utcz.com/p/232890.html