详解Mysql如何实现数据同步到Elasticsearch
一、同步原理
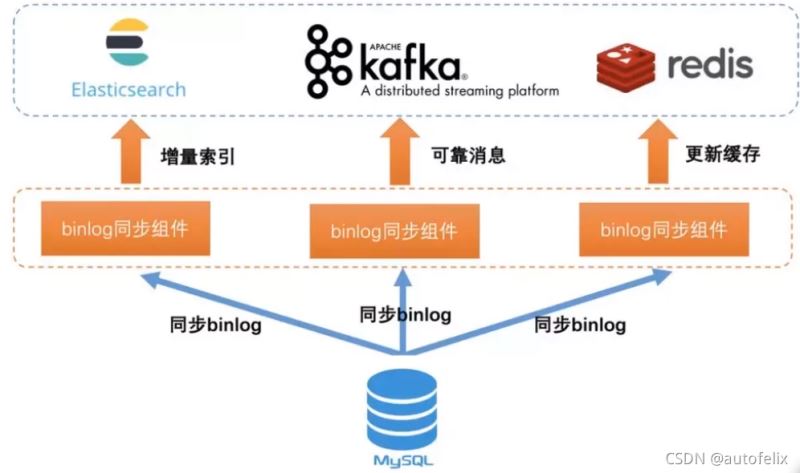
基于Mysql的binlog日志订阅:binlog日志是Mysql用来记录数据实时的变化
Mysql数据同步到ES中分为两种,分别是全量同步和增量同步
全量同步表示第一次建立好ES索引之后,将Mysql中所有数据一次性导入到ES中
增量同步表示Mysql中产生新的数据,这些新的数据包括三种情况,就是新插入Mysql中的数据,更新老的数据,删除的数据,这些数据的变动与新增都要同步到ES中
二、logstash-input-jdbc
logstash官方插件,集成在logstash中,下载logstash即可,通过配置文件实现mysql与elasticsearch数据同步
优点
- 能实现mysql数据全量和增量的数据同步,且能实现定时同步
- 版本更新迭代快,相对稳定
- 作为ES固有插件logstash一部分,易用
缺点
- 不能实现同步删除操作,MySQL数据删除后Elasticsearch中数据仍存在
- 同步最短时间差为一分钟,一分钟数据同步一次,无法做到实时同步
三、go-mysql-elasticsearch
go-mysql-elasticsearch 是国内作者开发的一款插件
优点
- 能实现mysql数据全量和增量的数据同步
缺点
- 无法实现数据全量同步Elasticsearch
- 仍处理开发、相对不稳定阶段
四、elasticsearch-jdbc
elasticsearch-jdbc 目前最新的版本是2.3.4,支持的ElasticSearch的版本为2.3.4, 未实践
优点
- 能实现mysql数据全量和增量的数据同步
缺点
- 目前最新的版本是2.3.4,支持的ElasticSearch的版本为2.3.4
- 不能实现同步删除操作,MySQL数据删除后Elasticsearch中数据仍存在
五、logstash-input-jdbc实现同步
第一步安装:
logstash5.x之后,集成了logstash-input-jdbc插件。安装logstash后通过命令安装logstash-input-jdbc插件
cd /logstash-6.4.2/bin
./logstash-plugin install logstash-input-jdbc
第二步配置:
在logstash-6.4.2/config文件夹下新建jdbc.conf,配置如下
在logstash-6.4.2/config 目录下新建jdbc.sql文件
select * from t_employee
第三步运行
cd logstash-6.4.2
# 检查配置文件语法是否正确
bin/logstash -f config/jdbc.conf --config.test_and_exit
# 启动
bin/logstash -f config/jdbc.conf --config.reload.automatic
--config.reload.automatic:会自动重新加载配置文件内容
在kibana中创建索引后查看同步数据
PUT octopus
GET octopus/_search
六、go-mysql-elasticsearch实现同步
第一步:mysql binlog日志
go-mysql-elasticsearch通过mysql中binlog日志实现数据增加,删除,修改同步elasticsearch
mysql的binlog日志主要用于数据库的主从复制与数据恢复。binlog中记录了数据的增删改查操作,主从复制过程中,主库向从库同步binlog日志,从库对binlog日志中的事件进行重放,从而实现主从同步。
mysql binlog日志有三种模式,分别为:
ROW: 记录每一行数据被修改的情况,但是日志量太大
STATEMENT: 记录每一条修改数据的SQL语句,减少了日志量,但是SQL语句使用函数或触发器时容易出现主从不一致
MIXED: 结合了ROW和STATEMENT的优点,根据具体执行数据操作的SQL语句选择使用ROW或者STATEMENT记录日志
要通过mysql binlog将数据同步到ES集群,只能使用ROW模式,因为只有ROW模式才能知道mysql中的数据的修改内容。
以UPDATE操作为例,ROW模式的binlog日志内容示例如下:
SET TIMESTAMP=1527917394/*!*/;
BEGIN
/*!*/;
# at 3751
#180602 13:29:54 server id 1 end_log_pos 3819 CRC32 0x8dabdf01 Table_map: `webservice`.`building` mapped to number 74
# at 3819
#180602 13:29:54 server id 1 end_log_pos 3949 CRC32 0x59a8ed85 Update_rows: table id 74 flags: STMT_END_F
BINLOG '
UisSWxMBAAAARAAAAOsOAAAAAEoAAAAAAAEACndlYnNlcnZpY2UACGJ1aWxkaW5nAAYIDwEPEREG
wACAAQAAAAHfq40=
UisSWx8BAAAAggAAAG0PAAAAAEoAAAAAAAEAAgAG///A1gcAAAAAAAALYnVpbGRpbmctMTAADwB3
UkRNbjNLYlV5d1k3ajVbD64WWw+uFsDWBwAAAAAAAAtidWlsZGluZy0xMAEPAHdSRE1uM0tiVXl3
WTdqNVsPrhZbD64Whe2oWQ==
'/*!*/;
### UPDATE `webservice`.`building`
### WHERE
### @1=2006 /* LONGINT meta=0 nullable=0 is_null=0 */
### @2='building-10' /* VARSTRING(192) meta=192 nullable=0 is_null=0 */
### @3=0 /* TINYINT meta=0 nullable=0 is_null=0 */
### @4='wRDMn3KbUywY7j5' /* VARSTRING(384) meta=384 nullable=0 is_null=0 */
### @5=1527754262 /* TIMESTAMP(0) meta=0 nullable=0 is_null=0 */
### @6=1527754262 /* TIMESTAMP(0) meta=0 nullable=0 is_null=0 */
### SET
### @1=2006 /* LONGINT meta=0 nullable=0 is_null=0 */
### @2='building-10' /* VARSTRING(192) meta=192 nullable=0 is_null=0 */
### @3=1 /* TINYINT meta=0 nullable=0 is_null=0 */
### @4='wRDMn3KbUywY7j5' /* VARSTRING(384) meta=384 nullable=0 is_null=0 */
### @5=1527754262 /* TIMESTAMP(0) meta=0 nullable=0 is_null=0 */
### @6=1527754262 /* TIMESTAMP(0) meta=0 nullable=0 is_null=0 */
# at 3949
#180602 13:29:54 server id 1 end_log_pos 3980 CRC32 0x58226b8f Xid = 182
COMMIT/*!*/;
STATEMENT模式下binlog日志内容示例为:
SET TIMESTAMP=1527919329/*!*/;
update building set Status=1 where Id=2000
/*!*/;
# at 688
#180602 14:02:09 server id 1 end_log_pos 719 CRC32 0x4c550a7d Xid = 200
COMMIT/*!*/;
从ROW模式和STATEMENT模式下UPDATE操作的日志内容可以看出,ROW模式完整地记录了要修改的某行数据更新前的所有字段的值以及更改后所有字段的值,而STATEMENT模式只单单记录了UPDATE操作的SQL语句。我们要将mysql的数据实时同步到ES, 只能选择ROW模式的binlog, 获取并解析binlog日志的数据内容,执行ES document api,将数据同步到ES集群中。
查看,修改binlog模式
# 查看binlog模式
mysql> show variables like "%binlog_format%";
# 修改binlog模式
mysql> set global binlog_format='ROW';
# 查看binlog是否开启
mysql> show variables like 'log_bin';
# 开启bīnlog
修改my.cnf文件log-bin = mysql-bin
第二步安装
# 安装go
sudo apt-get install go
# 安装godep
go get github.com/tools/godep
# 获取go-mysql-elasticsearch插件
go get github.com/siddontang/go-mysql-elasticsearch
# 安装go-mysql-elasticsearch插件
cd go/src/github.com/siddontang/go-mysql-elasticsearch
make
第三步配置
go/src/github.com/siddontang/go-mysql-elasticsearch/etc/river.toml
# MySQL address, user and password
# user must have replication privilege in MySQL.
my_addr = "127.0.0.1:3306" # 需要同步的mysql基本设置
my_user = "root"
my_pass = "root"
# Elasticsearch address
es_addr = "127.0.0.1:9200" # 本地elasticsearch配置
# Path to store data, like master.info, and dump MySQL data
data_dir = "./var" # 数据存储的url
# 以下配置保存默认不变
# Inner Http status address
stat_addr = "127.0.0.1:12800"
# pseudo server id like a slave
server_id = 1001
# mysql or mariadb
flavor = "mysql"
# mysqldump execution path
mysqldump = "mysqldump"
# MySQL data source
[[source]]
schema = "test" //elasticsearch 与 mysql 同步时对应的数据库名称
# Only below tables will be synced into Elasticsearch.
# 要同步test这个database里面的几张表。对于一些项目如果使用了分表机制,我们可以用通配符来匹配,譬如t_[0-9]{4},就可# 以匹配 table t_0000 到 t_9999。
tables = ["t", "t_[0-9]{4}", "tfield", "tfilter"]
# Below is for special rule mapping
# 对一个 table,我们需要指定将它的数据同步到 ES 的哪一个 index 的 type 里面。如果不指定,我们默认会用起 schema # name 作为 ES 的 index 和 type
[[rule]]
schema = "test" //数据库名称
table = "t" //表名称
index = "test" //对应的索引名称
type = "t" //对应的类型名称
# 将所有满足格式 t_[0-9]{4} 的 table 同步到 ES 的 index 为 test,type 为 t 的下面。当然,这些表需要保证
# schema 是一致的
[[rule]]
schema = "test"
table = "t_[0-9]{4}"
index = "test"
type = "t"
# 对于 table tfilter,我们只会同步 id 和 name 这两列,其他的都不会同步
filter = ["id", "name"]
# table tfield 的 column id ,我们映射成了 es_id,而 tags 则映射成了 es_tags
# list 这个字段,他显示的告知需要将对应的 column 数据转成 ES 的 array type。这个现在通常用于 MySQL 的 varchar # 等类型,我们可能会存放类似 “a,b,c” 这样的数据,然后希望同步给 ES 的时候变成 [a, b, c] 这样的列表形式。
[rule.field]
# Map column `id` to ES field `es_id`
id="es_id"
# Map column `tags` to ES field `es_tags` with array type
tags="es_tags,list"
# Map column `keywords` to ES with array type
keywords=",list"
第四步运行
cd go/src/github.com/siddontang/go-mysql-elasticsearch
bin/go-mysql-elasticsearch -config=./etc/river.toml
七、elasticsearch-jdbc实现同步
下载工具
解压:unzip elasticsearch-jdbc-2.3.2.0-dist.zip
设置环境变量
[root@autofelix /]# vi /etc/profile
export JDBC_IMPORTER_HOME=/elasticsearch-jdbc-2.3.2.0
使环境变量生效
[root@autofelix /]# source /etc/profile
配置参考
第一步:在根目录下建立根目录下新建文件夹odbc_es 如下
[root@autofelix /]# ll /odbc_es/
drwxr-xr-x 2 root root 4096 Jun 16 03:11 logs
-rwxrwxrwx 1 root root 542 Jun 16 04:03 mysql_import_es.sh
第二步:新建脚本mysql_import_es.sh,内容如下
[root@autofelix odbc_es]# cat mysql_import_es.sh
'#!/bin/sh
bin=$JDBC_IMPORTER_HOME/bin
lib=$JDBC_IMPORTER_HOME/lib
echo '{
"type" : "jdbc",
"jdbc": {
"elasticsearch.autodiscover":true,
"elasticsearch.cluster":"my-application", #簇名,详见:/usr/local/elasticsearch/config/elasticsearch.yml
"url":"jdbc:mysql://10.8.5.101:3306/test", #mysql数据库地址
"user":"root", #mysql用户名
"password":"123456", #mysql密码
"sql":"select * from cc",
"elasticsearch" : {
"host" : "10.8.5.101",
"port" : 9300
},
"index" : "myindex", #新的index
"type" : "mytype" #新的type
}
}'| java \
-cp "${lib}/*" \
-Dlog4j.configurationFile=${bin}/log4j2.xml \
org.xbib.tools.Runner \
org.xbib.tools.JDBCImporter
第三步:为 mysql_import_es.sh 添加可执行权限。
[root@autofelix odbc_es]# chmod a+x mysql_import_es.sh
第四步:执行脚本mysql_import_es.sh
[root@autofelix odbc_es]# ./mysql_import_es.sh
到此这篇关于详解Mysql如何实现数据同步到Elasticsearch的文章就介绍到这了,更多相关Mysq数据同步到Elasticsearch内容请搜索以前的文章或继续浏览下面的相关文章希望大家以后多多支持!
以上是 详解Mysql如何实现数据同步到Elasticsearch 的全部内容, 来源链接: utcz.com/p/231696.html