JavaScript实现简易tab栏切换案例
本文实例为大家分享了JavaScript实现简易tab栏切换效果的具体代码,供大家参考,具体内容如下
1. tab栏-案例1

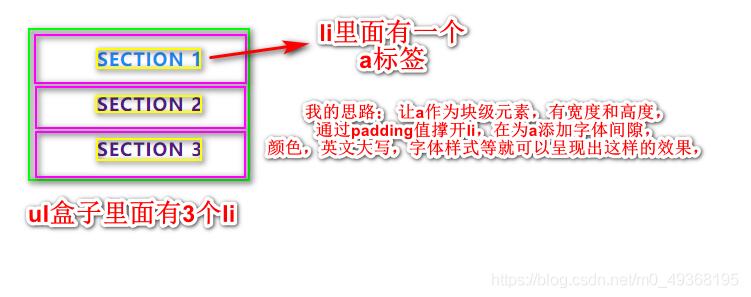
tab栏分析

li里面的分析
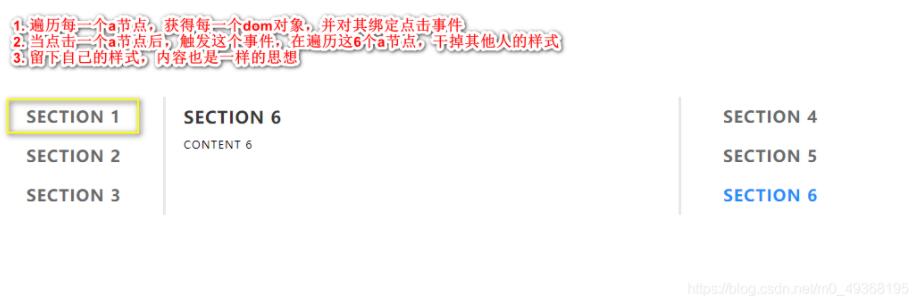
js实现隐藏与显示
排他思想:
1)、所有元素全部清除样式(干掉其他人)
2)、给当前元素设置样式 (留下我自己)
3)、注意顺序不能颠倒,首先干掉其他人,再设置自己
我的思路:
代码实现:
<!DOCTYPE html>
<html lang="en">
<head>
<meta charset="UTF-8">
<title>Document</title>
<style>
* {
margin: 0;
padding: 0;
}
li {
list-style: none;
}
a {
text-decoration: none;
color: #666;
}
.vertical-tab {
width: 980px;
margin: 100px auto;
}
.vertical-tab .nav {
width: 200px;
list-style: none;
}
.vertical-tab .nav-tabs1 {
float: left;
border-right: 3px solid #e7e7e7;
}
.vertical-tab .nav-tabs2 {
float: right;
border-left: 3px solid #e7e7e7;
}
.vertical-tab li a {
display: block;
padding: 10px 20px;
text-align: center;
text-transform: uppercase;
letter-spacing: 1px;
font-size: 18px;
font-weight: 700;
}
.vertical-tab .active {
color: #198df8;
}
.vertical-tab .tabs {
width: 500px;
float: left;
}
.vertical-tab .tab-content {
padding: 10px 20px;
text-transform: uppercase;
letter-spacing: 1px;
}
.vertical-tab .tab-content h3 {
color: #333;
margin: 0 0 10px 0;
}
.vertical-tab .tab-content p {
font-size: 12px;
}
.vertical-tab .hidden {
display: none;
}
</style>
</head>
<body>
<div class="vertical-tab">
<ul class="nav nav-tabs1">
<li><a href="javascript:;" class="active" index="1">section 1</a></li>
<li><a href="javascript:;" index='2'>section 2</a></li>
<li><a href="javascript:;" index="3">section 3</a></li>
</ul>
<div class="tab-content tabs">
<div class="tab-content1">
<h3>section 1</h3>
<p>content 1</p>
</div>
<div class="tab-content1 hidden">
<h3>section 2</h3>
<p>content 2</p>
</div>
<div class="tab-content1 hidden">
<h3>section 3</h3>
<p>content 3</p>
</div>
<div class="tab-content1 hidden">
<h3>section 4</h3>
<p>content 4</p>
</div>
<div class="tab-content1 hidden">
<h3>section 5</h3>
<p>content 5</p>
</div>
<div class="tab-content1 hidden">
<h3>section 6</h3>
<p>content 6</p>
</div>
</div>
<ul class="nav nav-tabs2">
<li><a href="javascript:;" index="4">section 4</a></li>
<li><a href="javascript:;" index="5">section 5</a></li>
<li><a href="javascript:;" index="6">section 6</a></li>
</ul>
</div>
<script>
var as = document.querySelectorAll("a")
var item = document.querySelectorAll(".tab-content1")
console.log(as)
// console.log(lis)
for (var i = 0; i < as.length; i++) {
as[i].addEventListener('click', function() {
// 干掉其他人
for (var j = 0; j < as.length; j++) {
as[j].className = ''
}
// 留下自己
this.className = "active"
// 显示内容
var index = this.getAttribute('index')
console.log(index)
// 干掉其他人
for (var i = 0; i < item.length; i++) {
item[i].style.display = "none"
}
// 留下自己
item[index - 1].style.display = "block"
})
}
</script>
</body>
</html>
vue实现
vue实现起来相对简单,只需要灵活运用v-if和v-for
具体代码:
<!DOCTYPE html>
<html lang="en">
<head>
<meta charset="UTF-8">
<meta name="viewport" content="width=device-width, initial-scale=1.0">
<meta http-equiv="X-UA-Compatible" content="ie=edge">
<title>Document</title>
<style>
* {
margin: 0;
padding: 0;
}
.vertical-tab {
width: 920px;
margin: 100px auto;
}
.vertical-tab .nav {
list-style: none;
width: 200px;
}
.vertical-tab .nav-tabs1 {
border-right: 3px solid #e7e7e7;
}
.vertical-tab .nav-tabs2 {
border-left: 3px solid #e7e7e7;
}
.vertical-tab .nav a {
display: block;
font-size: 18px;
font-weight: 700;
text-align: center;
letter-spacing: 1px;
text-transform: uppercase;
padding: 10px 20px;
margin: 0 0 1px 0;
text-decoration: none;
}
.vertical-tab .tab-content {
color: #555;
background-color: #fff;
font-size: 15px;
letter-spacing: 1px;
line-height: 23px;
padding: 10px 15px 10px 25px;
display: table-cell;
position: relative;
}
.vertical-tab .nav-tabs1 {
float: left;
}
.vertical-tab .tabs {
width: 500px;
box-sizing: border-box;
float: left;
}
.vertical-tab .tab-content h3 {
font-weight: 600;
text-transform: uppercase;
margin: 0 0 5px 0;
}
.vertical-tab .nav-tabs2 {
float: right;
}
.tab-content {
position: relative;
}
.tab-content .tab-pane {
position: absolute;
top: 10px;
left: 20px;
}
.nav li.active a {
color: #198df8;
background: #fff;
border: none;
}
.fade {
opacity: 0;
transition: all .3s linear;
}
.fade.active {
opacity: 1;
}
</style>
</head>
<body>
<div class="vertical-tab" id="app">
<!-- Nav tabs -->
<ul class="nav nav-tabs1">
<li v-on:click='change(index,0)' :class='currentIndex==index?"active":""' v-if="index < list.length/2" v-for="(item, index) in list"><a href="#" rel="external nofollow" rel="external nofollow" > {{item.title}} </a></li>
</ul>
<!-- Tab panes -->
<div class="tab-content tabs">
<div class="tab-pane fade" :class='currentIndex==index?"active":""' :key='item.id' v-for='(item, index) in list'>
<h3>{{item.title}}</h3>
<p>{{item.content}}</p>
</div>
</div>
<!-- Nav tabs -->
<ul class="nav nav-tabs2">
<li v-on:click='change(index,1)' :class='currentIndex==index?"active":""' v-if="index >= list.length/2" v-for="(item, index) in list"><a href="#" rel="external nofollow" rel="external nofollow" > {{item.title}} </a></li>
</ul>
</div>
<script type="text/javascript" src="js/vue.js"></script>
<script>
new Vue({
el: "#app",
data: {
currentIndex: 0, // 选项卡当前的索引
list: [{
id: 1,
title: 'Section 1',
content: 'content1'
}, {
id: 2,
title: 'Section 2',
content: 'content2'
}, {
id: 3,
title: 'Section 3',
content: 'content3'
}, {
id: 4,
title: 'Section 4',
content: 'content4'
}, {
id: 5,
title: 'Section 5',
content: 'content5'
}, {
id: 6,
title: 'Section 6',
content: 'content6'
}]
},
methods: {
change(index, flag) {
if (flag) {
console.log(index)
this.currentIndex = index;
} else {
this.currentIndex = index;
}
}
}
})
</script>
</body>
如果大家还想深入学习,可以点击两个精彩的专题:javascript选项卡操作方法汇总 jquery选项卡操作方法汇总
以上就是本文的全部内容,希望对大家的学习有所帮助,也希望大家多多支持。
以上是 JavaScript实现简易tab栏切换案例 的全部内容, 来源链接: utcz.com/p/220786.html