vue-resource 拦截器interceptors使用详解
前言
拦截器-interceptor
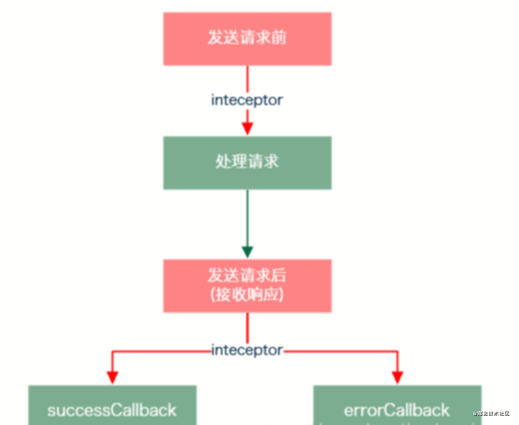
在现代的一些前端框架上,拦截器基本上是很基础但很重要的一环,比如Angular原生就支持拦截器配置,VUE的Axios模块也给我们提供了拦截器配置,那么拦截器到底是什么,它有什么用?
拦截器能帮助我们解决的
- 添加统一的request的参数
- 比如header中加入X-Requested-With,比如客户端需要实现sign和token的验证机制,比如你可以写$http.get(‘/files', params),拦截器帮你拼接成 http://www.xxxx.com/1/files 这样的请求地址
- 处理统一的responseError
- 比如重连机制,拿到error.code错误码重连,比如token过期,重新拿到token再次send request
- 比如统一报错信息,给所有返回的404来个提示也会很酷
在vue项目使用vue-resource实现异步加载的过程中,需要在任何一个页面任何一次http请求过程中,增加对token过期的判断,如果token已过期,需要跳转至登录页面。如果要在每个页面中的http请求操作中添加一次判断,那将会是一个非常大的修改工作量。那么vue-resource是否存在一个对于任何一次请求响应捕获的的公共回调函数呢?答案是有的!
vue-resource的interceptors拦截器的作用正是解决此需求的妙方。在每次http的请求响应之后,如果设置了拦截器,会优先执行拦截器函数,获取响应体,然后才会决定是否把response返回给then进行接收。那么我们可以在这个拦截器里边添加对响应状态码的判断,来决定是跳转到登录页面还是留在当前页面继续获取数据。
安装与引用
NPM: npm install vue-resource --save-dev
/*引入Vue框架*/
import Vue from 'vue'
/*引入资源请求插件*/
import VueResource from 'vue-resource'
/*使用VueResource插件*/
Vue.use(VueResource)
下边代码添加在main.js中
Vue.http.interceptors.push((request, next) => {
console.log(this)//此处this为请求所在页面的Vue实例
// modify request
request.method = 'POST';//在请求之前可以进行一些预处理和配置
// continue to next interceptor
next((response) => {//在响应之后传给then之前对response进行修改和逻辑判断。对于token时候已过期的判断,就添加在此处,页面中任何一次http请求都会先调用此处方法
response.body = '...';
return response;
});
});
拦截器实例
(1)为请求添加loading效果
通过inteceptor,我们可以为所有的请求处理加一个loading:请求发送前显示loading,接收响应后隐藏loading。
具体步骤如下:
//1、添加一个loading组件
<template id='loading-template'>
<div class='loading-overlay'></div>
</template>
//2、将loading组件作为另外一个Vue实例的子组件
var help = new Vue({
el: '#help',
data: {
showLoading: false
},
components: {
'loading': {
template: '#loading-template',
}
}
})
//3、将该Vue实例挂载到某个HTML元素
<div id='help'>
<loading v-show='showLoading'></loading>
</div>
//4、添加inteceptor
Vue.http.interceptors.push((request, next) => {
loading.show = true;
next((response) => {
loading.show = false;
return response;
});
});
但是,当用户在画面上停留时间太久时,视图数据可能已经不是最新的了,这时如果用户删除或修改某一条数据,如果这条数据已经被其他用户删除了,服务器会反馈一个404的错误,但由于我们的put和delete请求没有处理errorCallback,所以用户是不知道他的操作是成功还是失败了。这个问题,同样也可以通过inteceptor解决。
(2)为请求添加共同的错误处理方法
//1、继续沿用上面的loading组件,在#help元素下加一个对话框
<div id='help'>
<loading v-show='showLoading' ></loading>
<modal-dialog :show='showDialog'>
<header class='dialog-header' slot='header'>
<h3 class='dialog-title'>Server Error</h3>
</header>
<div class='dialog-body' slot='body'>
<p class='error'>Oops,server has got some errors, error code: {{errorCode}}.</p>
</div>
</modal-dialog>
</div>
//2、给help实例的data选项添加两个属性
var help = new Vue({
el: '#help',
data: {
showLoading: false,
showDialog: false,
errorCode: ''
},
components: {
'loading': {
template: '#loading-template',
}
}
})
//3、修改inteceptor
Vue.http.interceptors.push((request, next) => {
help.showLoading = true;
next((response) => {
if(!response.ok){
help.errorCode = response.status;
help.showDialog = true;
}
help.showLoading = false;
return response;
});
});
到此这篇关于vue-resource 拦截器interceptors使用详解的文章就介绍到这了,更多相关vue-resource拦截器内容请搜索以前的文章或继续浏览下面的相关文章希望大家以后多多支持!
以上是 vue-resource 拦截器interceptors使用详解 的全部内容, 来源链接: utcz.com/p/219398.html