keep-alive保持组件状态的方法
keep-alive的设计初衷
有些业务场景需要根据不同的判断条件,动态地在多个组件之间切换。频繁的组件切换会导致组件反复渲染,如果组件包含有大量的逻辑和dom节点,极易造成性能问题。其次,切换后组件的状态也会完全丢失。keep-alive的设计初衷就是为了保持组件的状态,避免组件的重复渲染。
为什么keep-alive可以直接使用
开发者无需注册和引入,直接可以在模板中使用。 跟开发者使用Vue.component自定义的组件不同,keep-alive无需注册,在模板中直接可以使用,如下所示:
<keep-alive>
<component :is="view"></component>
</keep-alive>
这是因为keep-alive是vue的内置组件,已经在vue中提前定义。
// core/components/keep-alive.js
export default {
name: 'keep-alive',
abstract: true,
props: {
include: patternTypes,
exclude: patternTypes,
max: [String, Number]
},
created () {
this.cache = Object.create(null)
this.keys = []
},
destroyed () {
// keep-alive的销毁,将所有缓存的组件清除
for (const key in this.cache) {
pruneCacheEntry(this.cache, key, this.keys)
}
},
mounted () {
// 如果指定了include和exclude属性,需要实时观察当前这两个属性的变化,以及时的更新缓存
this.$watch('include', val => {
pruneCache(this, name => matches(val, name))
})
this.$watch('exclude', val => {
pruneCache(this, name => !matches(val, name))
})
},
render () {
// keepAlive组件本身不会被渲染成dom节点,其render方法的处理逻辑的是将其包裹的组件的vnode返回
const slot = this.$slots.default
// 获取第一个组件子节点
const vnode: VNode = getFirstComponentChild(slot)
const componentOptions: ?VNodeComponentOptions = vnode && vnode.componentOptions
if (componentOptions) {
// check pattern
const name: ?string = getComponentName(componentOptions)
const { include, exclude } = this
if (
// not included
(include && (!name || !matches(include, name))) ||
// excluded
(exclude && name && matches(exclude, name))
) {
return vnode
}
const { cache, keys } = this
const key: ?string = vnode.key == null
// same constructor may get registered as different local components
// so cid alone is not enough (#3269)
? componentOptions.Ctor.cid + (componentOptions.tag ? `::${componentOptions.tag}` : '')
: vnode.key
// 1、如果缓存中存在该vnode,从缓存中取得该组件的实例(一个组件对应一颗vnode树,同时一个组件对应一个vue子类的实例),不再重新创建
if (cache[key]) {
vnode.componentInstance = cache[key].componentInstance
// make current key freshest
// 将当前的组件的key作为最新的缓存(更新其在keys数组中的顺序)
remove(keys, key)
keys.push(key)
} else {
// 2、如果未命中缓存,添加到缓存
cache[key] = vnode
keys.push(key)
// 如果缓存超过限制,淘汰最旧的缓存
if (this.max && keys.length > parseInt(this.max)) {
pruneCacheEntry(cache, keys[0], keys, this._vnode)
}
}
// 标记为keepAlive组件
vnode.data.keepAlive = true
}
return vnode || (slot && slot[0])
}
}
// core/components/index.js
import KeepAlive from './keep-alive'
export default {
KeepAlive
}
// core/global-api/index.js
// 导入内置组件
import builtInComponents from '../components/index'
/**
* 为Vue添加全局方法和属性
* @param {GlobalAPI} Vue
*/
export function initGlobalAPI (Vue: GlobalAPI) {
// ...省略了无关代码
Vue.options = Object.create(null)
// 添加内置组件keep-alive
extend(Vue.options.components, builtInComponents)
}
buildInComponents中包含了keep-alive的定义。在initGlobalAPI方法中,将内置组件添加到了 vue的全局变量中。
extend(A, B)是个简单的对象属性复制方法。将对象B中的属性复制到对象A中。
keep-alive是如何保持组件状态的
为了保持组件状态,keep-alive设计了缓存机制。
我们知道,模板中的每个HTML标签在vue中由相应的vnode节点对象来表示。如果是HTML标签是组件标签,需要为该标签的vnode创建一个组件实例。组件实例负责组件内的HTML模板的编译和渲染。因此相比于普通HTML标签的vnode节点,组件vnode节点会存在componentOptions和 componentInstance 这两个属性中保存组件选项对象和组件实例的引用。
首先,我们从keep-alive组件的实现代码中可以看到在组件的created钩子中设计了缓存机制:
created () {
this.cache = Object.create(null)
this.keys = []
}
keep-alive设置了cache和keys两个属性来缓存子组件。其中cache中的每项是一个以所包裹的组件的组件名为key,包裹组件对应的vnoded为值的对象。keys的每一项是其所包裹的组件的组件名。
render 函数是vue实例和vue组件实例中用来创建vnode的方法。我们在实际的应用中,一般是通过template和el来指定模板,然后由vue将模板编译成render函数。如果用户希望能更灵活地控制vnode的创建可以提供自定义的render函数。
render () {
const slot = this.$slots.default
// 获取第一个组件子节点
const vnode: VNode = getFirstComponentChild(slot)
const componentOptions: ?VNodeComponentOptions = vnode && vnode.componentOptions
if (componentOptions) {
// check pattern
const name: ?string = getComponentName(componentOptions)
const { include, exclude } = this
if (
// not included
(include && (!name || !matches(include, name))) ||
// excluded
(exclude && name && matches(exclude, name))
) {
return vnode
}
const { cache, keys } = this
const key: ?string = vnode.key == null
// same constructor may get registered as different local components
// so cid alone is not enough (#3269)
? componentOptions.Ctor.cid + (componentOptions.tag ? `::${componentOptions.tag}` : '')
: vnode.key
// 1、如果缓存中存在该vnode,从缓存中取得该组件的实例(一个组件对应一颗vnode树,同时一个组件对应一个vue子类的实例),不再重新创建
if (cache[key]) {
vnode.componentInstance = cache[key].componentInstance
// make current key freshest
// 将当前的组件的key作为最新的缓存(更新其在keys数组中的顺序)
remove(keys, key)
keys.push(key)
} else {
// 2、如果未命中缓存,添加到缓存
cache[key] = vnode
keys.push(key)
// 如果缓存超过限制,淘汰最旧的缓存
if (this.max && keys.length > parseInt(this.max)) {
pruneCacheEntry(cache, keys[0], keys, this._vnode)
}
}
// 标记为keepAlive组件
vnode.data.keepAlive = true
}
return vnode || (slot && slot[0])
}
keep-alive内部就是单独提供了render函数来自定义了vnode的创建逻辑。首先keep-alive获取到其所包裹的子组件的根vnode,然后去cache中查找该组件是否存在。
如果cache中不存在子组件vnode,则以{子组件名: 子组件vnode}的形式保存到cache对象中。同时将子组件名字保存到keys数组中。同时如果当前缓存的数量已经超过max所设置的最大值,需要淘汰掉最近最少使用的缓存项(LRU)。
如果cache中存在子组件vnode,那么只需要复用缓存的组件vnode的组件实例(componentInstance)。同时需要将该子组件vnode在缓存中顺序调到最前面,这个主要是为了在缓存不足时,正确地淘汰缓存项。
举例说明
最后通过一个例子加深一下理解。
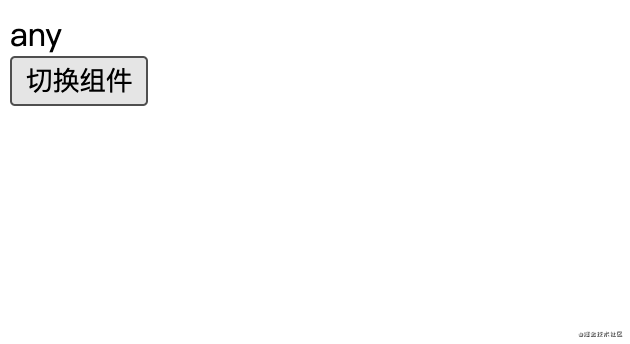
<div id="app">
<keep-alive><component :is="view"></component></keep-alive>
<button @click="view = view =='count'? 'any': 'count'">切换组件</button>
</div>
Vue.component("count", {
data() {
return {
count:0
};
},
template: "<div @click='count+=1'>点了我 {{count}} 次</div>"
});
Vue.component("any", {
template: "<div>any</div>"
});
new Vue({
el: "#app",
data: {
view: "count"
}
});
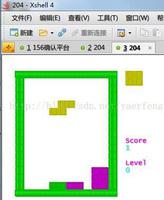
由于view默认值是count,因此keep-alive包裹的子组件是count。此时keep-alive的缓存中为空,因此会把组件count的vnode添加到缓存。缓存结果为
cache = {1::count: {tag: "vue-component-1-count", data:{tag: "component", hook: {…}}}, componentOptions, componentInstance, ...}
keys = ["1::count"]

点击一下组件count,组件的显示内容变成"点了我1次",然后切换到组件any。与count组件相同,由于在keep-alive的缓存中还未保存any组件的vnode,因此需要将any添加到缓存中。此时缓存结果变成了:
cache = {
1::count: {tag: "vue-component-1-count", data:{tag: "component", hook: {…}}, componentOptions, componentInstance, ...},
2::any: {tag: "vue-component-2-any", data:{tag: "component", hook: {…}}, componentOptions, componentInstance, ...},
}
keys = ["1::count", "2::any"]
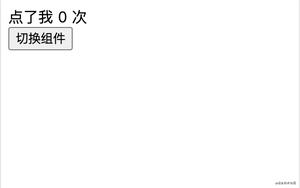
页面显示结果为:
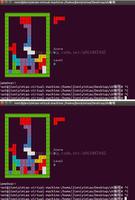
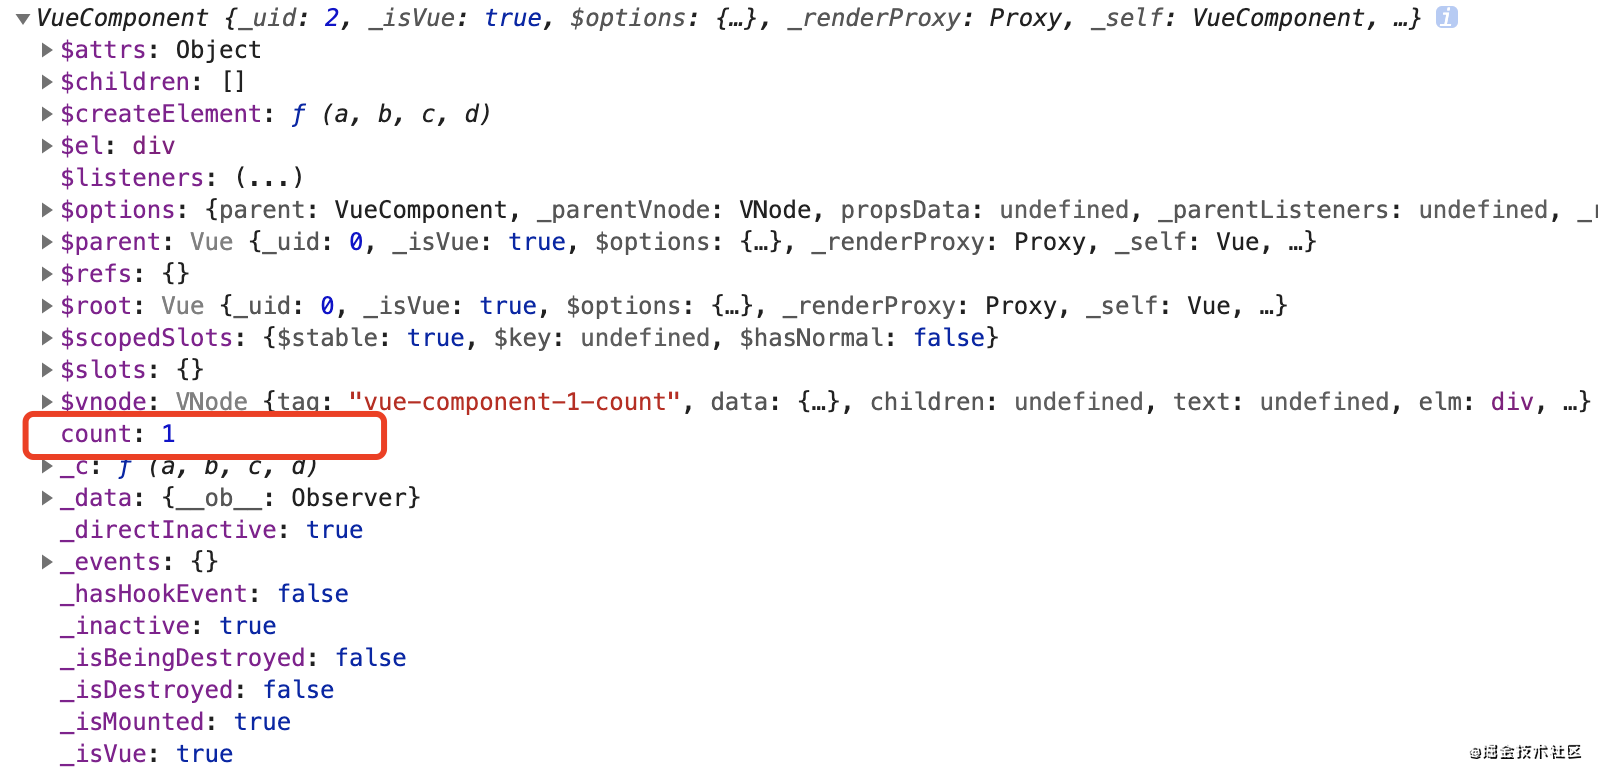
再次点击切换组件,切回count。此时count组件的vnode在缓存中已经存在,所以直接复用了原来count组件vnode中所保存的组件实例,组件实例中保存了原来的count值,因此组件切换完后,组件的状态也跟着还原了回来。
下图为count组件实例的状态,可以看到count的值得到了保持:
最终页面显示结果为:

从上面的分析可知,如果组件被包裹在keep-alive组件中,组件vnode会缓存到cache中。而组件的状态又会保存在组件实例中(componentInstance),当组件再次切换回来时,keep-alive直接将之前缓存的状态进行还原,也就实现了组件状态的保持。
以上就是keep-alive保持组件状态的方法的详细内容,更多关于keep-alive保持组件状态的资料请关注其它相关文章!
以上是 keep-alive保持组件状态的方法 的全部内容, 来源链接: utcz.com/p/218968.html