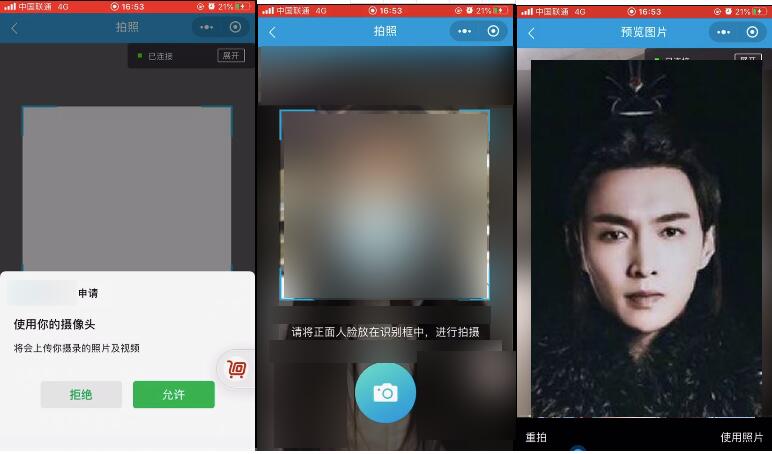
微信小程序使用前置摄像头拍照
本文实例为大家分享了微信小程序使用前置摄像头拍照的具体代码,供大家参考,具体内容如下
1、拍照页面:
<template>
<view title="拍照">
<camera v-if="openCamera" device-position="front" frame-size="large" class="zipai" @error="error"> </camera>
<cover-image src="/static/image/renzheng_zz.png" class="zhezhao"></cover-image>
<cover-view class="wenzi fint34">请将正面人脸放在识别框中,进行拍摄</cover-view>
<cover-image class="paizhao" src="/static/image/renzheng_pz.png" @click="takePhoto"></cover-image>
</view>
</template>
<script>
export default {
data() {
return {
openCamera:true
}
},
methods: {
takePhoto() {
const ctx = wx.createCameraContext()
ctx.takePhoto({
quality: 'high',
success: (res) => {
let tempFilePath = res.tempImagePath
uni.navigateTo({
url:'/pages/renzhengwxtu/renzhengwxtu?src='+tempFilePath
})
}
})
},
//用户拒绝授权摄像头
error(e) {
this.openCamera=false
wx.showModal({
title: '警告',
content: '若不授权使用摄像头,将无法使用拍照功能!',
cancelText: '不授权',
cancelColor: '#1ba9ba',
confirmText: '授权',
confirmColor: '#1ba9ba',
success:(res)=> {
if (res.confirm) {//允许打开授权页面
//调起客户端小程序设置界面,返回用户设置的操作结果
wx.openSetting({
success:(res)=> {
res.authSetting = {
"scope.camera": true
}
this.openCamera=true
},
})
} else if (res.cancel) {//拒绝打开授权页面
wx.navigateBack({delta:1})
}
}
})
},
}
}
</script>
2、预览图片页面:
<template>
<view title="预览图片">
<image mode="widthFix" :src="src" class="renlian"></image>
<view class="btns">
<text @click="takePhoto">重拍</text>
<text @click="usePhoto">使用照片</text>
</view>
</view>
</template>
<script>
export default {
data() {
return {
src: '',
timeId:null,
}
},
onLoad(option) {
this.src=option.src
},
onHide() {
clearTimeout(this.timeId);
this.timeId=null;
},
methods: {
takePhoto() {
uni.navigateBack({delta: 1});
},
usePhoto() {
this.$request.uploadFileMinipro(this.src,this.retoRenzheng);
},
retoRenzheng(){
this.timeId=setTimeout(()=>{
var pages = getCurrentPages();
var prevPage = pages[pages.length - 3]; //上一个页面
prevPage.fromTu= true;
uni.navigateBack({delta: 2});
},200);
},
}
}
</script>
3、上传图片方法:
// uploadFileMinipro
function uploadFileMinipro(tempFilePath,callback){
// 1.2 上传头像
let uin =common.getGlobalUserInfo().id;
let reurl=common.ip;
uni.uploadFile({
url: reurl,
filePath: tempFilePath,
name: "file",
formData:{uin:uin},
success:(res)=>{
console.log("res=",res);
// 注意,这里获得是一个string,需要转换一下
let resData = JSON.parse(res.data);
if (resData.status == 1) {//<=0:人工返回的错误信息
setErrorMessage("上传成功");
if (typeof callback === "function"){
callback();//刷新当前页面
}
} else if (resData.status < 1) {
setErrorMessage(resData.msg)
} else {
setErrorMessage()
}
},
fail:(res)=>{
console.log("上传失败");
},
});
}
为大家推荐现在关注度比较高的微信小程序教程一篇:《微信小程序开发教程》小编为大家精心整理的,希望喜欢。
以上就是本文的全部内容,希望对大家的学习有所帮助,也希望大家多多支持。
以上是 微信小程序使用前置摄像头拍照 的全部内容, 来源链接: utcz.com/p/218247.html