基于Spring实现文件上传功能
本小节你将建立一个可以接受HTTP multi-part 文件的服务。
你将建立一个后台服务来接收文件以及前台页面来上传文件。
要利用servlet容器上传文件,你要注册一个MultipartConfigElement类,以往需要在web.xml 中配置<multipart-config>,
而在这里,你要感谢SpringBoot,一切都为你自动配置好了。
1、新建一个文件上传的Controller:
应用已经包含一些 存储文件 和 从磁盘中加载文件 的类,他们在cn.tiny77.guide05这个包下。我们将会在FileUploadController中用到这些类。
package cn.tiny77.guide05;
import java.io.IOException;
import java.util.List;
import java.util.stream.Collectors;
import org.springframework.beans.factory.annotation.Autowired;
import org.springframework.core.io.Resource;
import org.springframework.http.HttpHeaders;
import org.springframework.http.ResponseEntity;
import org.springframework.stereotype.Controller;
import org.springframework.ui.Model;
import org.springframework.web.bind.annotation.ExceptionHandler;
import org.springframework.web.bind.annotation.GetMapping;
import org.springframework.web.bind.annotation.PathVariable;
import org.springframework.web.bind.annotation.PostMapping;
import org.springframework.web.bind.annotation.RequestParam;
import org.springframework.web.bind.annotation.ResponseBody;
import org.springframework.web.multipart.MultipartFile;
import org.springframework.web.servlet.mvc.method.annotation.MvcUriComponentsBuilder;
import org.springframework.web.servlet.mvc.support.RedirectAttributes;
@Controller
public class FileUploadController {
private final StorageService storageService;
@Autowired
public FileUploadController(StorageService storageService) {
this.storageService = storageService;
}
@GetMapping("/")
public String listUploadedFiles(Model model) throws IOException {
List<String> paths = storageService.loadAll().map(
path -> MvcUriComponentsBuilder.fromMethodName(FileUploadController.class,
"serveFile", path.getFileName().toString()).build().toString())
.collect(Collectors.toList());
model.addAttribute("files", paths);
return "uploadForm";
}
@GetMapping("/files/{filename:.+}")
@ResponseBody
public ResponseEntity<Resource> serveFile(@PathVariable String filename) {
Resource file = storageService.loadAsResource(filename);
return ResponseEntity.ok().header(HttpHeaders.CONTENT_DISPOSITION,
"attachment; filename=\"" + file.getFilename() + "\"").body(file);
}
@PostMapping("/")
public String handleFileUpload(@RequestParam("file") MultipartFile file,
RedirectAttributes redirectAttributes) {
storageService.store(file);
redirectAttributes.addFlashAttribute("message",
"You successfully uploaded " + file.getOriginalFilename() + "!");
return "redirect:/";
}
@ExceptionHandler(StorageFileNotFoundException.class)
public ResponseEntity<?> handleStorageFileNotFound(StorageFileNotFoundException exc) {
return ResponseEntity.notFound().build();
}
}
该类用@Controller注解,因此SpringMvc可以基于它设定相应的路由。每一个@GetMapping和@PostMapping注解将绑定对应的请求参数和请求类型到特定的方法。
GET / 通过StorageService 扫描文件列表并 将他们加载到 Thymeleaf 模板中。它通过MvcUriComponentsBuilder来生成资源文件的连接地址。
GET /files/{filename} 当文件存在时候,将加载文件,并发送文件到浏览器端。通过设置返回头"Content-Disposition"来实现文件的下载。
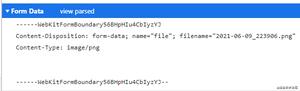
POST / 接受multi-part文件并将它交给StorageService保存起来。
你需要提供一个服务接口StorageService来帮助Controller操作存储层。接口大致如下
package cn.tiny77.guide05;
import org.springframework.core.io.Resource;
import org.springframework.web.multipart.MultipartFile;
import java.nio.file.Path;
import java.util.stream.Stream;
public interface StorageService {
void init();
void store(MultipartFile file);
Stream<Path> loadAll();
Path load(String filename);
Resource loadAsResource(String filename);
void deleteAll();
}
以下是接口实现类
package cn.tiny77.guide05;
import java.io.IOException;
import java.net.MalformedURLException;
import java.nio.file.Files;
import java.nio.file.Path;
import java.nio.file.Paths;
import java.nio.file.StandardCopyOption;
import java.util.stream.Stream;
import org.springframework.beans.factory.annotation.Autowired;
import org.springframework.core.io.Resource;
import org.springframework.core.io.UrlResource;
import org.springframework.stereotype.Service;
import org.springframework.util.FileSystemUtils;
import org.springframework.util.StringUtils;
import org.springframework.web.multipart.MultipartFile;
@Service
public class FileSystemStorageService implements StorageService {
private final Path rootLocation;
@Autowired
public FileSystemStorageService(StorageProperties properties) {
this.rootLocation = Paths.get(properties.getLocation());
}
@Override
public void store(MultipartFile file) {
String filename = StringUtils.cleanPath(file.getOriginalFilename());
try {
if (file.isEmpty()) {
throw new StorageException("无法保存空文件 " + filename);
}
if (filename.contains("..")) {
// This is a security check
throw new StorageException(
"无权访问该位置 "
+ filename);
}
Files.copy(file.getInputStream(), this.rootLocation.resolve(filename),
StandardCopyOption.REPLACE_EXISTING);
}
catch (IOException e) {
throw new StorageException("无法保存文件 " + filename, e);
}
}
@Override
public Stream<Path> loadAll() {
try {
return Files.walk(this.rootLocation, 1)
.filter(path -> !path.equals(this.rootLocation))
.map(path -> this.rootLocation.relativize(path));
}
catch (IOException e) {
throw new StorageException("读取文件异常", e);
}
}
@Override
public Path load(String filename) {
return rootLocation.resolve(filename);
}
@Override
public Resource loadAsResource(String filename) {
try {
Path file = load(filename);
Resource resource = new UrlResource(file.toUri());
if (resource.exists() || resource.isReadable()) {
return resource;
}
else {
throw new StorageFileNotFoundException(
"无法读取文件: " + filename);
}
}
catch (MalformedURLException e) {
throw new StorageFileNotFoundException("无法读取文件: " + filename, e);
}
}
@Override
public void deleteAll() {
FileSystemUtils.deleteRecursively(rootLocation.toFile());
}
@Override
public void init() {
try {
Files.createDirectories(rootLocation);
}
catch (IOException e) {
throw new StorageException("初始化存储空间出错", e);
}
}
}
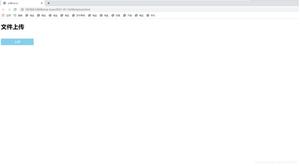
2、建立一个Html页面
这里使用Thymeleaf模板
<html xmlns:th="http://www.thymeleaf.org">
<body>
<div th:if="${message}">
<h2 th:text="${message}"/>
</div>
<div>
<form method="POST" enctype="multipart/form-data" action="/">
<table>
<tr><td>File to upload:</td><td><input type="file" name="file" /></td></tr>
<tr><td></td><td><input type="submit" value="Upload" /></td></tr>
</table>
</form>
</div>
<div>
<ul>
<li th:each="file : ${files}">
<a th:href="${file}" rel="external nofollow" th:text="${file}" />
</li>
</ul>
</div>
</body>
</html>
页面主要分为三部分分
- 顶部展示SpringMvc传过来的信息
- 一个提供用户上传文件的表单
- 一个后台提供的文件列表
3、限制上传文件的大小
在文件上传的应用中通常要设置文件大小的,想象一下后台处理的文件如果是5GB,那得多糟糕!在SpringBoot中,我们可以通过属性文件来控制。
新建一个application.properties,代码如下:
spring.http.multipart.max-file-size=128KB #文件总大小不能超过128kb
spring.http.multipart.max-request-size=128KB #请求数据的大小不能超过128kb
4、应用启动函数
package cn.tiny77.guide05;
import org.springframework.boot.CommandLineRunner;
import org.springframework.boot.SpringApplication;
import org.springframework.boot.autoconfigure.SpringBootApplication;
import org.springframework.boot.context.properties.EnableConfigurationProperties;
import org.springframework.context.annotation.Bean;
@SpringBootApplication
@EnableConfigurationProperties(StorageProperties.class)
public class Application {
public static void main(String[] args) {
SpringApplication.run(Application.class, args);
}
@Bean
CommandLineRunner init(StorageService storageService) {
return (args) -> {
storageService.deleteAll();
storageService.init();
};
}
}
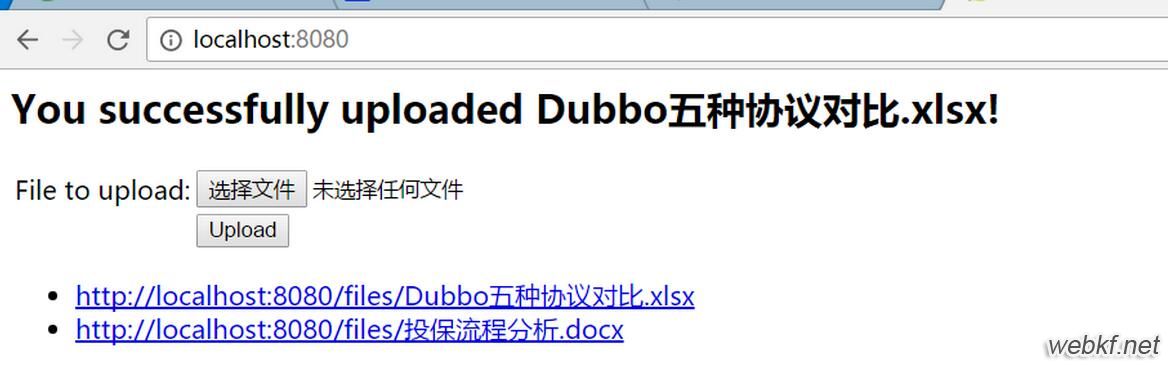
5、运行结果
以上是 基于Spring实现文件上传功能 的全部内容, 来源链接: utcz.com/p/215905.html