详解spring boot实现websocket
前言
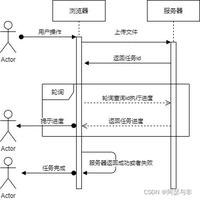
QQ这类即时通讯工具多数是以桌面应用的方式存在。在没有websocket出现之前,如果开发一个网页版的即时通讯应用,则需要定时刷新页面或定时调用ajax请求,这无疑会加大服务器的负载和增加了客户端的流量。而websocket的出现,则完美的解决了这些问题。
spring boot对websocket进行了封装,这对实现一个websocket网页即时通讯应用来说,变得非常简单。
一、准备工作
pom.xml引入
<groupId>org.springframework.boot</groupId>
<artifactId>spring-boot-starter-websocket</artifactId>
</dependency>
完整的pom.xml文件代码如下:
<?xml version="1.0" encoding="UTF-8"?>
<project xmlns="http://maven.apache.org/POM/4.0.0" xmlns:xsi="http://www.w3.org/2001/XMLSchema-instance"
xsi:schemaLocation="http://maven.apache.org/POM/4.0.0 http://maven.apache.org/xsd/maven-4.0.0.xsd">
<modelVersion>4.0.0</modelVersion>
<groupId>com.example</groupId>
<artifactId>spring-boot-16</artifactId>
<version>0.0.1-SNAPSHOT</version>
<packaging>jar</packaging>
<name>spring-boot-16</name>
<description>Demo project for Spring Boot</description>
<parent>
<groupId>org.springframework.boot</groupId>
<artifactId>spring-boot-starter-parent</artifactId>
<version>1.5.3.RELEASE</version>
<relativePath /> <!-- lookup parent from repository -->
</parent>
<properties>
<project.build.sourceEncoding>UTF-8</project.build.sourceEncoding>
<project.reporting.outputEncoding>UTF-8</project.reporting.outputEncoding>
<java.version>1.8</java.version>
</properties>
<dependencies>
<dependency>
<groupId>org.springframework.boot</groupId>
<artifactId>spring-boot-starter-thymeleaf</artifactId>
</dependency>
<dependency>
<groupId>org.springframework.boot</groupId>
<artifactId>spring-boot-starter-web</artifactId>
</dependency>
<dependency>
<groupId>org.springframework.boot</groupId>
<artifactId>spring-boot-starter-websocket</artifactId>
</dependency>
<dependency>
<groupId>org.springframework.boot</groupId>
<artifactId>spring-boot-devtools</artifactId>
<scope>runtime</scope>
</dependency>
<dependency>
<groupId>org.springframework.boot</groupId>
<artifactId>spring-boot-starter-test</artifactId>
<scope>test</scope>
</dependency>
</dependencies>
<build>
<plugins>
<plugin>
<groupId>org.springframework.boot</groupId>
<artifactId>spring-boot-maven-plugin</artifactId>
</plugin>
</plugins>
</build>
</project>
二、代码编写
1.创建名为“WebSocketConfig.java”的类来配置websocket,并继承抽象类“AbstractWebSocketMessageBrokerConfigurer”
此类声明“@EnableWebSocketMessageBroker”的注解
package com.example;
import org.springframework.context.annotation.Configuration;
import org.springframework.messaging.simp.config.MessageBrokerRegistry;
import org.springframework.web.socket.config.annotation.AbstractWebSocketMessageBrokerConfigurer;
import org.springframework.web.socket.config.annotation.EnableWebSocketMessageBroker;
import org.springframework.web.socket.config.annotation.StompEndpointRegistry;
@Configuration
@EnableWebSocketMessageBroker
public class WebSocketConfig extends AbstractWebSocketMessageBrokerConfigurer {
@Override
public void configureMessageBroker(MessageBrokerRegistry config) {
config.enableSimpleBroker("/topic");
config.setApplicationDestinationPrefixes("/app");
}
@Override
public void registerStompEndpoints(StompEndpointRegistry registry) {
registry.addEndpoint("/my-websocket").withSockJS();
}
}
这里配置了以“/app”开头的websocket请求url。和名为“my-websocket”的endpoint(端点)
2.编写一个DTO类来承载消息:
package com.example;
public class SocketMessage {
public String message;
public String date;
}
3.创建App.java类,用于启用spring boot和用于接收、发送消息的控制器。
package com.example;
import java.text.DateFormat;
import java.text.SimpleDateFormat;
import java.util.Date;
import org.springframework.beans.factory.annotation.Autowired;
import org.springframework.boot.SpringApplication;
import org.springframework.boot.autoconfigure.SpringBootApplication;
import org.springframework.messaging.handler.annotation.MessageMapping;
import org.springframework.messaging.handler.annotation.SendTo;
import org.springframework.messaging.simp.SimpMessagingTemplate;
import org.springframework.scheduling.annotation.EnableScheduling;
import org.springframework.scheduling.annotation.Scheduled;
import org.springframework.stereotype.Controller;
import org.springframework.web.bind.annotation.GetMapping;
@Controller
@EnableScheduling
@SpringBootApplication
public class App {
public static void main(String[] args) {
SpringApplication.run(App.class, args);
}
@Autowired
private SimpMessagingTemplate messagingTemplate;
@GetMapping("/")
public String index() {
return "index";
}
@MessageMapping("/send")
@SendTo("/topic/send")
public SocketMessage send(SocketMessage message) throws Exception {
DateFormat df = new SimpleDateFormat("yyyy-MM-dd HH:mm:ss");
message.date = df.format(new Date());
return message;
}
@Scheduled(fixedRate = 1000)
@SendTo("/topic/callback")
public Object callback() throws Exception {
// 发现消息
DateFormat df = new SimpleDateFormat("yyyy-MM-dd HH:mm:ss");
messagingTemplate.convertAndSend("/topic/callback", df.format(new Date()));
return "callback";
}
}
“send”方法用于接收客户端发送过来的websocket请求。
@EnableScheduling注解为:启用spring boot的定时任务,这与“callback”方法相呼应,用于每隔1秒推送服务器端的时间。
4.在“resources/templates”目录下创建index.html文件:
<!DOCTYPE html>
<html>
<head>
<title>玩转spring boot――websocket</title>
<script src="//cdn.bootcss.com/angular.js/1.5.6/angular.min.js"></script>
<script src="https://cdn.bootcss.com/sockjs-client/1.1.4/sockjs.min.js"></script>
<script src="https://cdn.bootcss.com/stomp.js/2.3.3/stomp.min.js"></script>
<script type="text/javascript">
/*<![CDATA[*/
var stompClient = null;
var app = angular.module('app', []);
app.controller('MainController', function($rootScope, $scope, $http) {
$scope.data = {
//连接状态
connected : false,
//消息
message : '',
rows : []
};
//连接
$scope.connect = function() {
var socket = new SockJS('/my-websocket');
stompClient = Stomp.over(socket);
stompClient.connect({}, function(frame) {
// 注册发送消息
stompClient.subscribe('/topic/send', function(msg) {
$scope.data.rows.push(JSON.parse(msg.body));
$scope.data.connected = true;
$scope.$apply();
});
// 注册推送时间回调
stompClient.subscribe('/topic/callback', function(r) {
$scope.data.time = '当前服务器时间:' + r.body;
$scope.data.connected = true;
$scope.$apply();
});
$scope.data.connected = true;
$scope.$apply();
});
};
$scope.disconnect = function() {
if (stompClient != null) {
stompClient.disconnect();
}
$scope.data.connected = false;
}
$scope.send = function() {
stompClient.send("/app/send", {}, JSON.stringify({
'message' : $scope.data.message
}));
}
});
/*]]>*/
</script>
</head>
<body ng-app="app" ng-controller="MainController">
<h2>玩转spring boot――websocket</h2>
<h4>
出处:刘冬博客 <a href="http://www.cnblogs.com/goodhelper" rel="external nofollow" >http://www.cnblogs.com/goodhelper</a>
</h4>
<label>WebSocket连接状态:</label>
<button type="button" ng-disabled="data.connected" ng-click="connect()">连接</button>
<button type="button" ng-click="disconnect()"
ng-disabled="!data.connected">断开</button>
<br />
<br />
<div ng-show="data.connected">
<label>{{data.time}}</label> <br /> <br /> <input type="text"
ng-model="data.message" placeholder="请输入内容..." />
<button ng-click="send()" type="button">发送</button>
<br /> <br /> 消息列表: <br />
<table>
<thead>
<tr>
<th>内容</th>
<th>时间</th>
</tr>
</thead>
<tbody>
<tr ng-repeat="row in data.rows">
<td>{{row.message}}</td>
<td>{{row.date}}</td>
</tr>
</tbody>
</table>
</div>
</body>
</html>
除了引用angular.js的CDN文件外,还需要引用sockjs和stomp。
完整的项目结构,如下图所示:

三、运行效果

点击“连接”按钮,出现发送消息的输入框。并接收到服务器端的时间推送。
输入发送内容并点击“发送”按钮后,页面显示出刚才发送的消息。
点击“断开”按钮,则服务器端不会再推送消息。
总结
在开发一个基于web的即时通讯应用的过程中,我们还需考虑session的机制。
还需要一个集合来承载当前的在线用户,并做一个定时任务,其目的是用轮询的方式定时处理在线用户的状态,有哪些用户在线,又有哪些用户离线。
参考:
http://spring.io/guides/gs/scheduling-tasks/
http://spring.io/guides/gs/messaging-stomp-websocket/
代码地址:https://github.com/carter659/spring-boot-16
以上是 详解spring boot实现websocket 的全部内容, 来源链接: utcz.com/p/214081.html