uploadify java实现多文件上传和预览
本文实例为大家分享了java文件上传和预览实现代码,供大家参考,具体内容如下
1、下载uploadify插件
2、index.html
<!DOCTYPE html>
<html lang="en">
<head>
<@head/>
<script src="<@path/>/js/uploadify-v3.1/jquery.uploadify-3.1.js"></script>
<link href="<@path/>/js/uploadify-v3.1/uploadify.css" rel="stylesheet" type="text/css" />
<style type="text/css">
#uploader {
position: relative;
}
#uploader_queue {
position: absolute;
width: 600px;
left: 200px;
top: 0;
}
</style>
<script type="text/javascript">
$(function() {
$("#file_upload")
.uploadify(
{
'auto' : false,
'method' : "get",
'formData' : {
'folder' : 'file'
},
'height' : 30,
'swf' : '<@path/>/js/uploadify-v3.1/uploadify.swf', // flash
'uploader' : '<@path/>/uploadAttach.do', //
'width' : 120,
'fileTypeDesc' : 'ֻ支持多种文件格式',
'fileTypeExts' : '.dat;.264;.h264;.mp4;.dav;.MP4;.AVI;.ts;.avi;'
+ '.mpg;.rmvb;.flv;.rm;.mov;.wmv;.JPG;.bmp;.png;.BMP;.jpg;.PNG;'
+ '.gif;.xlsx;.xls;.txt;.pdf;.doc;.docx;.rar;.zip;.7z',
'fileSizeLimit' : '800KB',
'buttonText' : '选择文件',
'uploadLimit' : 5,
'successTimeout' : 5,
'requeueErrors' : false,
'removeTimeout' : 10,
'removeCompleted' : false,
'queueSizeLimit' : 10,
'queueID' : 'uploader_queue',
'progressData' : 'speed',
'onInit' : function() {
},
'onUploadSuccess' : function(file, data, response) {
$("#uploader_view").append(
'<img height="60" alt="" src="<@path/>/upload/'
+ encodeURI(data)
+ '"/><br/><br/>');
},
'onQueueComplete' : function(queueData) {
$('#uploader_msg').html(
queueData.uploadsSuccessful
+ '个文件上传成功<br/>');
}
});
});
</script>
</head>
<body class="">
<@header/>
<br />
<br />
<br />
<br />
<div id="uploader">
<p>
<input type="file" name="file_upload" id="file_upload" />
</p>
<a href="javascript:$('#file_upload').uploadify('upload','*')">上传</a>
<a href="javascript:$('#file_upload').uploadify('stop')">取消上传</a>
<div id="uploader_queue"></div>
<div id="uploader_msg"></div>
<div id="uploader_view"></div>
</div>
<br />
<br />
<br />
<br /> <@footer/>
</body>
</html>
3、java文件
package com.frame.core.ctrl;
import java.io.File;
import java.io.FileNotFoundException;
import java.io.FileOutputStream;
import java.io.IOException;
import java.io.PrintWriter;
import java.util.Date;
import java.util.Map;
import java.util.UUID;
import javax.servlet.ServletException;
import javax.servlet.http.HttpServletRequest;
import javax.servlet.http.HttpServletResponse;
import org.apache.log4j.Logger;
import org.springframework.stereotype.Controller;
import org.springframework.ui.ModelMap;
import org.springframework.web.bind.annotation.RequestMapping;
import org.springframework.web.multipart.MultipartFile;
import org.springframework.web.multipart.MultipartHttpServletRequest;
import org.springframework.web.servlet.ModelAndView;
@Controller
public class loginCtrl {
private static Logger log = Logger.getLogger(loginCtrl.class);
@RequestMapping(value = "/goindex")
public ModelAndView goindex() {
ModelAndView mav = new ModelAndView("index");
mav.addObject("name", "笑傲江湖");
mav.addObject("projectName", "Freemarker框架");
return mav;
}
@RequestMapping(value = "/login")
public void login(HttpServletRequest request,HttpServletResponse response) throws ServletException, IOException {
request.getSession().setAttribute("username", "身份认证成功");
request.getRequestDispatcher("/index.jsp").forward(request, response);
}
@RequestMapping("/uploadAttach")
public void processUploadDir(ModelMap modelMap,
MultipartHttpServletRequest request, PrintWriter writer) throws Exception {
Map<String, MultipartFile> fileMap = request.getFileMap();
String path = request.getSession().getServletContext().getRealPath("/");;
System.out.println("path:"+path);
Date currentTime = new Date();
long prefix = currentTime.getTime();
StringBuffer attachIds = new StringBuffer();
for (Map.Entry<String, MultipartFile> f : fileMap.entrySet()) {
MultipartFile file = f.getValue();
if (!isLegalFile(file)) {
String msg = "is a illegal file";
throw new RuntimeException(msg);
}
String originalFileName = prefix + "_" + file.getOriginalFilename();
File fileDir = new File(path + "/upload" + File.separator);
if (!fileDir.exists()) {
fileDir.mkdirs();
}
File files = new File(path + "/upload" + File.separator
+ originalFileName);
FileOutputStream fileOutputStream = null;
try {
fileOutputStream = new FileOutputStream(files);
fileOutputStream.write(file.getBytes());
fileOutputStream.flush();
attachIds.append(originalFileName + ",");
} catch (FileNotFoundException e) {
e.printStackTrace();
} catch (IOException e) {
e.printStackTrace();
} catch (Exception e) {
e.printStackTrace();
} finally {
if (fileOutputStream != null) {
try {
fileOutputStream.close();
} catch (IOException e) {
e.printStackTrace();
}
}
}
}
writer.write(attachIds.toString().substring(0,attachIds.toString().length()-1));
}
private final String[] fileType = new String[]{".dat",".264",".h264",".mp4",".dav",".MP4",".AVI",".ts",".avi",".mpg",".rmvb",".flv",".rm",".mov",".wmv",
".JPG",".bmp",".png",".BMP",".jpg",".PNG",".gif",
".xlsx",".xls",".txt",".pdf",".doc",".docx",
".rar",".zip",".7z"};
private boolean isLegalFile(MultipartFile file) {
String originalFileName = file.getOriginalFilename();
for(String ft : fileType) {
if (originalFileName.endsWith(ft)) {
return true;
}
}
return false;
}
}
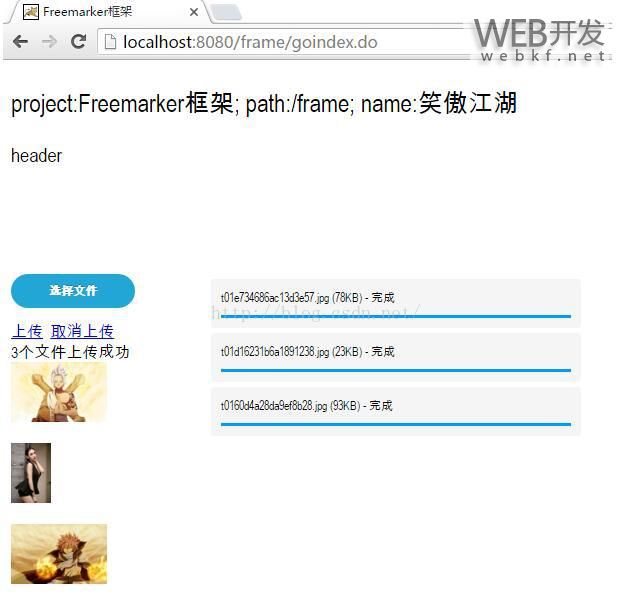
效果图:

以上就是本文的全部内容,希望对大家的学习有所帮助,也希望大家多多支持。
以上是 uploadify java实现多文件上传和预览 的全部内容, 来源链接: utcz.com/p/210538.html


