Spring中多配置文件及引用其他bean的方式
Spring多配置文件有什么好处?
按照目的、功能去拆分配置文件,可以提高配置文件的可读性与维护性,如将配置事务管理、数据源等少改动的配置与配置bean单独分开。
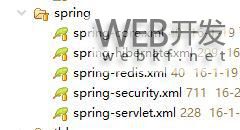
Spring读取配置文件的几种方式:
1、使用Spring自身提供的ApplicationContext方式读取
在Java程序中可以使用ApplicationContext两个实现类ClassPathXmlApplicationContext以及FileSystemXmlApplicationContext来读取多个配置文件,他们的构造器都可以接收一个配置文件数组。
如: ApplicationContext ctx = new ClassPathXmlApplicationContext(configLocations);与采用FileSystemXmlApplicationContext创建ApplicationContext的方式相似,区别仅在于二者搜索配置文件的路径不同:ClassPathXmlApplicationContext通过CLASSPATH路径搜索配置文件:而FileSystemXmlApplicationContext则在当前路径搜索配置文件。
方法一:在初始化时保存ApplicationContext对象
代码:
ApplicationContext ac = new FileSystemXmlApplicationContext("applicationContext.xml");
ac.getBean("beanId");
说明:
这种方式适用于采用Spring框架的独立应用程序,需要程序通过配置文件手工初始化Spring的情况。
方法二:通过Spring提供的工具类获取ApplicationContext对象
代码:
import org.springframework.web.context.support.WebApplicationContextUtils;
ApplicationContext ac1 = WebApplicationContextUtils.getRequiredWebApplicationContext(ServletContext sc)
ApplicationContext ac2 = WebApplicationContextUtils.getWebApplicationContext(ServletContext sc)
ac1.getBean("beanId");
ac2.getBean("beanId");
说明:
这种方式适合于采用Spring框架的B/S系统,通过ServletContext对象获取ApplicationContext对象,然后在通过它获取需要的类实例。
上面两个工具方式的区别是,前者在获取失败时抛出异常,后者返回null。
方法三:继承自抽象类ApplicationObjectSupport
说明:
抽象类ApplicationObjectSupport提供getApplicationContext()方法,可以方便的获取到ApplicationContext。Spring初始化时,会通过该抽象类的setApplicationContext(ApplicationContext context)方法将ApplicationContext 对象注入。
方法四:继承自抽象类WebApplicationObjectSupport
说明:
类似上面方法,调用getWebApplicationContext()获取WebApplicationContext
方法五:实现接口ApplicationContextAware
说明:
实现该接口的setApplicationContext(ApplicationContext context)方法,并保存ApplicationContext 对象。Spring初始化时,会通过该方法将ApplicationContext 对象注入。
以上方法适合不同的情况,请根据具体情况选用相应的方法。
2、使用web工程启动时加载
在web.xml中配置web容器启动是自动加载哪些配置文件:
<context-param>
<param-name>contextConfigLocation</param-name>
<param-value>/WEB-INF/spring/spring-core.xml</param-value>
</context-param>
<servlet>
<servlet-name>springMVC</servlet-name>
<servlet-class>org.springframework.web.servlet.DispatcherServlet</servlet-class>
<init-param>
<param-name>contextConfigLocation</param-name>
<param-value>/WEB-INF/spring/spring-servlet.xml</param-value>
</init-param>
<load-on-startup>1</load-on-startup>
</servlet>
<servlet-mapping>
<servlet-name>springMVC</servlet-name>
<url-pattern>/</url-pattern>
</servlet-mapping>
多个的时候可以用 * 号来代替。
<servlet>
<servlet-name>app</servlet-name>
<servlet-class>
org.springframework.web.servlet.DispatcherServlet
</servlet-class>
<context-param>
<param-name>contextConfigLocation</param-name>
<param-value>/WEB-INF/applicationContext*.xml,/WEB-
INF/user_spring.xml</param-value>
</context-param>
<load-on-startup>1</load-on-startup>
</servlet>
3、Xml配置文件中导入其他配置文件
在/WEB-INF/applicationContext.xml配置应用服务去加载,可以在applicationContext.xml中用import引入其他的配置文件
<?xml version="1.0" encoding="UTF-8"?>
<beans xmlns="http://www.springframework.org/schema/beans"
xmlns:context="http://www.springframework.org/schema/context" xmlns:p="http://www.springframework.org/schema/p"
xmlns:mvc="http://www.springframework.org/schema/mvc" xmlns:tx="http://www.springframework.org/schema/tx"
xmlns:aop="http://www.springframework.org/schema/aop" xmlns:xsi="http://www.w3.org/2001/XMLSchema-instance"
xsi:schemaLocation="http://www.springframework.org/schema/beans
http://www.springframework.org/schema/beans/spring-beans-3.2.xsd
http://www.springframework.org/schema/context
http://www.springframework.org/schema/context/spring-context-3.2.xsd
http://www.springframework.org/schema/mvc
http://www.springframework.org/schema/mvc/spring-mvc-3.2.xsd
http://www.springframework.org/schema/tx
http://www.springframework.org/schema/tx/spring-tx-3.2.xsd
http://www.springframework.org/schema/aop
http://www.springframework.org/schema/aop/spring-aop-3.2.xsd">
<import resource="spring-servlet.xml"/>
<import resource="spring-security.xml"/>
<import resource="spring-hibernate.xml"/>
<import resource="spring-redis.xml"/>
</beans>
以上是 Spring中多配置文件及引用其他bean的方式 的全部内容, 来源链接: utcz.com/p/209621.html


