nginx容器配置文件独立的实现
创建一个容器
[root@server1 ~]# docker run -it --name nginx1 -v /opt/data/web2:/web -p 81:80 centos:latest /bin/bash
[root@608de4875036 /]#
进入web目录,下载nginx包
[root@608de4875036 web]# wget http://nginx.org/download/nginx-1.20.1.tar.gz
解压目录
[root@608de4875036 web]# ls
nginx-1.20.1 nginx-1.20.1.tar.gz
安装依赖包
[root@608de4875036 web]# yum -y install pcre-devel openssl openssl-devel gd-devel gcc gcc-c++ make
[root@608de4875036 web]# yum -y groups mark install 'Development Tools'
创建用户
[root@608de4875036 web]# useradd -r -M -s /sbin/nologin nginx
[root@608de4875036 web]# id nginx
uid=998(nginx) gid=996(nginx) groups=996(nginx)
创建日志存放文件地址
[root@6ad47178bdd6 web]# mkdir log
编译安装
[root@608de4875036 web]# ls
log nginx-1.20.1 nginx-1.20.1.tar.gz
[root@608de4875036 web]# cd nginx-1.20.1
[root@608de4875036 nginx-1.20.1]# ls
auto conf html README
CHANGES configure LICENSE src
CHANGES.ru contrib man
[root@608de4875036 nginx-1.20.1]# ./configure \
--prefix=/web/nginx \
--user=nginx \
--group=nginx \
--with-debug \
--with-http_ssl_module \
--with-http_realip_module \
--with-http_image_filter_module \
--with-http_gunzip_module \
--with-http_gzip_static_module \
--with-http_stub_status_module \
--http-log-path=/web/log/access.log \
--error-log-path=/web/log/error.log
[root@608de4875036 nginx-1.20.1]# make && make install
查看目录
[root@6ad47178bdd6 web]# ls
log nginx nginx-1.20.1 nginx-1.20.1.tar.gz
[root@608de4875036 web]# cd nginx
[root@608de4875036 nginx]# ls
conf html logs sbin
配置环境变量
[root@608de4875036 nginx]# ls
conf html logs sbin
[root@608de4875036 nginx]# cd sbin/
[root@608de4875036 sbin]# ls
nginx
[root@608de4875036 sbin]# pwd
/web/nginx/sbin
[root@608de4875036 sbin]# echo "export PATH=/web/nginx/sbin:\$PATH" > /etc/profile.d/nginx.sh
[root@608de4875036 sbin]# source /etc/profile.d/nginx.sh
[root@608de4875036 sbin]# which nginx
/web/nginx/sbin/nginx
启动服务
[root@608de4875036 sbin]# ss -antl
State Recv-Q Send-Q Local Address:Port Peer Address:Port Process
LISTEN 0 128 0.0.0.0:80 0.0.0.0:*
在容器上查看服务
[root@608de4875036 web]# ls
nginx nginx-1.20.1 nginx-1.20.1.tar.gz
[root@608de4875036 web]# cd nginx
[root@608de4875036 nginx]# ls
client_body_temp html sbin
conf logs scgi_temp
fastcgi_temp proxy_temp uwsgi_temp
在宿主机上查看
[root@server1 ~]# cd /opt/data/
[root@server1 data]# ls
web1 web2
[root@server1 data]# cd web2
[root@server1 web2]# ls
log nginx nginx-1.20.1 nginx-1.20.1.tar.gz
[root@server1 web2]# cd nginx
[root@server1 nginx]# ls
client_body_temp html sbin
conf logs scgi_temp
fastcgi_temp proxy_temp uwsgi_temp
可以看到数据已同步
在宿主上上修改配置文件
创建一个名为xy的目录,把游戏代码复制到这个目录下
[root@server1 html]# pwd
/opt/data/web2/nginx/html
[root@server1 html]# mkdir yx
[root@server1 html]# cd yx
[root@server1 yx]# ls
image index.html js
在创建一个目录test
[root@server1 html]# mkdir test
[root@server1 html]# ls
[root@server1 html]# ls
50x.html index.html test yx
[root@server1 html]# mv 50x.html index.html test/
[root@server1 html]# ls
test yx
修改nginx.conf配置文件
[root@server1 conf]# vi nginx.conf
........
server {
listen 8080;
server_name test.example.com;
location / {
root /web/nginx/html/test; #容器内文件地址
index index.html index.htm;
}
}
server {
listen 80;
server_name xy.example.com;
#charset koi8-r;
#access_log logs/host.access.log main;
location / {
root /web/nginx/html/yx; #容器内文件地址
index index.html index.htm;
}
.....
但是这样修改有点问题,只映射了一个端口,还有一个端口没有映射
[root@server1 conf]# docker port 608de4875036
80/tcp -> 0.0.0.0:81
80/tcp -> :::81
怎么决绝呢?
把这个容器删掉
[root@server1 ~]# docker stop 608de4875036
608de4875036
[root@server1 ~]# docker rm 608de4875036
608de4875036
这里的数据还在宿主机上
[root@server1 web2]# ls
log nginx nginx-1.20.1 nginx-1.20.1.tar.gz
重新创建以一容器映射这个目录
[root@server1 ~]# docker run -it --name nginx2 -v /opt/data/web2:/web -p 80:80 -p 8080:8080 centos:latest /bin/bash
[root@6ad47178bdd6 /]#
在宿主机上查看
[root@server1 ~]# docker ps
CONTAINER ID IMAGE COMMAND CREATED STATUS PORTS NAMES
6ad47178bdd6 centos:latest "/bin/bash" 23 seconds ago Up 22 seconds 0.0.0.0:80->80/tcp, :::80->80/tcp, 0.0.0.0:8080->8080/tcp, :::8080->8080/tcp nginx2
[root@server1 ~]# docker port 6ad47178bdd6
80/tcp -> 0.0.0.0:80
80/tcp -> :::80
8080/tcp -> 0.0.0.0:8080
8080/tcp -> :::8080
在容器里查看数据有没有同步
[root@6ad47178bdd6 /]# ls
bin home lost+found opt run sys var
dev lib media proc sbin tmp web
etc lib64 mnt root srv usr
[root@6ad47178bdd6 /]# cd web/
[root@6ad47178bdd6 web]# ls
nginx nginx-1.20.1 nginx-1.20.1.tar.gz
[root@6ad47178bdd6 web]# cd nginx
[root@6ad47178bdd6 nginx]# ls
client_body_temp html sbin
conf logs scgi_temp
fastcgi_temp proxy_temp uwsgi_temp
#数据以同步
启动服务
#写一个环境变量
[root@6ad47178bdd6 /]# cat /etc/profile.d/nginx.sh
export PATH=/web/nginx/sbin:$PATH
#创建nginx用户
[root@6ad47178bdd6 /]# useradd -r -M -s /sbin/nologin nginx
[root@6ad47178bdd6 /]# nginx
[root@6ad47178bdd6 /]# ss -antl
State Recv-Q Send-Q Local Address:Port Peer Address:Port Process
LISTEN 0 128 0.0.0.0:80 0.0.0.0:*
LISTEN 0 128 0.0.0.0:8080 0.0.0.0:*
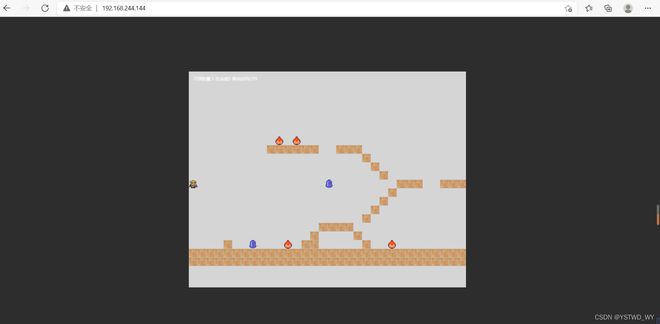
访问192.168.244.145:80
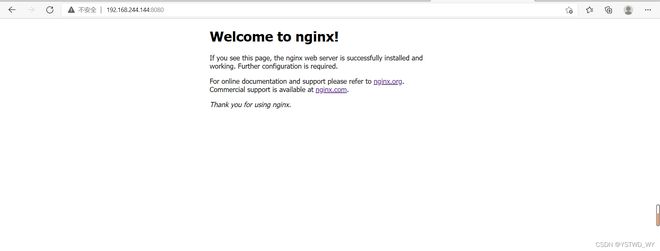
访问192.168.244.145:8080
到此这篇关于nginx容器配置文件独立的实现的文章就介绍到这了,更多相关nginx容器配置文件独立内容请搜索以前的文章或继续浏览下面的相关文章希望大家以后多多支持!
以上是 nginx容器配置文件独立的实现 的全部内容, 来源链接: utcz.com/p/253394.html