Spring中Bean的作用域和自动装配方式
Bean的作用域
Spring中bean的作用域共有singleton、prototype、request、session、application、websocket六种
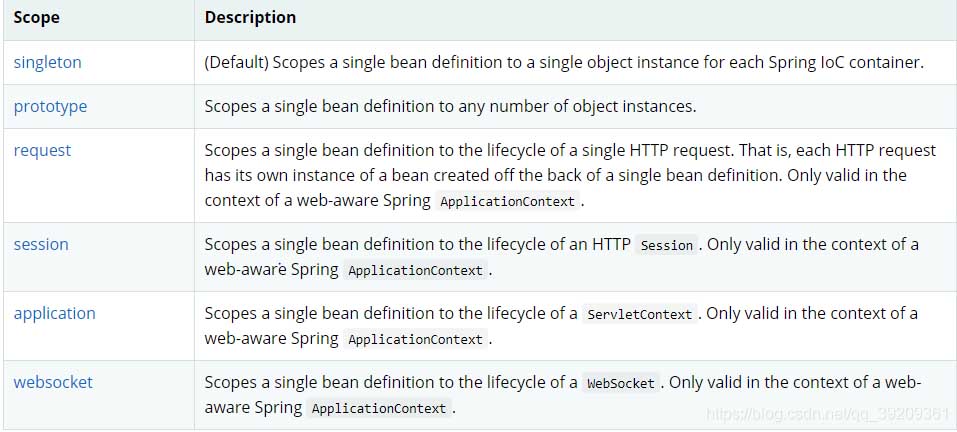
其中后四种都是用在Web应用程序中的,主要介绍前两种singleton(单例)和prototype(原型)
Bean的作用域范围为singleton时,所有实例共享一个对象。
Spring的默认配置为scope = “singleton”,以下两种配置的效果是一样的:
默认配置
<?xml version="1.0" encoding="UTF-8"?>
<beans xmlns="http://www.springframework.org/schema/beans"
xmlns:xsi="http://www.w3.org/2001/XMLSchema-instance"
xmlns:p="http://www.springframework.org/schema/p"
xmlns:c="http://www.springframework.org/schema/c"
xsi:schemaLocation="http://www.springframework.org/schema/beans http://www.springframework.org/schema/beans/spring-beans.xsd">
<!--Spring默认配置为scope = "singleton"-->
<bean id = "user" class="indi.stitch.pojo.User" />
</beans>
scope = “singleton”
<?xml version="1.0" encoding="UTF-8"?>
<beans xmlns="http://www.springframework.org/schema/beans"
xmlns:xsi="http://www.w3.org/2001/XMLSchema-instance"
xmlns:p="http://www.springframework.org/schema/p"
xmlns:c="http://www.springframework.org/schema/c"
xsi:schemaLocation="http://www.springframework.org/schema/beans http://www.springframework.org/schema/beans/spring-beans.xsd">
<!--Spring默认配置为scope = "singleton"-->
<bean id = "user" class="indi.stitch.pojo.User" scope = "singleton" />
</beans>
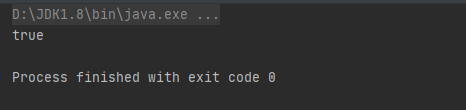
测试类及输出结果:
import indi.stitch.pojo.User;
import org.junit.Test;
import org.springframework.context.ApplicationContext;
import org.springframework.context.support.ClassPathXmlApplicationContext;
public class MyTest {
@Test
public void test2() {
ApplicationContext context = new ClassPathXmlApplicationContext("namespace.xml");
User user = context.getBean("user", User.class);
User user2 = context.getBean("user", User.class);
System.out.println(user == user2);
}
}
scope = “prototype”
<?xml version="1.0" encoding="UTF-8"?>
<beans xmlns="http://www.springframework.org/schema/beans"
xmlns:xsi="http://www.w3.org/2001/XMLSchema-instance"
xmlns:p="http://www.springframework.org/schema/p"
xmlns:c="http://www.springframework.org/schema/c"
xsi:schemaLocation="http://www.springframework.org/schema/beans http://www.springframework.org/schema/beans/spring-beans.xsd">
<!--Spring默认配置为scope = "singleton"-->
<bean id = "user" class="indi.stitch.pojo.User" scope = "prototype" />
</beans>
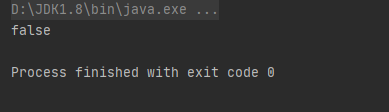
测试类及输出结果:
import indi.stitch.pojo.User;
import org.junit.Test;
import org.springframework.context.ApplicationContext;
import org.springframework.context.support.ClassPathXmlApplicationContext;
public class MyTest {
@Test
public void test2() {
ApplicationContext context = new ClassPathXmlApplicationContext("namespace.xml");
User user = context.getBean("user", User.class);
User user2 = context.getBean("user", User.class);
System.out.println(user == user2);
}
}
Bean的自动装配
Spring中Bean的自动装配基于autowired标签实现
首先创建实体类People、Cat、Dog,People和Cat、Dog是组合关系,People中定义了依赖于Cat、Dog的属性
People实体类
package indi.stitch.pojo;
public class People {
private Cat cat;
private Dog dog;
public Cat getCat() {
return cat;
}
public void setCat(Cat cat) {
this.cat = cat;
}
public Dog getDog() {
return dog;
}
public void setDog(Dog dog) {
this.dog = dog;
}
@Override
public String toString() {
return "People{" +
"cat=" + cat +
", dog=" + dog +
'}';
}
}
Cat实体类
package indi.stitch.pojo;
public class Cat {
public void shout() {
System.out.println("miao~");
}
}
Dog实体类
package indi.stitch.pojo;
public class Dog {
public void shout() {
System.out.println("wang~");
}
}
通过name自动装配
<?xml version="1.0" encoding="UTF-8"?>
<beans xmlns="http://www.springframework.org/schema/beans"
xmlns:xsi="http://www.w3.org/2001/XMLSchema-instance"
xsi:schemaLocation="http://www.springframework.org/schema/beans http://www.springframework.org/schema/beans/spring-beans.xsd">
<bean id = "cat" class="indi.stitch.pojo.Cat" />
<bean id = "dog" class="indi.stitch.pojo.Dog" />
<!--在Spring上下文中通过检索name完成自动装配,检索依据为bean中属性的set方法除set部分外的后缀-->
<bean id = "people" class="indi.stitch.pojo.People" autowire="byName"/>
</beans>
测试类及输出结果:
import indi.stitch.pojo.People;
import org.springframework.context.ApplicationContext;
import org.springframework.context.support.ClassPathXmlApplicationContext;
public class MyTest {
public static void main(String[] args) {
ApplicationContext context = new ClassPathXmlApplicationContext("beans.xml");
People people = context.getBean("people", People.class);
people.getCat().shout();
people.getDog().shout();
}
}
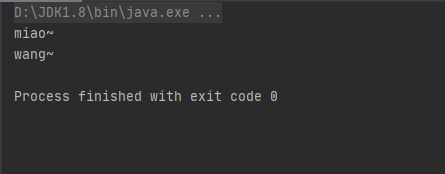
输出结果

通过type自动装配
<?xml version="1.0" encoding="UTF-8"?>
<beans xmlns="http://www.springframework.org/schema/beans"
xmlns:xsi="http://www.w3.org/2001/XMLSchema-instance"
xsi:schemaLocation="http://www.springframework.org/schema/beans http://www.springframework.org/schema/beans/spring-beans.xsd">
<bean id = "cat" class="indi.stitch.pojo.Cat" />
<bean id = "dog" class="indi.stitch.pojo.Dog" />
<!--在Spring上下文中通过对属性对应类型进行检索完成自动装配,Spring配置中不能存在被依赖的相同类型的多个bean,被依赖的bean在Spring中配置时可以省略id属性-->
<bean id = "people" class="indi.stitch.pojo.People" autowire="byType"/>
</beans>
测试类和结果和上面相同
import indi.stitch.pojo.People;
import org.springframework.context.ApplicationContext;
import org.springframework.context.support.ClassPathXmlApplicationContext;
public class MyTest {
public static void main(String[] args) {
ApplicationContext context = new ClassPathXmlApplicationContext("beans.xml");
People people = context.getBean("people", People.class);
people.getCat().shout();
people.getDog().shout();
}
}
输出结果
以上为个人经验,希望能给大家一个参考,也希望大家多多支持。
以上是 Spring中Bean的作用域和自动装配方式 的全部内容, 来源链接: utcz.com/p/249424.html