【小程序】小程序canvas写一个简单的图片应用
应用展示
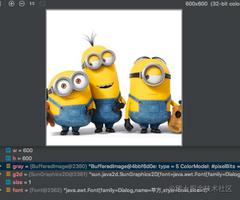
截图

在线预览

需求
既然是小应用,那就希望最终成品是有 适用的场景 且是 有价值 的
需求来源
这个应用需求的灵感
在以前工作生活中,经常会无意中获得同事的 美照
这时我们想要把这张照片做成表情包
一般给图片添加几个说明文字
一个有意思的沟通工具(表情包)就完成了
需求分析
基于以上需求的拆解
可以将要应用功能实现整理一下
- 用户需要上传一张图片
- 可以添加文字
- 文字可以作 样式调整 和 旋转缩放
- 另外我们希望还可以插入一些贴图
- 贴图可以做 旋转缩放
- 用户导出图片到相册
实现
github仓库 https://github.com/luosijie/f...
这个应用是用小程序开发的
- 使用框架:mpx
- 使用技术:小程序canvas
状态管理
import { createStore } from '@mpxjs/core'const store = createStore({
state: {
cavas: null, // cnavas实例
ctx: null, // canvas上下文实例
elements: [], // canvas元素
activeIndex: null, // 当前编辑中的元素索引
mode: 'background', // 当前编辑模式:background, text, sticker
fontStyle: { // 文字默认样式
opacity: 1,
fillStyle: '#000000',
strokeStyle: '#000000'
}
},
mutations: {
setCanvas (state, data) {
state.canvas = data
},
setCtx (state, data) {
state.ctx = data
},
setElements (state, data) {
state.elements = data
},
setMode (state, data) {
state.mode = data
},
setActiveIndex (state, data) {
state.activeIndex = data
},
setFontStyle (state, { key, data }) {
state.fontStyle[key] = data
},
// 添加文字
addText (state) {
const size = 50
const string = '请输入文字'
const text = {
type: 'text',
data: string,
scale: 1,
size,
left: 100,
top: 100,
rotate: 0,
opacity: state.fontStyle.opacity,
fillStyle: state.fontStyle.fillStyle,
strokeStyle: state.fontStyle.strokeStyle
}
state.elements.push(text)
state.activeIndex = state.elements.length - 1
},
// 添加贴图
addSticker (state, data) {
state.elements.push(data)
state.activeIndex = state.elements.length - 1
},
// 删除当前选中
deleteActiveELement (state) {
state.elements.splice(state.activeIndex, 1)
state.activeIndex = null
},
// 清空画布
clear (state) {
state.elements = []
state.activeIndex = null
}
}
})
export default store
画布初始化
// 初始化画布async initCanvas() {
const query = this.createSelectorQuery()
query
.select('#canvas')
.fields({ node: true, size: true })
.exec(async res => {
const canvas = res[0].node
const ctx = canvas.getContext('2d')
store.commit('setCanvas', canvas)
store.commit('setCtx', ctx)
await this.loadImage('/images/icon-rotate.png').then(res => {
this.image.rotate = res
})
canvas.width = res[0].width * this.dpr
canvas.height = res[0].height * this.dpr
ctx.scale(this.dpr, this.dpr)
this.drawGrid()
})
}
绘制图片
/*** 绘制图片
* @param { Object } ele canvas元素
*/
drawImage(ele) {
this.ctx.save()
const width = ele.width
const height = ele.height
const centerX = ele.left + ele.width / 2
const centerY = ele.top + ele.height / 2
this.ctx.translate(centerX, centerY)
this.ctx.rotate(ele.rotate)
this.ctx.drawImage(ele.data, ele.left - centerX, ele.top - centerY, width, height)
this.ctx.restore()
}
绘制文字
/*** 绘制文字
* @param { Object } ele canvas元素
*/
drawText(ele) {
this.ctx.save()
const width = ele.size * ele.data.length
const height = ele.size
const centerX = ele.left + width / 2
const centerY = ele.top + height / 2
this.ctx.translate(centerX, centerY)
this.ctx.rotate(ele.rotate)
this.ctx.font = `${ele.size}px bold sans-serif`
this.ctx.globalAlpha = ele.opacity
this.ctx.fillStyle = ele.fillStyle
this.ctx.strokeStyle = ele.strokeStyle
// this.ctx.lineWidth = 2
this.ctx.textBaseline = 'top'
console.log('draw-text', ele)
this.ctx.fillText(ele.data, ele.left - centerX, ele.top - centerY)
this.ctx.strokeText(ele.data, ele.left - centerX, ele.top - centerY)
this.ctx.restore()
}
绘制控制元件
initController(ele) {const cs = this.convert2ControllerSize(ele)
this.ctx.save()
this.ctx.strokeStyle = '#eee'
this.ctx.translate(cs.centerX, cs.centerY)
this.ctx.rotate(cs.rotate)
// 绘制虚线边框
this.ctx.setLineDash([10, 5], 5)
this.ctx.strokeRect(cs.left - cs.centerX, cs.top - cs.centerY, cs.width, cs.height)
// 绘制控制点-旋转
this.ctx.drawImage(this.image.rotate, cs.left + cs.width - 10 - cs.centerX, cs.top + cs.height - 10 - cs.centerY, 20, 20)
this.ctx.restore()
}
画布渲染函数
// 画布渲染函数renderCanvas() {
this.ctx.clearRect(0, 0, this.ctx.canvas.width, this.ctx.canvas.height)
this.drawGrid()
console.log('draw-background', this.background)
if (this.background) this.drawImage(this.background)
for (let i = 0; i < this.elements.length; i++) {
const ele = this.elements[i]
// 渲染背景
if (ele.type === 'background') {
this.drawImage(ele)
}
if (ele.type === 'sticker') {
this.drawImage(ele)
}
// 渲染文字
if (ele.type === 'text') {
this.drawText(ele)
}
// 选中元素添加控制元件
if (this.activeIndex === i) {
this.initController(ele)
}
}
}
事件监听
移动
// 移动事件绑定函数handleMove(e) {
console.log('mouse-move', e)
if (e.touches.length > 1) return
const x = e.touches[0].x
const y = e.touches[0].y
const dx = this.startTouches[0].x - x
const dy = this.startTouches[0].y - y
const elements = this.elements.slice()
elements[this.activeIndex || 0].left = this.startSelected.left - dx
elements[this.activeIndex || 0].top = this.startSelected.top - dy
store.commit('setElements', elements)
}
旋转
// 旋转绑定函数handleRotate(e) {
console.log('handleRotate')
const start = this.startTouches[0]
const end = e.touches[0]
const center = {
x: this.startSelected.centerX,
y: this.startSelected.centerY
}
const startLength = Math.sqrt((center.x - start.x) ** 2 + (center.y - start.y) ** 2)
const endLength = Math.sqrt((center.x - end.x) ** 2 + (center.y - end.y) ** 2)
const radian = this.convert2Radian(start, end, center)
const scale = endLength / startLength
const elements = this.elements.slice()
const selected = elements[this.activeIndex]
// 旋转
selected.rotate = this.startSelected.rotate - radian
// 缩放
if (selected.type === 'text') {
selected.left = this.startSelected.centerX - this.startSelected.size * this.startSelected.data.length * scale / 2
selected.top = this.startSelected.centerY - this.startSelected.size * scale / 2
selected.size = this.startSelected.size * scale
}
if (selected.type === 'sticker') {
selected.left = this.startSelected.centerX - this.startSelected.width * scale / 2
selected.top = this.startSelected.centerY - this.startSelected.height * scale / 2
selected.width = this.startSelected.width * scale
selected.height = this.startSelected.height * scale
}
store.commit('setElements', elements)
}
缩放
// 缩放事件绑定函数handleScale(e) {
if (e.touches.length !== 2 || this.mode !== 'background') return
const startLength = Math.sqrt(
(this.startTouches[0].x - this.startTouches[1].x) ** 2 +
(this.startTouches[0].y - this.startTouches[1].y) ** 2
)
const endLength = Math.sqrt(
(e.touches[0].x - e.touches[1].x) ** 2 + (e.touches[0].y - e.touches[1].y) ** 2
)
const scale = endLength / startLength
const elements = this.elements.slice()
const selected = elements[this.activeIndex || 0]
selected.left = this.startSelected.centerX - this.startSelected.width * scale / 2
selected.top = this.startSelected.centerY - this.startSelected.height * scale / 2
selected.width = this.startSelected.width * scale
selected.height = this.startSelected.height * scale
// elements[this.activeIndex || 0].scale = this.startSelected.scale * scale
store.commit('setElements', elements)
}
导出图片
export() {if (!store.state.elements.length) {
wx.showToast({
title: '加点东西再导出吧',
icon: 'none'
})
return
}
wx.showModal({
title: '提示',
content: '图片将保存到手机相册',
success(res) {
if (res.confirm) {
console.log('export-canvas', store.state.ctx)
const canvas = store.state.canvas
wx.canvasToTempFilePath({
x: 0,
y: 0,
width: canvas.width,
height: canvas.height,
canvas,
complete(res) {
if (res.errMsg === 'canvasToTempFilePath:ok') {
wx.saveImageToPhotosAlbum({
filePath: res.tempFilePath,
success(res) {
wx.showToast({
title: '图片保存成功',
icon: 'none'
})
}
})
}
}
})
}
}
})
}
github仓库 https://github.com/luosijie/f...
以上是 【小程序】小程序canvas写一个简单的图片应用 的全部内容, 来源链接: utcz.com/a/98991.html