【Java】我所知道设计模式之原型模式
前言需求
接下里介绍的是Java 的设计模式之一:原型模式
现在有一只羊 tom
姓名为: tom, 年龄为:1,颜色为:白色
请编写程序创建和 tom 羊 属性完全相同的 10 只羊
请问你会怎么制作呢?
一、什么是原型模式
原型模式(Prototype 模式)是指:用原型实例指定创建对象的种类,并且通过拷贝这些原型,创建新的对象
原型模式是一种创建型设计模式,允许一个对象再创建另外一个可定制的对象,无需知道如何创建的细节
工作原理是:通过将一个原型对象传给那个要发动创建的对象,这个要发动创建的对象通过请求原型对象拷贝它们自己来实施创建,即对象.clone()
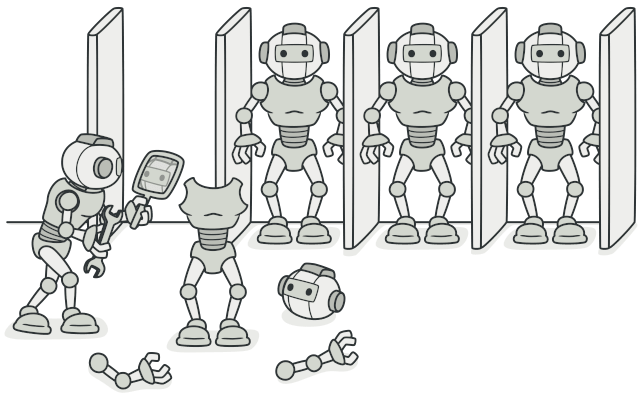
形象的理解:齐天大圣孙悟空拔出猴毛, 变出其它孙大圣
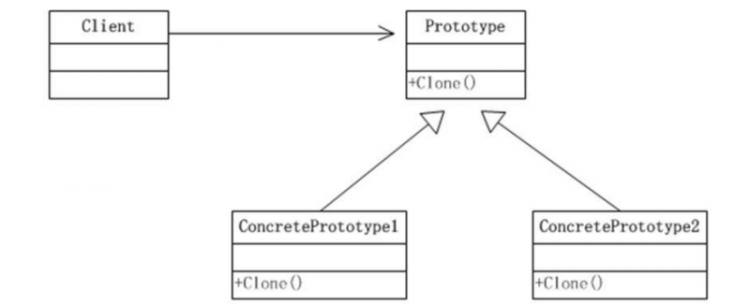
原理结构图说明
Prototype : 原型类,声明一个克隆自己的接口
ConcretePrototype: 具体的原型类, 实现一个克隆自己的操作
Client: 让一个原型对象克隆自己,从而创建一个新的对象(属性一样)
二、通过示例说明情况
我们按照传统方式解决之前提出的克隆羊问题

class Sheep{public String name;
public int age;
public String color;
public Sheep(String name, int age, String color) {
this.name = name;
this.age = age;
this.color = color;
}
public String getName() {
return name;
}
public void setName(String name) {
this.name = name;
}
public int getAge() {
return age;
}
public void setAge(int age) {
this.age = age;
}
public String getColor() {
return color;
}
public void setColor(String color) {
this.color = color;
}
}
我们生成一只羊,然后根据这只羊的属性创建十只羊
public static void main(String[] args) {//传统的方法
Sheep sheep = new Sheep("tom", 1, "白色");
Sheep sheep2 = new Sheep(sheep.getName(), sheep.getAge(), sheep.getColor());
Sheep sheep3 = new Sheep(sheep.getName(), sheep.getAge(), sheep.getColor());
Sheep sheep4 = new Sheep(sheep.getName(), sheep.getAge(), sheep.getColor());
//.........
}
传统的方式的优缺点
- 优点是
比较好理解,简单易操作。 - 在
创建新的对象时,总是需要重新获取原始对象的属性,如果创建的对象比较复杂时,效率较低 - 总是
需要重新初始化对象,而不是动态地获得对象运行时的状态, 不够灵活
改进的思路分析
思路:Java 中 Object 类是所有类的根类,Object 类提供了一个 clone()方法.
该方法可以将一个 Java 对象复制一份,但是需要实现 clone 的Java 类必须要实现一个接口 Cloneable,该接口表示该类能够复制且具有复制的能力 =>原型模式
class Sheep implements Cloneable {//省略关键代码....
//克隆该实例,使用默认的clone方法来完成
@Override
protected Object clone(){
Sheep sheep = null;
try {
sheep = (Sheep) super.clone();
} catch (CloneNotSupportedException e) {
e.printStackTrace();
}
return sheep;
}
}
那么我们是使用demo看看,与传统模式有何变化呢?
public static void main(String[] args) {//传统的方法
Sheep sheep = new Sheep("tom", 1, "白色");
Sheep sheep2 = (Sheep)sheep.clone();
Sheep sheep3 = (Sheep)sheep.clone();
Sheep sheep4 = (Sheep)sheep.clone();
//.........
}
我们在使用原型模式的时候,克隆则就不无需每次new一个对象
并且如果Sheep方法,如何添加了一个字段属性,也会自己完成初始化
class Sheep implements Cloneable {private String name;
private int age;
private String color;
private String address;
public Sheep(String name, int age, String color, String address) {
this.name = name;
this.age = age;
this.color = color;
this.address = address;
}
public String getAddress() {
return address;
}
public void setAddress(String address) {
this.address = address;
}
}
public static void main(String[] args) {//传统的方法
Sheep sheep = new Sheep("tom", 1, "白色","内蒙古");
Sheep sheep2 = (Sheep)sheep.clone();
Sheep sheep3 = (Sheep)sheep.clone();
Sheep sheep4 = (Sheep)sheep.clone();
//.........
}
三、Spring框架源码解析
Spring 中原型 bean 的创建,就是原型模式的应用
我们使用一个类来举例说明一下
class Monster{private Integer id = 10;
private String nickName = "牛魔王";
private String skill = "芭蕉扇";
public Monster() {
System.out.println("monster 创建....");
}
public Monster(Integer id, String nickName, String skill) {
this.id = id;
this.nickName = nickName;
this.skill = skill;
}
public Integer getId() {
return id;
}
public void setId(Integer id) {
this.id = id;
}
public String getNickName() {
return nickName;
}
public void setNickName(String nickName) {
this.nickName = nickName;
}
public String getSkill() {
return skill;
}
public void setSkill(String skill) {
this.skill = skill;
}
}
同时我们这里还有一个bean的xml文件配置
<beans xmlns="http://www.springframework.org/schema/beans"xmlns:xsi="http://www.w3.org/2001/XMLSchema-instance"
xmlns:p="http://www.springframework.org/schema/p"
xmlns:context="http://www.springframework.org/schema/context"
xmlns:mvc="http://www.springframework.org/schema/mvc"
xmlns:util="http://www.springframework.org/schema/util"
xmlns:task="http://www.springframework.org/schema/task"
xsi:schemaLocation="
http://www.springframework.org/schema/mvc
http://www.springframework.org/schema/mvc/spring-mvc-3.0.xsd
http://www.springframework.org/schema/beans
http://www.springframework.org/schema/beans/spring-beans-3.0.xsd
http://www.springframework.org/schema/context
http://www.springframework.org/schema/context/spring-context-3.0.xsd
http://www.springframework.org/schema/util
http://www.springframework.org/schema/util/spring-util-3.0.xsd
http://www.springframework.org/schema/task
http://www.springframework.org/schema/task/spring-task-3.2.xsd"
<!--我们这里的scope="prototype" 即原型模式来创建-->
<bean id="id01" class="com.spring.bean.Monster" scope="prototype"/>
</beans>
接下来我们使用demo,测试原型模式下的bean,获取对象是否相等
public static void main(String[] args) {ApplicationContext applicationContext = new ClassPathXmlApplicationContext("bean.xml");
Object bean1 =applicationContext.getBean("id01");
System.out.println("bean1 = "+bean1);
Object bean2 =applicationContext.getBean("id01");
System.out.println("bean2 = "+bean2);
System.out.println(bean1 == bean2);
}
运行结果如下:
monster 创建....
bean1=Monster{id=10,nickName='牛魔王', skill='芭蕉扇'}
monster 创建....
bean2=Monster{id=10,nickName='牛魔王', skill='芭蕉扇'}
false
说明这两个对象,他的变量相同,但是不是同一个对象,返回了false
那么我们需要知道他是在哪里用到了原型呢?我们debug看看
public abstract class AbstractApplicationContext extends DefaultResourceLoader implements ConfigurableApplicationContext, DisposableBean {//省略其他关键代码....
public Object getBean(String name) throws BeansException {
return this.getBeanFactory().getBean(name);
}
public <T> T getBean(String name, Class<T> requiredType) throws BeansException {
return this.getBeanFactory().getBean(name, requiredType);
}
public <T> T getBean(Class<T> requiredType) throws BeansException {
return this.getBeanFactory().getBean(requiredType);
}
public Object getBean(String name, Object... args) throws BeansException {
return this.getBeanFactory().getBean(name, args);
}
public boolean containsBean(String name) {
return this.getBeanFactory().containsBean(name);
}
public boolean isSingleton(String name) throws NoSuchBeanDefinitionException {
return this.getBeanFactory().isSingleton(name);
}
public boolean isPrototype(String name) throws NoSuchBeanDefinitionException {
return this.getBeanFactory().isPrototype(name);
}
}
我们发现他是采用BeanFactory里的getBean,那么我进到里面去看
public abstract class AbstractRefreshableApplicationContext extends AbstractApplicationContext {//省略其他关键代码....
public final ConfigurableListableBeanFactory getBeanFactory() {
synchronized(this.beanFactoryMonitor) {
if (this.beanFactory == null) {
throw new IllegalStateException("BeanFactory not initialized or already closed - call 'refresh' before accessing beans via the ApplicationContext");
} else {
return this.beanFactory;
}
}
}
}
返回工厂后,我们就进BeanFactory的getBean方法里看看
public abstract class AbstractBeanFactory extends FactoryBeanRegistrySupport implements ConfigurableBeanFactory {//省略其他关键代码....
public AbstractBeanFactory() {}
public AbstractBeanFactory(BeanFactory parentBeanFactory) {
this.parentBeanFactory = parentBeanFactory;
}
public Object getBean(String name) throws BeansException {
return this.doGetBean(name, (Class)null, (Object[])null, false);
}
public <T> T getBean(String name, Class<T> requiredType) throws BeansException {
return this.doGetBean(name, requiredType, (Object[])null, false);
}
public Object getBean(String name, Object... args) throws BeansException {
return this.doGetBean(name, (Class)null, args, false);
}
public <T> T getBean(String name, Class<T> requiredType, Object... args) throws BeansException {
return this.doGetBean(name, requiredType, args, false);
}
}
发现是调用doGetBean方法,那我们再进去doGetBean方法看看
public abstract class AbstractBeanFactory extends FactoryBeanRegistrySupport implements ConfigurableBeanFactory {//省略其他关键代码....
protected <T> T doGetBean(String name, Class<T> requiredType, final Object[] args, boolean typeCheckOnly) throws BeansException {
final String beanName = this.transformedBeanName(name);
Object sharedInstance = this.getSingleton(beanName);
Object bean;
if (sharedInstance != null && args == null) {
if (this.logger.isDebugEnabled()) {
if (this.isSingletonCurrentlyInCreation(beanName)) {
this.logger.debug("Returning eagerly cached instance of singleton bean '" + beanName + "' that is not fully initialized yet - a consequence of a circular reference");
} else {
this.logger.debug("Returning cached instance of singleton bean '" + beanName + "'");
}
}
bean = this.getObjectForBeanInstance(sharedInstance, name, beanName, (RootBeanDefinition)null);
} else {
if (this.isPrototypeCurrentlyInCreation(beanName)) {
throw new BeanCurrentlyInCreationException(beanName);
}
BeanFactory parentBeanFactory = this.getParentBeanFactory();
if (parentBeanFactory != null && !this.containsBeanDefinition(beanName)) {
String nameToLookup = this.originalBeanName(name);
if (args != null) {
return parentBeanFactory.getBean(nameToLookup, args);
}
return parentBeanFactory.getBean(nameToLookup, requiredType);
}
if (!typeCheckOnly) {
this.markBeanAsCreated(beanName);
}
try {
final RootBeanDefinition mbd = this.getMergedLocalBeanDefinition(beanName);
this.checkMergedBeanDefinition(mbd, beanName, args);
String[] dependsOn = mbd.getDependsOn();
String[] arr$;
if (dependsOn != null) {
arr$ = dependsOn;
int len$ = dependsOn.length;
for(int i$ = 0; i$ < len$; ++i$) {
String dependsOnBean = arr$[i$];
this.getBean(dependsOnBean);
this.registerDependentBean(dependsOnBean, beanName);
}
}
if (mbd.isSingleton()) {
sharedInstance = this.getSingleton(beanName, new ObjectFactory<Object>() {
public Object getObject() throws BeansException {
try {
return AbstractBeanFactory.this.createBean(beanName, mbd, args);
} catch (BeansException var2) {
AbstractBeanFactory.this.destroySingleton(beanName);
throw var2;
}
}
});
bean = this.getObjectForBeanInstance(sharedInstance, name, beanName, mbd);
} else if (mbd.isPrototype()) {
arr$ = null;
Object prototypeInstance;
try {
this.beforePrototypeCreation(beanName);
prototypeInstance = this.createBean(beanName, mbd, args);
} finally {
this.afterPrototypeCreation(beanName);
}
bean = this.getObjectForBeanInstance(prototypeInstance, name, beanName, mbd);
} else {
String scopeName = mbd.getScope();
Scope scope = (Scope)this.scopes.get(scopeName);
if (scope == null) {
throw new IllegalStateException("No Scope registered for scope '" + scopeName + "'");
}
try {
Object scopedInstance = scope.get(beanName, new ObjectFactory<Object>() {
public Object getObject() throws BeansException {
AbstractBeanFactory.this.beforePrototypeCreation(beanName);
Object var1;
try {
var1 = AbstractBeanFactory.this.createBean(beanName, mbd, args);
} finally {
AbstractBeanFactory.this.afterPrototypeCreation(beanName);
}
return var1;
}
});
bean = this.getObjectForBeanInstance(scopedInstance, name, beanName, mbd);
} catch (IllegalStateException var21) {
throw new BeanCreationException(beanName, "Scope '" + scopeName + "' is not active for the current thread; " + "consider defining a scoped proxy for this bean if you intend to refer to it from a singleton", var21);
}
}
} catch (BeansException var23) {
this.cleanupAfterBeanCreationFailure(beanName);
throw var23;
}
}
if (requiredType != null && bean != null && !requiredType.isAssignableFrom(bean.getClass())) {
try {
return this.getTypeConverter().convertIfNecessary(bean, requiredType);
} catch (TypeMismatchException var22) {
if (this.logger.isDebugEnabled()) {
this.logger.debug("Failed to convert bean '" + name + "' to required type [" + ClassUtils.getQualifiedName(requiredType) + "]", var22);
}
throw new BeanNotOfRequiredTypeException(name, requiredType, bean.getClass());
}
} else {
return bean;
}
}
}
代码很多,我这里采用图片的方式标注出来
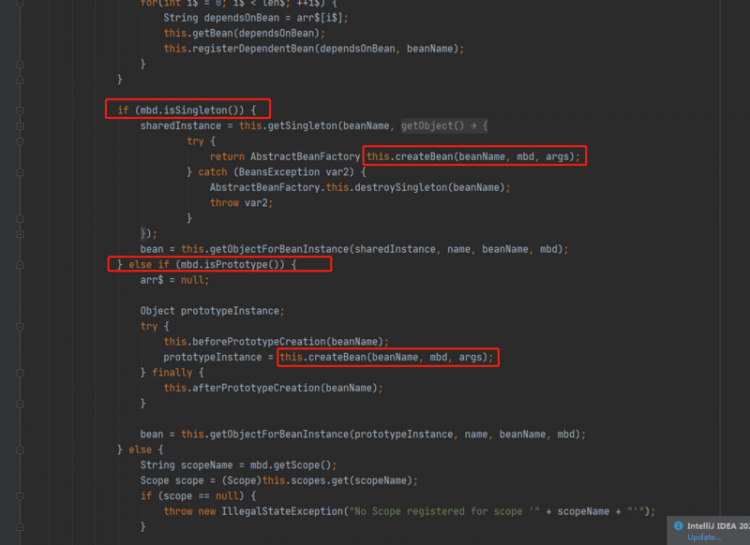
关于在spring框架中原型模式,由于小编水平有限,暂且先了解这么多
四、浅拷贝和深拷贝
浅拷贝的介绍
对于数据类型是基本数据类型的成员变量,浅拷贝会直接进行值传递,也就是将该属性值复制一份给新的对象。
对于数据类型是引用数据类型的成员变量,比如说成员变量是某个数组、某个类的对象等,那么浅拷贝会进行引用传递,也就是只是将该成员变量的引用值(内存地址)复制一份给新的对象。
为实际上两个对象的该成员变量都指向同一个实例。
在这种情况下,在一个对象中修改该成员变量会影响到另一个对象的该成员变量值
比如说之前克隆羊,我们添加一个对象字段
class Sheep implements Cloneable {//省略其他关键性代码.....
private Sheep friend;
public Sheep(String name, int age, String color, String address, Sheep friend) {
this.name = name;
this.age = age;
this.color = color;
this.address = address;
this.friend = friend;
}
public Sheep getFriend() {
return friend;
}
public void setFriend(Sheep friend) {
this.friend = friend;
}
}
这时我们创建demo ,一起看看体会引用拷贝地址指向新对象
public static void main(String[] args) {Sheep friend = new Sheep("jack", 2, "黑色","内蒙古");
Sheep sheep = new Sheep("tom", 1, "白色","内蒙古",friend);
Sheep sheep2 = (Sheep)sheep.clone();
Sheep sheep3 = (Sheep)sheep.clone();
Sheep sheep4 = (Sheep)sheep.clone();
System.out.println(sheep2 + "hashCode"+sheep2.friend.hashCode());
System.out.println(sheep3+ "hashCode"+sheep3.friend.hashCode());
System.out.println(sheep4+ "hashCode"+sheep4.friend.hashCode());
}
运行结果如下:
Sheep{name='tom', age=1, color='白色', address='内蒙古}hashCode460141958
Sheep{name='tom', age=1, color='白色', address='内蒙古}hashCode460141958
Sheep{name='tom', age=1, color='白色', address='内蒙古}hashCode460141958
有没有发现,我们输出好朋友的时候,都是指向同一个地址
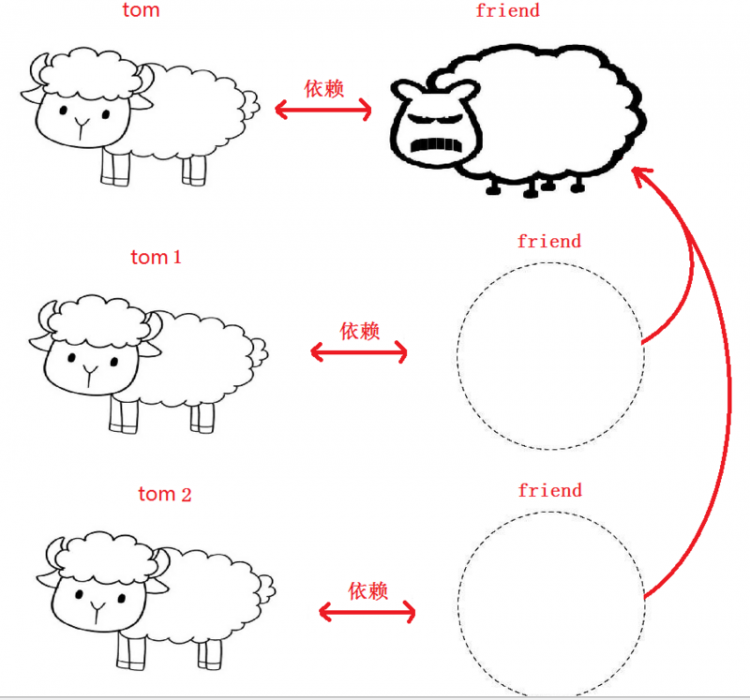
这证明我们没有真正的拷贝一个好朋友的对象,我们称这为浅拷贝
浅拷贝是使用默认的 clone()方法来实现:就是sheep = (Sheep) super.clone();
深拷贝基本介绍
复制对象的所有基本数据类型的成员变量值
为所有引用数据类型的成员变量申请存储空间,并复制每个引用数据类型成员变量所引用的对象,直到该对象可达的所有对象。也就是说,对象进行深拷贝要对整个对象(包括对象的引用类型)进行拷贝
深拷贝实现方式 1:重写 clone 方法来实现深拷贝
深拷贝实现方式 2:通过对象序列化实现深拷贝(推荐)
我们通过新的示例类来举例说明这两种情况
class DeepCloneableTarget implements Cloneable {public String name; //String 属 性
public String cloneClass; //String 属 性
public DeepCloneableTarget() {
super();
}
public DeepCloneableTarget(String name, String cloneClass) {
this.name = name;
this.cloneClass = cloneClass;
}
public String getName() {
return name;
}
public void setName(String name) {
this.name = name;
}
public String getCloneClass() {
return cloneClass;
}
public void setCloneClass(String cloneClass) {
this.cloneClass = cloneClass;
}
@Override
protected Object clone() throws CloneNotSupportedException {
return super.clone();
}
}
我们使用默认的拷贝方法,现在我们添加多一个类添加对象引用
class DeepProtoType implements Cloneable {public String name; //String 属 性
public DeepCloneableTarget deepCloneableTarget;// 引用类型
public DeepProtoType() {}
public DeepProtoType(String name, DeepCloneableTarget deepCloneableTarget) {
this.name = name;
this.deepCloneableTarget = deepCloneableTarget;
}
public String getName() {
return name;
}
public void setName(String name) {
this.name = name;
}
public DeepCloneableTarget getDeepCloneableTarget() {
return deepCloneableTarget;
}
public void setDeepCloneableTarget(DeepCloneableTarget deepCloneableTarget) {
this.deepCloneableTarget = deepCloneableTarget;
}
}
那么我们的第一种方式是:采用重写 clone 方法来实现深拷贝
class DeepProtoType implements Cloneable {//省略其他关键代码....
@Override
protected Object clone() throws CloneNotSupportedException {
//完成对基本数据类型和String类型的拷贝
Object deep = null;
deep = super.clone();
//再完成对类里的引用类型拷贝
DeepProtoType deepProtoType = (DeepProtoType)deep;
deepProtoType.setDeepCloneableTarget((DeepCloneableTarget)deepCloneableTarget.clone());
return deepProtoType;
}
}
接下里我们使用demo 看看第一种方式的深拷贝效果怎么样?
public static void main(String[] args) {DeepCloneableTarget target = new DeepCloneableTarget("大牛", "大牛的类");
DeepProtoType p1 = new DeepProtoType();
p1.setName("小明");
p1.setDeepCloneableTarget(target);
try {
//方式 1 完成深拷贝
DeepProtoType p2 = (DeepProtoType)p1.clone();
System.out.println("p1.name = " + p1.name + " p1.deepCloneableTarget=" + p1.deepCloneableTarget.hashCode());
System.out.println("p2.name = " + p1.name + " p2.deepCloneableTarget=" + p2.deepCloneableTarget.hashCode());
} catch (CloneNotSupportedException e) {
e.printStackTrace();
}
}
运行结果如下:
p1.name = 小明 p1.deepCloneableTarget=460141958
p2.name = 小明 p2.deepCloneableTarget=1163157884
这种方式采用先拷贝基本数据类型再拷贝引用类型
1.这种方式如果DeepCloneableTarget里也有引用类型的类,那么它也需要重写这个方法,这就会导致多重重写
2.如果多个类的引用就会导致很繁琐,工作量巨大,关系复杂
结论:只适合一层关系的引用,实际不太推荐
那么我们的第二种方式是:通过对象序列化实现深拷贝(推荐)
使用序列化的方式,我们需要实现Serializable接口
public class DeepProtoType implements Serializable, Cloneable{//省略其他关键代码....
}
public class DeepCloneableTarget implements Serializable, Cloneable{
//省略其他关键代码....
}
public class DeepProtoType implements Serializable, Cloneable{//省略其他关键代码....
//深拷贝 - 方式 2 通过对象的序列化实现 (推荐)
public Object deepClone() {
//创建流对象
ByteArrayOutputStream bos = null;
ObjectOutputStream oos = null;
ByteArrayInputStream bis = null;
ObjectInputStream ois = null;
try {
//序列化
bos = new ByteArrayOutputStream();
oos = new ObjectOutputStream(bos);
oos.writeObject(this); //当前这个对象以对象流的方式输出
//反序列化
bis = new ByteArrayInputStream(bos.toByteArray());
ois = new ObjectInputStream(bis);
DeepProtoType copyObj = (DeepProtoType) ois.readObject();
return copyObj;
} catch (Exception e) {
return null;
} finally {
//关闭流
try {
bos.close();
oos.close();
bis.close();
ois.close();
} catch (Exception e2) {
}
}
}
}
接下里我们使用demo 看看第二种方式的深拷贝效果怎么样?
public static void main(String[] args) {DeepCloneableTarget target = new DeepCloneableTarget("大牛", "小牛");
DeepProtoType p1 = new DeepProtoType();
p1.setName("小明");
p1.setDeepCloneableTarget(target);
//方式 2 完成深拷贝
DeepProtoType p2 = (DeepProtoType) p1.deepClone();
System.out.println("p1.name = " + p1.name + " p1.deepCloneableTarget=" + p1.deepCloneableTarget.hashCode());
System.out.println("p2.name = " + p1.name + " p2.deepCloneableTarget=" + p2.deepCloneableTarget.hashCode());
}
运行结果如下:
p1.name = 小明 p1.deepCloneableTarget=1836019240
p2.name = 小明 p2.deepCloneableTarget=363771819
五、原型模式的注意事项和细节
创建新的对象比较复杂时,可以利用原型模式简化对象的创建过程,同时也能够提高效率
不用重新初始化对象,而是动态地获得对象运行时的状态
如果原始对象发生变化(增加或者减少属性),其它克隆对象的也会发生相应的变化,无需修改代码
在实现深克隆的时候可能需要比较复杂的代码
缺点:需要为每一个类配备一个克隆方法,这对全新的类来说不是很难,但对已有的类进行改造时,需要修改其源代码,违背了 ocp 原则,这点请注意.
参考资料
尚硅谷:设计模式(韩顺平老师):单例模式
Refactoring.Guru:《深入设计模式》
以上是 【Java】我所知道设计模式之原型模式 的全部内容, 来源链接: utcz.com/a/97218.html

