【Python】20 行代码:Serverless 架构下用 Python 轻松搞定图像分类和预测

作者 | 江昱
前言
图像分类是人工智能领域的一个热门话题。通俗解释就是,根据各自在图像信息中所反映的不同特征,把不同类别的目标区分开来的图像处理方法。
它利用计算机对图像进行定量分析,把图像或图像中的每个像元或区域划归为若干个类别中的某一种,以代替人的视觉判读。
图像分类在实际生产生活中也是经常遇到的,而且针对不同领域或者需求有着很强的针对性。例如通过拍摄花朵识别花朵信息、通过人脸比对人物信息等。
通常情况下,这些图像识别或者分类的工具,都是在客户端进行数据采集,在服务端进行运算获得结果,也就是说一般情况下都是有专门的 API 实现图像识别的。例如各大云厂商都会为我们有偿提供类似的能力:
阿里云图像识别页面:

华为云图像识别页面:

本文将会通过一个有趣的 Python 库,快速将图像分类的功能搭建在云函数上,并且和 API 网关结合,对外提供 API 功能,实现一个 Serverless 架构的“图像分类 API”。
首先和大家介绍一下需要的依赖库:ImageAI。通过该依赖的官方文档我们可以看到这样的描述:
也就是说这个依赖库,可以帮助我们完成基本的图像识别和视频的目标提取,虽然他给了一些数据集和模型,但是我们也可以根据自身需要对其进行额外的训练,进行定制化拓展。通过官方给的代码,我们可以看到一个简单的 Demo:
# -*- coding: utf-8 -*-from imageai.Prediction import ImagePrediction
# 模型加载
prediction = ImagePrediction()
prediction.setModelTypeAsResNet()
prediction.setModelPath("resnet50_weights_tf_dim_ordering_tf_kernels.h5")
prediction.loadModel()
predictions, probabilities = prediction.predictImage("./picture.jpg", result_count=5 )
for eachPrediction, eachProbability in zip(predictions, probabilities):
print(str(eachPrediction) + " : " + str(eachProbability))
当我们指定的 picture.jpg 图片为:
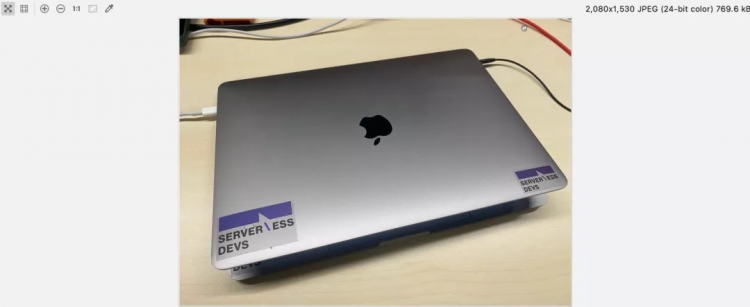
我们在执行之后的结果是:
laptop : 71.43893241882324notebook : 16.265612840652466
modem : 4.899394512176514
hard_disc : 4.007557779550552
mouse : 1.2981942854821682
如果在使用过程中觉得模型 resnet50_weights_tf_dim_ordering_tf_kernels.h5 过大,耗时过长,可以按需求选择模型:
- SqueezeNet(文件大小:4.82 MB,预测时间最短,精准度适中)
- ResNet50 by Microsoft Research (文件大小:98 MB,预测时间较快,精准度高)
- InceptionV3 by Google Brain team (文件大小:91.6 MB,预测时间慢,精度更高)
- DenseNet121 by Facebook AI Research (文件大小:31.6 MB,预测时间较慢,精度最高)
模型下载地址可参考 Github 地址:
https://github.com/OlafenwaMoses/ImageAI/releases/tag/1.0
或者参考 ImageAI 官方文档:
https://imageai-cn.readthedocs.io/zh_CN/latest/ImageAI_Image_Prediction.html
项目 Serverless 化
将项目按照函数计算的需求,编写好入口方法,以及做好项目初始化,同时在当前项目下创建文件夹 model,并将模型文件拷贝到该文件夹:

项目整体流程:

实现代码:
# -*- coding: utf-8 -*-from imageai.Prediction import ImagePrediction
import json
import uuid
import base64
import random
# Response
class Response:
def __init__(self, start_response, response, errorCode=None):
self.start = start_response
responseBody = {
'Error': {"Code": errorCode, "Message": response},
} if errorCode else {
'Response': response
}
# 默认增加uuid,便于后期定位
responseBody['ResponseId'] = str(uuid.uuid1())
print("Response: ", json.dumps(responseBody))
self.response = json.dumps(responseBody)
def __iter__(self):
status = '200'
response_headers = [('Content-type', 'application/json; charset=UTF-8')]
self.start(status, response_headers)
yield self.response.encode("utf-8")
# 随机字符串
randomStr = lambda num=5: "".join(random.sample('abcdefghijklmnopqrstuvwxyz', num))
# 模型加载
print("Init model")
prediction = ImagePrediction()
prediction.setModelTypeAsResNet()
print("Load model")
prediction.setModelPath("/mnt/auto/model/resnet50_weights_tf_dim_ordering_tf_kernels.h5")
prediction.loadModel()
print("Load complete")
def handler(environ, start_response):
try:
request_body_size = int(environ.get('CONTENT_LENGTH', 0))
except (ValueError):
request_body_size = 0
requestBody = json.loads(environ['wsgi.input'].read(request_body_size).decode("utf-8"))
# 图片获取
print("Get pucture")
imageName = randomStr(10)
imageData = base64.b64decode(requestBody["image"])
imagePath = "/tmp/" + imageName
with open(imagePath, 'wb') as f:
f.write(imageData)
# 内容预测
print("Predicting ... ")
result = {}
predictions, probabilities = prediction.predictImage(imagePath, result_count=5)
print(zip(predictions, probabilities))
for eachPrediction, eachProbability in zip(predictions, probabilities):
result[str(eachPrediction)] = str(eachProbability)
return Response(start_response, result)
所需要的依赖:
tensorflow==1.13.1numpy==1.19.4
scipy==1.5.4
opencv-python==4.4.0.46
pillow==8.0.1
matplotlib==3.3.3
h5py==3.1.0
keras==2.4.3
imageai==2.1.5
编写部署所需要的配置文件:
ServerlessBookImageAIDemo:Component: fc
Provider: alibaba
Access: release
Properties:
Region: cn-beijing
Service:
Name: ServerlessBook
Description: Serverless图书案例
Log: Auto
Nas: Auto
Function:
Name: serverless_imageAI
Description: 图片目标检测
CodeUri:
Src: ./src
Excludes:
- src/.fun
- src/model
Handler: index.handler
Environment:
- Key: PYTHONUSERBASE
Value: /mnt/auto/.fun/python
MemorySize: 3072
Runtime: python3
Timeout: 60
Triggers:
- Name: ImageAI
Type: HTTP
Parameters:
AuthType: ANONYMOUS
Methods:
- GET
- POST
- PUT
Domains:
- Domain: Auto
项目部署与测试
在完成上述步骤之后,可以通过:
s deploy进行项目部署,部署完成可以看到结果:

完成部署之后,可以通过:
s install docker进行依赖的安装:
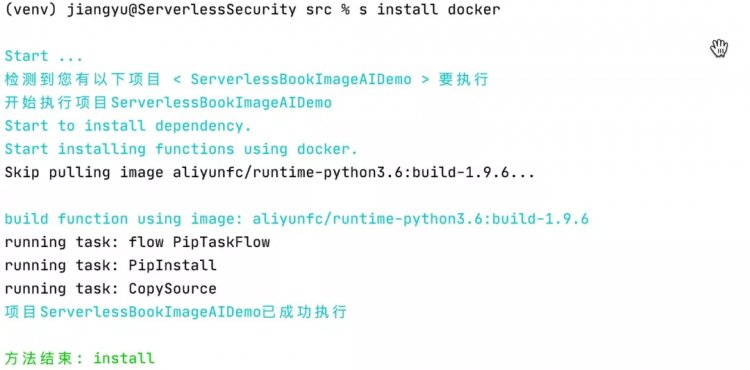
依赖安装完成可以看到在目录下生成了 .fun 的目录,该目录就是通过 docker 打包出来的依赖文件,这些依赖正是我们在 requirements.txt 文件中声明的依赖内容。
完成之后,我们通过:
s nas sync ./src/.fun将依赖目录打包上传到 nas,成功之后再将 model 目录打包上传:
s nas sync ./src/model完成之后可以通过:
s nas ls --all查看目录详情:
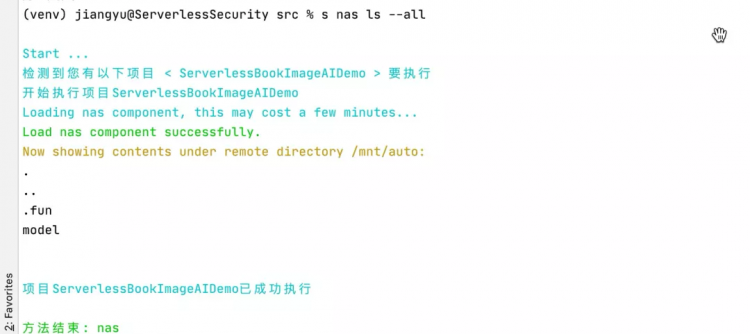
完成之后,我们可以编写脚本进行测试,同样适用刚才的测试图片,通过代码:
import jsonimport urllib.request
import base64
import time
with open("picture.jpg", 'rb') as f:
data = base64.b64encode(f.read()).decode()
url = 'http://35685264-1295939377467795.test.functioncompute.com/'
timeStart = time.time()
print(urllib.request.urlopen(urllib.request.Request(
url=url,
data=json.dumps({'image': data}).encode("utf-8")
)).read().decode("utf-8"))
print("Time: ", time.time() - timeStart)
可以看到结果:
{"Response": {"laptop": "71.43893837928772", "notebook": "16.265614330768585", "modem": "4.899385944008827", "hard_disc": "4.007565602660179", "mouse": "1.2981869280338287"}, "ResponseId": "1d74ae7e-298a-11eb-8374-024215000701"}Time: 29.16020894050598
可以看到,函数计算顺利地返回了预期结果,但是整体耗时却超乎想象,有近 30s,此时我们再次执行一下测试脚本:
{"Response": {"laptop": "71.43893837928772", "notebook": "16.265614330768585", "modem": "4.899385944008827", "hard_disc": "4.007565602660179", "mouse": "1.2981869280338287"}, "ResponseId": "4b8be48a-298a-11eb-ba97-024215000501"}Time: 1.1511380672454834
可以看到,再次执行的时间仅有 1.15 秒,比上次整整提升了 28 秒之多。
项目优化
在上一轮的测试中可以看到,项目首次启动和二次启动的耗时差距,其实这个时间差,主要是函数在加载模型的时候浪费了极长的时间。
即使在本地,我们也可以简单测试:
# -*- coding: utf-8 -*-import time
timeStart = time.time()
# 模型加载
from imageai.Prediction import ImagePrediction
prediction = ImagePrediction()
prediction.setModelTypeAsResNet()
prediction.setModelPath("resnet50_weights_tf_dim_ordering_tf_kernels.h5")
prediction.loadModel()
print("Load Time: ", time.time() - timeStart)
timeStart = time.time()
predictions, probabilities = prediction.predictImage("./picture.jpg", result_count=5)
for eachPrediction, eachProbability in zip(predictions, probabilities):
print(str(eachPrediction) + " : " + str(eachProbability))
print("Predict Time: ", time.time() - timeStart)
执行结果:
Load Time: 5.549695014953613laptop : 71.43893241882324
notebook : 16.265612840652466
modem : 4.899394512176514
hard_disc : 4.007557779550552
mouse : 1.2981942854821682
Predict Time: 0.8137111663818359
可以看到,在加载 imageAI 模块以及加载模型文件的过程中,一共耗时 5.5 秒,在预测部分仅有不到 1 秒钟的时间。而在函数计算中,机器性能本身就没有我本地的性能高,此时为了避免每次装载模型导致的响应时间过长,在部署的代码中,可以看到模型装载过程实际上是被放在了入口方法之外。这样做的一个好处是,项目每次执行的时候,不一定会有冷启动,也就是说在某些复用的前提下是可以复用一些对象的,即无需每次都重新加载模型、导入依赖等。
所以在实际项目中,为了避免频繁请求,实例重复装载、创建某些资源,我们可以将部分资源放在初始化的时候进行。这样可以大幅度提高项目的整体性能,同时配合厂商所提供的预留能力,可以基本上杜绝函数冷启动带来的负面影响。
总结
近年来,人工智能与云计算的发展突飞猛进,在 Serverless 架构中,如何运行传统的人工智能项目已经逐渐成为很多人所需要了解的事情。本文主要介绍了通过一个已有的依赖库(ImageAI)实现一个图像分类和预测的接口。借助这个例子,其实有几个事情是可以被明确的:
- Serverless 架构可以运行人工智能相关项目;
- Serverless 可以很好地兼容 Tensorflow 等机器学习/深度学习的工具;
- 虽然说函数计算本身有空间限制,但是实际上增加了硬盘挂载能力之后,函数计算本身的能力将会得到大幅度的拓展。
当然,本文也算是抛砖引玉,希望读者在本文之后,可以发挥自己的想象,将更多的 AI 项目与 Serverless 架构进行进一步结合。
以上是 【Python】20 行代码:Serverless 架构下用 Python 轻松搞定图像分类和预测 的全部内容, 来源链接: utcz.com/a/95566.html


