【小程序】记录一下微信小程序图片拖拽,放大,位移效果实现
记录一下微信小程序图片拖拽,放大,位移效果实现
冷山冷杉发布于 2020-06-05
因为需求需要对图片进行操作,放大,位移,旋转等
思路也是参考别的博客
这个写的比较全
https://blog.csdn.net/king096...
我看的第一篇是这个
https://www.jb51.net/article/...
实现思路
1 在一个区域里绘制图片,
2 记录所有图片的坐标,旋转角度,尺寸,中心点,缩放比例
3 创建cavnas画布,白底色,然后根据记录的图片的一些状态绘制
4 根据canvas生产出图片
先上效果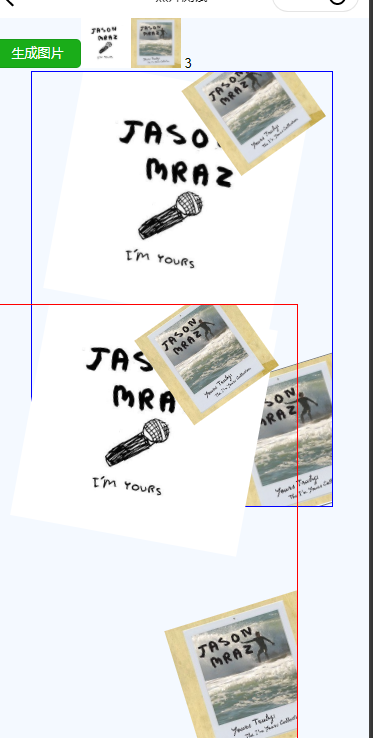
蓝框为拖拽区域
红框为cavnas绘制部分
贴代码
wxml
canvas标签正常情况下应该是隐藏或者让他定位到十万八千里外
因为需要展示效果,所以就没有隐藏,实际上线可以自己隐藏掉
<view class="container"><button class="mini-btn" bindtap="generate" type="primary" size="mini">生成图片</button>
<block wx:for="{{materialList}}" wx:key="index">
<image class="img-list" bindtap="addImg" data-index="{{index}}" mode="aspectFit" ></image>
</block>
{{itemList.length}}
<view class="img-box" id="img-box">
<!-- *************操作区域************* -->
<block wx:for="{{itemList}}" wx:key="index">
<!-- 圆心坐标 <text></text> -->
<!-- {{item.scale}}---{{item.r}} -->
<view class='touchWrap'>
<view class='imgWrap {{item.active? "touchActive":""}}'>
<view>
<image class="item-img" src='https://segmentfault.com/a/1190000022852750/{{item.image}}' bindload='loadImg' data-index="{{index}}" data-id='{{item.id}}' bindtouchstart='wraptouchStart' bindtouchmove='WraptouchMove'></image>
</view>
<!-- <image src='https://segmentfault.com/a/1190000022852750/{{item.image}}' bindload='loadImg' bindtouchend='WraptouchEnd'></image> -->
<image class='x' hidden="{{!item.active}}" bindtap="hiddenImg" data-index="{{index}}" src='https://segmentfault.com/assets/img/wqy-close.png' data-id='{{item.id}}'></image>
<image class='o' hidden="{{!item.active}}" data-index="{{index}}" src='https://segmentfault.com/assets/img/wqy-stretch.png' data-id='{{item.id}}' bindtouchstart='touchStart' bindtouchmove='touchMove'>
</image>
</view>
</view>
</block>
</view>
<canvas class='maskCanvas' canvas-id="maskCanvas"></canvas>
</view>
js部分
/** @Description:
* @Author: 冷山冷杉 <[email protected]>
* @Date: 2020-06-04 11:58:14
* @LastEditTime: 2020-06-05 16:14:51
* @LastEditors: 冷山冷杉 <[email protected]>
* @FilePath: \mini-fullalumni\pages\photoTest\photoTest.js
*/
const app = getApp()
const maskCanvas = wx.createCanvasContext('maskCanvas', this)
let items = []
Page({
data: {
itemList: [
],
materialList: [
{
id: null,
image: 'https://img3.doubanio.com/view/subject/m/public/s9074663.jpg',//图片地址
top: 0,//初始图片的位置
left: 0,
x: 0, //初始圆心位置,可再downImg之后又宽高和初始的图片位置得出
y: 0,
scale: 1,//缩放比例 1为不缩放
angle: 0,//旋转角度
active: true //判定点击状态
},
{
id: null,
image: 'https://img9.doubanio.com/view/subject/m/public/s3893375.jpg',
top: 0,
left: 0,
x: 0,
y: 0,
scale: 1,
angle: 0,
active: false
}
],
canvasWidth: null,
canvasHeight: null
},
onReady() {
const query = wx.createSelectorQuery()
query.select('#img-box').boundingClientRect()
query.selectViewport().scrollOffset()
query.exec((res) => {
this.setData({
canvasWidth: res[0].width,
canvasHeight: res[0].height
})
})
// wx.getSystemInfo({ // 获取系统信息
// success: sysData => {
// this.sysData = sysData
// // 设置画布宽高,this.sysData.windowWidth为屏幕的宽度
// this.setData({
// canvasWidth: this.sysData.windowWidth, // 如果觉得不清晰的话,可以把所有组件、宽高放大一倍
// canvasHeight: this.sysData.windowWidth
// })
// }
// })
},
addImg(e) {
let index = e.currentTarget.dataset.index
let materialList = this.data.materialList
let itemList = this.data.itemList
if (itemList.length) {
materialList[index].id = itemList[itemList.length - 1].id + 1
} else {
materialList[index].id = 1
}
itemList.push(JSON.parse(JSON.stringify(materialList[index])))
this.setData({ itemList })
},
loadImg(e) {
let index = e.currentTarget.dataset.index
let itemList = this.data.itemList
// x,y为圆心的距离, +25: 按钮定位的距离 + 按钮自身大小/2
itemList[index].width = e.detail.width
itemList[index].height = e.detail.height
itemList[index].x = e.detail.width / 2 + 25
itemList[index].y = e.detail.height / 2 + 25
this.setData({ itemList })
},
hiddenImg(e) {
let index = e.currentTarget.dataset.index
let itemList = this.data.itemList
itemList.splice(index, 1)
this.setData({ itemList })
},
wraptouchStart: function (e) {
let items = this.data.itemList;
for (let i = 0; i < items.length; i++) { //旋转数据找到点击的
items[i].active = false;
if (e.currentTarget.dataset.id == items[i].id) {
items[i].active = true; //开启点击属性
items[i].lx = e.touches[0].clientX; // 记录点击时的坐标值
items[i].ly = e.touches[0].clientY;
}
}
this.setData({ //赋值
itemList: items
})
},
WraptouchMove: function (e) {
let index = e.currentTarget.dataset.index
let items = this.data.itemList;
//移动时的坐标值也写图片的属性里
items[index]._lx = e.touches[0].clientX;
items[index]._ly = e.touches[0].clientY;
//追加改动值
items[index].left += items[index]._lx - items[index].lx; // x方向
items[index].top += items[index]._ly - items[index].ly; // y方向
items[index].x += items[index]._lx - items[index].lx;
items[index].y += items[index]._ly - items[index].ly;
//把新的值赋给老的值
items[index].lx = e.touches[0].clientX;
items[index].ly = e.touches[0].clientY;
this.setData({//赋值就移动了
itemList: items
})
},
// 触摸开始事件 items是this.data.itemList的全局变量,便于赋值 所有的值都应给到对应的对象里
touchStart: function (e) {
//找到点击的那个图片对象,并记录
let items = this.data.itemList;
let index = e.currentTarget.dataset.index
for (let i = 0; i < items.length; i++) {
items[i].active = false;
if (e.currentTarget.dataset.id == items[i].id) {
items[i].active = true;
}
}
//获取作为移动前角度的坐标
items[index].tx = e.touches[0].clientX;
items[index].ty = e.touches[0].clientY;
//移动前的角度
items[index].anglePre = this.countDeg(items[index].x, items[index].y, items[index].tx, items[index].ty)
//获取图片半径
items[index].r = this.getDistancs(items[index].x, items[index].y, items[index].left, items[index].top)
},
// 触摸移动事件
touchMove: function (e) {
let items = this.data.itemList;
let index = e.currentTarget.dataset.index
// items[index].x = e.detail.width / 2
// items[index].y = e.detail.height / 2
// this.setData({itemList: items})
//记录移动后的位置
items[index]._tx = e.touches[0].clientX;
items[index]._ty = e.touches[0].clientY;
//移动的点到圆心的距离 * 因为圆心的坐标是相对与父元素定位的 ,所有要减去父元素的OffsetLeft和OffsetTop来计算移动的点到圆心的距离
items[index].disPtoO = this.getDistancs(items[index].x, items[index].y, items[index]._tx, items[index]._ty)
items[index].scale = items[index].disPtoO / items[index].r; //手指滑动的点到圆心的距离与半径的比值作为图片的放大比例
items[index].oScale = 1 / items[index].scale;//图片放大响应的右下角按钮同比缩小
//移动后位置的角度
items[index].angleNext = this.countDeg(items[index].x, items[index].y, items[index]._tx, items[index]._ty)
//角度差
items[index].new_rotate = items[index].angleNext - items[index].anglePre;
//叠加的角度差
items[index].angle += items[index].new_rotate;
//用过移动后的坐标赋值为移动前坐标
items[index].tx = e.touches[0].clientX;
items[index].ty = e.touches[0].clientY;
items[index].anglePre = this.countDeg(items[index].x, items[index].y, items[index].tx, items[index].ty)
//赋值setData渲染
this.setData({
itemList: items
})
},
/*
*参数1和2为图片圆心坐标
*参数3和4为手点击的坐标
*返回值为手点击的坐标到圆心的角度
*/
countDeg: function (cx, cy, pointer_x, pointer_y) {
var ox = pointer_x - cx;
var oy = pointer_y - cy;
var to = Math.abs(ox / oy);
var angle = Math.atan(to) / (2 * Math.PI) * 360;//鼠标相对于旋转中心的角度
if (ox < 0 && oy < 0)//相对在左上角,第四象限,js中坐标系是从左上角开始的,这里的象限是正常坐标系
{
angle = -angle;
} else if (ox <= 0 && oy >= 0)//左下角,3象限
{
angle = -(180 - angle)
} else if (ox > 0 && oy < 0)//右上角,1象限
{
angle = angle;
} else if (ox > 0 && oy > 0)//右下角,2象限
{
angle = 180 - angle;
}
return angle;
},
getDistancs(cx, cy, pointer_x, pointer_y) {
var ox = pointer_x - cx;
var oy = pointer_y - cy;
return Math.sqrt(
ox * ox + oy * oy
);
},
generate: function () {
maskCanvas.save();
maskCanvas.beginPath();
//一张白图
maskCanvas.setFillStyle('#fff');
maskCanvas.fillRect(0, 0, this.data.windowWidth, this.data.canvasHeight)
maskCanvas.closePath();
maskCanvas.stroke();
this.data.itemList.forEach((val, index) => {
maskCanvas.save();
maskCanvas.translate(0, 0);
maskCanvas.beginPath();
maskCanvas.translate(val.x, val.y); // 圆心坐标
maskCanvas.rotate(val.angle * Math.PI / 180);
maskCanvas.translate(-(val.width * val.scale / 2) - 25, -(val.height * val.scale / 2) - 25)
maskCanvas.drawImage(val.image, 0, 0, val.width * val.scale, val.height * val.scale);
maskCanvas.restore();
})
maskCanvas.draw(false, (e) => {
wx.canvasToTempFilePath({
canvasId: 'maskCanvas',
success: res => {
this.setData({
canvasTemImg: res.tempFilePath
})
console.log(res.tempFilePath);
}
}, this)
})
}
})
css
page{height:100%;
}
.img-list{
width: 100rpx;
height: 100rpx
}
.container{
height: 100%;
}
.img-box {
position: relative;
width: 80%;
overflow: hidden;
margin: auto;
border: 1px solid blue;
height: 60%;
}
.maskCanvas {
/* display: none; */
position: absolute;
left: 0;
bottom: 0;
border:1px solid red;
}
.o, .x {
width: 40rpx;
height: 40rpx;
position: absolute;
}
.o{
bottom: -20px;
right: -20px;
}
.x{
top: -20px;
left: -20px
}
.touchWrap {
position: absolute;
}
.imgWrap{
border: 1px solid transparent;
}
.touchActive{
border: 1px solid black;
}
jason
{"navigationBarTitleText": "照片测试",
"usingComponents": {},
"disableScroll": true
}
这是个demo,自己大概测过没问题
因为页面简洁,如果要放在页面上换样式,可能会有问题
仅供参考,仅供参考!
javascriptcanvas小程序
阅读 1.1k发布于 2020-06-05
本作品系原创,采用《署名-非商业性使用-禁止演绎 4.0 国际》许可协议
冷山冷杉
还有头发的前端复制粘贴工程师
20 声望
0 粉丝
冷山冷杉
还有头发的前端复制粘贴工程师
20 声望
0 粉丝
宣传栏
因为需求需要对图片进行操作,放大,位移,旋转等
思路也是参考别的博客
这个写的比较全
https://blog.csdn.net/king096...
我看的第一篇是这个
https://www.jb51.net/article/...
实现思路
1 在一个区域里绘制图片,
2 记录所有图片的坐标,旋转角度,尺寸,中心点,缩放比例
3 创建cavnas画布,白底色,然后根据记录的图片的一些状态绘制
4 根据canvas生产出图片
先上效果
蓝框为拖拽区域
红框为cavnas绘制部分
贴代码
wxml
canvas标签正常情况下应该是隐藏或者让他定位到十万八千里外
因为需要展示效果,所以就没有隐藏,实际上线可以自己隐藏掉
<view class="container"><button class="mini-btn" bindtap="generate" type="primary" size="mini">生成图片</button>
<block wx:for="{{materialList}}" wx:key="index">
<image class="img-list" bindtap="addImg" data-index="{{index}}" mode="aspectFit" ></image>
</block>
{{itemList.length}}
<view class="img-box" id="img-box">
<!-- *************操作区域************* -->
<block wx:for="{{itemList}}" wx:key="index">
<!-- 圆心坐标 <text></text> -->
<!-- {{item.scale}}---{{item.r}} -->
<view class='touchWrap'>
<view class='imgWrap {{item.active? "touchActive":""}}'>
<view>
<image class="item-img" src='https://segmentfault.com/a/1190000022852750/{{item.image}}' bindload='loadImg' data-index="{{index}}" data-id='{{item.id}}' bindtouchstart='wraptouchStart' bindtouchmove='WraptouchMove'></image>
</view>
<!-- <image src='https://segmentfault.com/a/1190000022852750/{{item.image}}' bindload='loadImg' bindtouchend='WraptouchEnd'></image> -->
<image class='x' hidden="{{!item.active}}" bindtap="hiddenImg" data-index="{{index}}" src='https://segmentfault.com/assets/img/wqy-close.png' data-id='{{item.id}}'></image>
<image class='o' hidden="{{!item.active}}" data-index="{{index}}" src='https://segmentfault.com/assets/img/wqy-stretch.png' data-id='{{item.id}}' bindtouchstart='touchStart' bindtouchmove='touchMove'>
</image>
</view>
</view>
</block>
</view>
<canvas class='maskCanvas' canvas-id="maskCanvas"></canvas>
</view>
js部分
/** @Description:
* @Author: 冷山冷杉 <[email protected]>
* @Date: 2020-06-04 11:58:14
* @LastEditTime: 2020-06-05 16:14:51
* @LastEditors: 冷山冷杉 <[email protected]>
* @FilePath: \mini-fullalumni\pages\photoTest\photoTest.js
*/
const app = getApp()
const maskCanvas = wx.createCanvasContext('maskCanvas', this)
let items = []
Page({
data: {
itemList: [
],
materialList: [
{
id: null,
image: 'https://img3.doubanio.com/view/subject/m/public/s9074663.jpg',//图片地址
top: 0,//初始图片的位置
left: 0,
x: 0, //初始圆心位置,可再downImg之后又宽高和初始的图片位置得出
y: 0,
scale: 1,//缩放比例 1为不缩放
angle: 0,//旋转角度
active: true //判定点击状态
},
{
id: null,
image: 'https://img9.doubanio.com/view/subject/m/public/s3893375.jpg',
top: 0,
left: 0,
x: 0,
y: 0,
scale: 1,
angle: 0,
active: false
}
],
canvasWidth: null,
canvasHeight: null
},
onReady() {
const query = wx.createSelectorQuery()
query.select('#img-box').boundingClientRect()
query.selectViewport().scrollOffset()
query.exec((res) => {
this.setData({
canvasWidth: res[0].width,
canvasHeight: res[0].height
})
})
// wx.getSystemInfo({ // 获取系统信息
// success: sysData => {
// this.sysData = sysData
// // 设置画布宽高,this.sysData.windowWidth为屏幕的宽度
// this.setData({
// canvasWidth: this.sysData.windowWidth, // 如果觉得不清晰的话,可以把所有组件、宽高放大一倍
// canvasHeight: this.sysData.windowWidth
// })
// }
// })
},
addImg(e) {
let index = e.currentTarget.dataset.index
let materialList = this.data.materialList
let itemList = this.data.itemList
if (itemList.length) {
materialList[index].id = itemList[itemList.length - 1].id + 1
} else {
materialList[index].id = 1
}
itemList.push(JSON.parse(JSON.stringify(materialList[index])))
this.setData({ itemList })
},
loadImg(e) {
let index = e.currentTarget.dataset.index
let itemList = this.data.itemList
// x,y为圆心的距离, +25: 按钮定位的距离 + 按钮自身大小/2
itemList[index].width = e.detail.width
itemList[index].height = e.detail.height
itemList[index].x = e.detail.width / 2 + 25
itemList[index].y = e.detail.height / 2 + 25
this.setData({ itemList })
},
hiddenImg(e) {
let index = e.currentTarget.dataset.index
let itemList = this.data.itemList
itemList.splice(index, 1)
this.setData({ itemList })
},
wraptouchStart: function (e) {
let items = this.data.itemList;
for (let i = 0; i < items.length; i++) { //旋转数据找到点击的
items[i].active = false;
if (e.currentTarget.dataset.id == items[i].id) {
items[i].active = true; //开启点击属性
items[i].lx = e.touches[0].clientX; // 记录点击时的坐标值
items[i].ly = e.touches[0].clientY;
}
}
this.setData({ //赋值
itemList: items
})
},
WraptouchMove: function (e) {
let index = e.currentTarget.dataset.index
let items = this.data.itemList;
//移动时的坐标值也写图片的属性里
items[index]._lx = e.touches[0].clientX;
items[index]._ly = e.touches[0].clientY;
//追加改动值
items[index].left += items[index]._lx - items[index].lx; // x方向
items[index].top += items[index]._ly - items[index].ly; // y方向
items[index].x += items[index]._lx - items[index].lx;
items[index].y += items[index]._ly - items[index].ly;
//把新的值赋给老的值
items[index].lx = e.touches[0].clientX;
items[index].ly = e.touches[0].clientY;
this.setData({//赋值就移动了
itemList: items
})
},
// 触摸开始事件 items是this.data.itemList的全局变量,便于赋值 所有的值都应给到对应的对象里
touchStart: function (e) {
//找到点击的那个图片对象,并记录
let items = this.data.itemList;
let index = e.currentTarget.dataset.index
for (let i = 0; i < items.length; i++) {
items[i].active = false;
if (e.currentTarget.dataset.id == items[i].id) {
items[i].active = true;
}
}
//获取作为移动前角度的坐标
items[index].tx = e.touches[0].clientX;
items[index].ty = e.touches[0].clientY;
//移动前的角度
items[index].anglePre = this.countDeg(items[index].x, items[index].y, items[index].tx, items[index].ty)
//获取图片半径
items[index].r = this.getDistancs(items[index].x, items[index].y, items[index].left, items[index].top)
},
// 触摸移动事件
touchMove: function (e) {
let items = this.data.itemList;
let index = e.currentTarget.dataset.index
// items[index].x = e.detail.width / 2
// items[index].y = e.detail.height / 2
// this.setData({itemList: items})
//记录移动后的位置
items[index]._tx = e.touches[0].clientX;
items[index]._ty = e.touches[0].clientY;
//移动的点到圆心的距离 * 因为圆心的坐标是相对与父元素定位的 ,所有要减去父元素的OffsetLeft和OffsetTop来计算移动的点到圆心的距离
items[index].disPtoO = this.getDistancs(items[index].x, items[index].y, items[index]._tx, items[index]._ty)
items[index].scale = items[index].disPtoO / items[index].r; //手指滑动的点到圆心的距离与半径的比值作为图片的放大比例
items[index].oScale = 1 / items[index].scale;//图片放大响应的右下角按钮同比缩小
//移动后位置的角度
items[index].angleNext = this.countDeg(items[index].x, items[index].y, items[index]._tx, items[index]._ty)
//角度差
items[index].new_rotate = items[index].angleNext - items[index].anglePre;
//叠加的角度差
items[index].angle += items[index].new_rotate;
//用过移动后的坐标赋值为移动前坐标
items[index].tx = e.touches[0].clientX;
items[index].ty = e.touches[0].clientY;
items[index].anglePre = this.countDeg(items[index].x, items[index].y, items[index].tx, items[index].ty)
//赋值setData渲染
this.setData({
itemList: items
})
},
/*
*参数1和2为图片圆心坐标
*参数3和4为手点击的坐标
*返回值为手点击的坐标到圆心的角度
*/
countDeg: function (cx, cy, pointer_x, pointer_y) {
var ox = pointer_x - cx;
var oy = pointer_y - cy;
var to = Math.abs(ox / oy);
var angle = Math.atan(to) / (2 * Math.PI) * 360;//鼠标相对于旋转中心的角度
if (ox < 0 && oy < 0)//相对在左上角,第四象限,js中坐标系是从左上角开始的,这里的象限是正常坐标系
{
angle = -angle;
} else if (ox <= 0 && oy >= 0)//左下角,3象限
{
angle = -(180 - angle)
} else if (ox > 0 && oy < 0)//右上角,1象限
{
angle = angle;
} else if (ox > 0 && oy > 0)//右下角,2象限
{
angle = 180 - angle;
}
return angle;
},
getDistancs(cx, cy, pointer_x, pointer_y) {
var ox = pointer_x - cx;
var oy = pointer_y - cy;
return Math.sqrt(
ox * ox + oy * oy
);
},
generate: function () {
maskCanvas.save();
maskCanvas.beginPath();
//一张白图
maskCanvas.setFillStyle('#fff');
maskCanvas.fillRect(0, 0, this.data.windowWidth, this.data.canvasHeight)
maskCanvas.closePath();
maskCanvas.stroke();
this.data.itemList.forEach((val, index) => {
maskCanvas.save();
maskCanvas.translate(0, 0);
maskCanvas.beginPath();
maskCanvas.translate(val.x, val.y); // 圆心坐标
maskCanvas.rotate(val.angle * Math.PI / 180);
maskCanvas.translate(-(val.width * val.scale / 2) - 25, -(val.height * val.scale / 2) - 25)
maskCanvas.drawImage(val.image, 0, 0, val.width * val.scale, val.height * val.scale);
maskCanvas.restore();
})
maskCanvas.draw(false, (e) => {
wx.canvasToTempFilePath({
canvasId: 'maskCanvas',
success: res => {
this.setData({
canvasTemImg: res.tempFilePath
})
console.log(res.tempFilePath);
}
}, this)
})
}
})
css
page{height:100%;
}
.img-list{
width: 100rpx;
height: 100rpx
}
.container{
height: 100%;
}
.img-box {
position: relative;
width: 80%;
overflow: hidden;
margin: auto;
border: 1px solid blue;
height: 60%;
}
.maskCanvas {
/* display: none; */
position: absolute;
left: 0;
bottom: 0;
border:1px solid red;
}
.o, .x {
width: 40rpx;
height: 40rpx;
position: absolute;
}
.o{
bottom: -20px;
right: -20px;
}
.x{
top: -20px;
left: -20px
}
.touchWrap {
position: absolute;
}
.imgWrap{
border: 1px solid transparent;
}
.touchActive{
border: 1px solid black;
}
jason
{"navigationBarTitleText": "照片测试",
"usingComponents": {},
"disableScroll": true
}
这是个demo,自己大概测过没问题
因为页面简洁,如果要放在页面上换样式,可能会有问题
仅供参考,仅供参考!
以上是 【小程序】记录一下微信小程序图片拖拽,放大,位移效果实现 的全部内容, 来源链接: utcz.com/a/105876.html






得票时间