Win10+VScode+miniconda安装tensorflowgpu [操作系统入门]

一、安装tensorflow-gpu
1.安装
conda activate py36
conda create -n tensorflowconda install tensorflow-gpu  //安装
2.若安装提示下面的错误。
解决方案:打开Anaconda Prompt(miniconda3),输入以下命令
conda config --add channels https://mirrors.tuna.tsinghua.edu.cn/anaconda/cloud/msys2/conda config --add channels https://mirrors.tuna.tsinghua.edu.cn/anaconda/cloud/conda-forge/
conda config --add channels https://mirrors.tuna.tsinghua.edu.cn/anaconda/pkgs/free/
conda config --set show_channel_urls yes
然后,激活py36再次安装tensorflow
conda activate py36
conda install tensorflow-gpu
安装成功。
3.新增环境变量
查看tensorflow是否安装成功,pip show tensorflow-gpu。
4.配置vscode中的settings.json文件(python->扩展设置->extra paths->在settings.json中编辑) ,如下所示,然后重新启动vscode。
"python.pythonPath": "D:APPMiniconda3envspy36python.exe", "python.autoComplete.extraPaths": [
"D:APPMiniconda3envspy36",
"D:APPMiniconda3envspy36libsite-packages"
],
"python.autoComplete.addBrackets":true,
5.安装cuda 待续
6.新建py文件,直接运行。
如果报下面的错误,大概就是找不到numpy,DLL load failed: 找不到指定的模块。
解决方法:用pip重新安装numpy(若numpy下载过程出现错误,是网速问题)
注意:tensorflow版本和numpy版本要适配!!!我的是tensorflow-gpu1.1.1+numpy1.14.0
pip uninstall numpy //卸载numpypip3 install numpy==1.14.0 //用pip重新安装numpy
6.若出现VCcode终端不能正确激活miniconda的环境的问题,打开步骤4中的setting.json文件,增加如下的代码
"terminal.integrated.shell.windows": "C:WindowsSystem32cmd.exe","terminal.integrated.shellArgs.windows": [
"/K",
"D:APPMiniconda3Scriptsactivate.bat D:APPMiniconda3"], //此处是miniconda3所在的位置
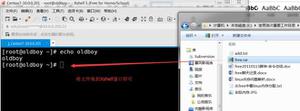
打开vscode终端效果如下:
7.运行py文件
python 1.py //1.py为文件名
Win10+VScode +miniconda安装tensorflow-gpu
以上是 Win10+VScode+miniconda安装tensorflowgpu [操作系统入门] 的全部内容, 来源链接: utcz.com/z/519375.html