Linux安装Nginx1.1.10

Nginx(发音同engine x)是一个异步框架的 Web服务器,也可以用作反向代理,负载平衡器 和 HTTP缓存。相较于Apachelighttpd具有占有内存少,稳定性高等优势,并且依靠并发能力强,丰富的模块库以及友好灵活的配置而闻名。在Linux操作系统下,nginx使用epoll事件模型,得益于此,nginx在Linux操作系统下效率相当高。
开始前,请确认gcc g++开发类库是否装好,默认已经安装,安装步骤:
gcc安装
yum -y install gcc-c++pcre安装
yum -y install pcre pcre-develzlib安装
yum -y install zlib zlib-develOpenSSL安装
yum -y install openssl openssl-develNginx安装
cd /usr/local/srcwget http://nginx.org/download/nginx-1.1.10.tar.gz
tar -zxvf nginx-1.1.10.tar.gz
cd nginx-1.1.10
./configure
make
make install
启动Nginx
为了防止端口80占用,apache端口尽量不要修改,所有我们可以选择修改Nginx端口,linux配置文件路径:/usr/local/nginx/conf/nginx.conf,可以修改端口为8888,当然也可以保留原始的80端口,我这里暂时不做修改。
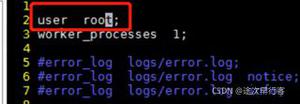
下面是nginx.conf原始配置文件:
#user nobody;
worker_processes 1;
#error_log logs/error.log;
#error_log logs/error.log notice;
#error_log logs/error.log info;
#pid logs/nginx.pid;
events {
worker_connections 1024;
}
http {
include mime.types;
default_type application/octet-stream;
#log_format main "$remote_addr - $remote_user [$time_local] "$request" "
# "$status $body_bytes_sent "$http_referer" "
# ""$http_user_agent" "$http_x_forwarded_for"";
#access_log logs/access.log main;
sendfile on;
#tcp_nopush on;
#keepalive_timeout 0;
keepalive_timeout 65;
#gzip on;
server {
listen 80;
server_name localhost;
#charset koi8-r;
#access_log logs/host.access.log main;
location / {
root html;
index index.html index.htm;
}
#error_page 404 /404.html;
# redirect server error pages to the static page /50x.html
#
error_page 500 502 503 504 /50x.html;
location = /50x.html {
root html;
}
# proxy the PHP scripts to Apache listening on 127.0.0.1:80
#
#location ~ .php$ {
# proxy_pass http://127.0.0.1;
#}
# pass the PHP scripts to FastCGI server listening on 127.0.0.1:9000
#
#location ~ .php$ {
# root html;
# fastcgi_pass 127.0.0.1:9000;
# fastcgi_index index.php;
# fastcgi_param SCRIPT_FILENAME /scripts$fastcgi_script_name;
# include fastcgi_params;
#}
# deny access to .htaccess files, if Apache"s document root
# concurs with nginx"s one
#
#location ~ /.ht {
# deny all;
#}
}
# another virtual host using mix of IP-, name-, and port-based configuration
#
#server {
# listen 8000;
# listen somename:8080;
# server_name somename alias another.alias;
# location / {
# root html;
# index index.html index.htm;
# }
#}
# HTTPS server
#
#server {
# listen 443;
# server_name localhost;
# ssl on;
# ssl_certificate cert.pem;
# ssl_certificate_key cert.key;
# ssl_session_timeout 5m;
# ssl_protocols SSLv2 SSLv3 TLSv1;
# ssl_ciphers HIGH:!aNULL:!MD5;
# ssl_prefer_server_ciphers on;
# location / {
# root html;
# index index.html index.htm;
# }
#}
}
启动nginx
netstat -ano|grep 80nginx重启、关闭、启动
启动
启动代码格式:nginx安装目录地址 -c nginx配置文件地址
例如:
[root@iz2zeg4xqcv95kl86o2w9bz /]# /usr/local/nginx/sbin/nginx -c /usr/local/nginx/conf/nginx.conf
如果你启动时遇到:
nginx: [emerg] bind() to 0.0.0.0:80 failed (98: Address already in use)
nginx: [emerg] bind() to 0.0.0.0:80 failed (98: Address already in use)
nginx: [emerg] bind() to 0.0.0.0:80 failed (98: Address already in use)
nginx: [emerg] bind() to 0.0.0.0:80 failed (98: Address already in use)
nginx: [emerg] bind() to 0.0.0.0:80 failed (98: Address already in use)
由于nginx默认启动的是80端口,而80端口服务器上其他应用占用,解决办法:可以使用
sudo fuser -k 80/tcp #关闭所有80端口的程序
使用效果如下:
[root@iz2zeg4xqcv95kl86o2w9bz /]# sudo fuser -k 80/tcp
80/tcp: 21290 25925 25928 25929 25930 25931 25932
再次启动,启动成功!
停止
1.查看Nginx进程号
[root@iz2zeg4xqcv95kl86o2w9bz ~]# ps -ef|grep nginx
2.杀死进程
[root@iz2zeg4xqcv95kl86o2w9bz ~]# kill -QUIT 进程ID
重启
第一步,验证nginx配置文件是否正确:
方法一:进入nginx安装目录sbin下,输入命令 ./nginx -t
看到如下显示nginx.conf syntax ok ,nginx.conf test is successful,说明配置文件正确!
方法二:在启动命令-c前加-t
/usr/local/nginx/sbin/nginx -t -c /usr/local/nginx/conf/nginx.conf第二步,重启nginx
进入nginx可执行目录sbin下,输入命令 ./nginx -s reload 即可重启
最终结果:
项目文件存放路径 : /usr/local/nginx/html
以上是 Linux安装Nginx1.1.10 的全部内容, 来源链接: utcz.com/z/518698.html