Pythonurllib实用方法、属性、流程总结

一、urllib、urllib2、urllib3、requests
urllib2室python2中的,python3合并了urllib和urllib2到urllib目录下,所以python3直接使用urllib。
urllib3是一个三方库,它提供了连接池、客户端SSL/TLS验证、文件编码上传、HTTP重定向、gzip和deflate压缩编码、HTTP和SOCKS代理等功能。
requests也是一个三方库,它依赖于urllib3,做了一些封装,所以一般使用requests的比较多。
二、urlopen
from urllib import request,parseresponse = request.urlopen(r"http://www.baidu.com", timeout=3000)
# <class "http.client.HTTPResponse">
print(type(response))
content = response.read()
# <class "bytes">
print(type(content))
print(content.decode("utf-8"))
# 传递参数
param = parse.urlencode({"id": "2"})
data = bytes(param, encoding="utf8")
response = request.urlopen(r"http://www.baidu.com", data=data)
urlopen的timeout可以设置超时时间,data可以设置参数。
urlencode是把参数编码为url参数:
param = parse.urlencode({"id": "2", "name": "中文"}, encoding="utf-8")# id=2&name=%E4%B8%AD%E6%96%87
print(param)
# %E4%B8%AD%E6%96%87
print(parse.quote("中文"))
print(parse.unquote("%E4%B8%AD%E6%96%87"))
三、Response
方法或属性 说明
read()
获取网页内容
status
HTTP状态码,200表示成功
getcode()
HTTP状态码,和status相同
reason
状态信息,成功为ok
msg
成功为ok
getheader("header_name")
获取指定header
getheaders()
获取所有header,元组列表
version
获取版本信息
debuglevel
获取调试等级
closed
获取对象是否关闭布尔值
geturl()
获取请求URL
info()
其他相应信息信息
import urllib.requestresponse = urllib.request.urlopen("http://www.baidu.com", timeout=3000)
# 获取网页内容
print(response.read().decode("utf-8"))
# 获取指定header
print(response.getheader("Content-Type"))
# 以元组列表获取头信息
print(response.getheaders())
# 获取版本信息
print(response.version)
# 获取状态码
print(response.status)
# 获取调试等级
print(response.debuglevel)
# 获取对象是否关闭布尔值
print(response.closed)
# 获取URL
print(response.geturl())
# 获取HTTP状态码
print(response.getcode())
# 获取msg
print(response.msg)
# 获取状态信息
print(response.reason)
# 获取其他信息
print(response.info())
四、Request
from urllib import request, parseurl = "http://127.0.0.1:8080/test/user"
headers = {
"User-Agent": "Mozilla/5.0 (Windows NT 10.0; Win64; x64; rv:70.0) Gecko/20100101 Firefox/70.0"
}
data = {"id": "1", "name": "tim"}
params = parse.urlencode(data)
byte_params = bytes(params, encoding="utf-8")
rst = request.Request(url=url, data=byte_params, headers=headers, method="POST")
rst.add_header("Accept", "text/html,application/xhtml+xml,application/xml;q=0.9,*/*;q=0.8")
rst.add_header("Accept-Encoding", "zh-CN,zh;q=0.8,zh-TW;q=0.7,zh-HK;q=0.5,en-US;q=0.3,en;q=0.2")
rst.add_header("Accept-Language", "gzip, deflate, br")
response = request.urlopen(rst)
print(response.read().decode("utf-8"))
五、异常
URLError在urllib库的error模块,继承了OSError类,由request模块产生的异常都可以通过捕获这个类来处理,URLError包含一个属性reason表示错误原因。
HTTPError是URLError的子类,有3个属性,code表示HTTP状态码,reason表示错误原因,headers是返回头信息。
from urllib import request,errorurl = "http://127.0.0.1:8080/test/user"
try:
response = request.urlopen(url, timeout=1)
except error.HTTPError as e:
print(e.reason, e.code, e.headers)
print("HTTPError:" + str(type(e)))
except error.URLError as e:
print(e.reason)
print("URLError:" + str(type(e)))
else:
print("success")
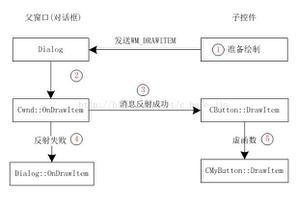
六、urllib handler处理流程
七、cookie
7.1 获取cookie
from http import cookiejarfrom urllib import request
url = "http://127.0.0.1:8080/test/cookie"
cookie = cookiejar.CookieJar()
handler = request.HTTPCookieProcessor(cookie)
opener = request.build_opener(handler)
response = opener.open(url)
print(response.read().decode("utf-8"))
for ck in cookie:
print(ck.name + ":" + ck.value)
7.2 cookie保存与重用
from http import cookiejarfrom urllib import request
url = "http://127.0.0.1:8080/test/cookie"
fielname = r"F: mpcookies.txt"
# cookie = cookiejar.MozillaCookieJar(filename=fielname)
cookie = cookiejar.LWPCookieJar(filename=fielname)
handler = request.HTTPCookieProcessor(cookie)
opener = request.build_opener(handler)
response = opener.open(url)
print(response.read().decode("utf-8"))
cookie.save(ignore_discard=True, ignore_expires=True)
# cookie = cookiejar.MozillaCookieJar()
cookie = cookiejar.LWPCookieJar()
cookie.load(fielname, ignore_discard=True, ignore_expires=True)
handler = request.HTTPCookieProcessor(cookie)
opener = request.build_opener(handler)
response = opener.open(url)
print(response.read().decode("utf-8"))
7.3 服务端代码
@RequestMapping("/cookie") public String cookie(HttpServletRequest request,
HttpServletResponse response,
@CookieValue(value = "pyck", required = false,defaultValue = "dfck") String pyck
){
Cookie[] cookies = request.getCookies();
if(cookies != null){
for(Cookie cookie : cookies){
System.out.println(cookie.getName() + " " + cookie.getValue());
}
}
Cookie cookie=new Cookie("pyck","happy");
response.addCookie(cookie);
System.out.println("pyck:" + pyck);
return pyck;
}
八、代理
from urllib.error import URLErrorfrom urllib.request import ProxyHandler, build_opener
proxy = ProxyHandler({
"http": "http://127.0.0.1:7777",
"https": "http://127.0.0.1:8888"
})
opener = build_opener(proxy)
try:
response=opener.open("https://www.baidu.com")
print(response.read().decode("utf-8"))
except URLError as e:
print(e.reason)
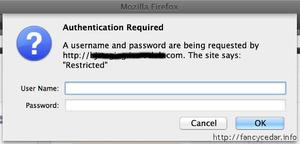
九、Auth
这里的auth是指HTTPBasicAuth,HTTPBasicAuth一般是服务器实现的,直接配置的用户密码和权限,不是我们常见的登录,因为一般我们都是自己实现登录。
不过我们还是有必要了解一下HTTPBasicAuth,很多的监控组件不会自己实现登录注册,就会简单的使用服务器提供的HTTPBasicAuth,例如Tomcat的监控。
下面就介绍一下python中利用HTTPBasicAuth,先下载Tomcat,然后tomcat根目录下conf目录下的tomcat-users.xml,tomcat-users节点下添加:
<role rolename="admin-gui"/><role rolename="manager-gui"/>
<role rolename="manager-jmx"/>
<role rolename="manager-script"/>
<role rolename="manager-status"/>
<user username="tim" password="123456" roles="admin-gui,manager-gui,manager-jmx,manager-script,manager-status"/>
在tomcat的bin目录下执行startup脚本就可以启动
from urllib.request import HTTPPasswordMgrWithDefaultRealmfrom urllib.request import HTTPBasicAuthHandler
from urllib.request import build_opener
from urllib import request, error
username = "tim"
password = "123456"
url = "http://localhost:8080/manager/status"
pwdMg = HTTPPasswordMgrWithDefaultRealm()
pwdMg.add_password(None, url, username, password)
auth_handler = HTTPBasicAuthHandler(pwdMg)
opener = build_opener(auth_handler)
try:
response = opener.open(url)
html = response.read().decode("utf8")
print(html)
except error.URLError as e:
print(e.reason)
# 没有auth,401
try:
response = request.urlopen(url)
except error.HTTPError as e:
print(e.reason, e.code, e.headers)
else:
print("success")
十、总结
以上是 Pythonurllib实用方法、属性、流程总结 的全部内容, 来源链接: utcz.com/z/511205.html