React 组件生命周期详解

本文详细介绍了 React 生命周期的用法以及各个阶段的生命周期进行,并且用实例代码做了详细演示。代码位置
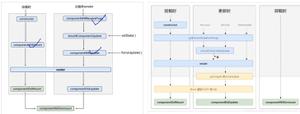
话不多说,先上图
上图是基于 React 16.4 之后的生命周期图解。如感觉不对,请先查看 React 版本
React 生命周期详解
各个阶段的生命周期函数
constructor 构造函数
在 React 组件挂载之前被调用,实现 React.Component 的子类的构造函数时,要在第一行加上 super(props)。
React 构造函数通常只用于两个目的:
- 通过分配一个对象到
this.state来初始化本地state - 将 事件处理程序 方法绑定到实例
如果没有初始化状态(state),并且没有绑定方法,通常不需要为 React 组件实现一个构造函数。
不需要在构造函数中调用
setState(),只需将初始状态设置给this.state即可 。
static getDerivedStateFromProps()
getDerivedStateFromProps 在每次调用 render 方法之前调用。包括初始化和后续更新时。
包含两个参数:第一个参数为即将更新的
props值,第二个参数为之前的state值
返回值:返回为
null时,不做任何副作用处理。倘若想更新某些state状态值,则返回一个对象,就会对state进行修改
该生命周期是静态函数,属于类的方法,其作用域内是找不到
this的
render()
render() 方法是类组件中唯一必须的方法,其余生命周期不是必须要写。
组件渲染时会走到该生命周期,展示的组件都是由 render() 生命周期的返回值来决定。
注意:
如果 shouldComponentUpdate() 方法返回 false ,render() 不会被调用。
componentDidMount()
在 React 组件装载(mounting)(插入树)后被立即调用。
componentDidMount 生命周期是进行发送网络请求、启用事件监听的好时机
如果有必要,可以在此生命周期中立刻调用 setState()
shouldComponentUpdate(nextProps, nextState)
在组件准备更新之前调用,可以控制组件是否进行更新,返回 true 时组件更新,返回 false 组件不更新。
包含两个参数,第一个是即将更新的 props 值,第二个是即将跟新后的 state 值,可以根据更新前后的 props 或 state 进行判断,决定是否更新,进行性能优化
不要
shouldComponentUpdate中调用 setState(),否则会导致无限循环调用更新、渲染,直至浏览器内存崩溃
getSnapshotBeforeUpdate(prevProps, prevState)
getSnapshotBeforeUpdate() 在最近一次的渲染输出被提交之前调用。也就是说,在 render 之后,即将对组件进行挂载时调用。
它可以使组件在 DOM 真正更新之前捕获一些信息(例如滚动位置),此生命周期返回的任何值都会作为参数传递给
componentDidUpdate()。如不需要传递任何值,那么请返回 null
componentDidUpdate(prevProps, prevState, snapshot)
componentDidUpdate() 在更新发生之后立即被调用。这个生命周期在组件第一次渲染时不会触发。
可以在此生命周期中调用 setState(),但是必须包含在条件语句中,否则会造成无限循环,最终导致浏览器内存崩溃
componentWillUnmount()
componentWillUnmount() 在组件即将被卸载或销毁时进行调用。
此生命周期是取消网络请求、移除监听事件、清理 DOM 元素、清理定时器等操作的好时机
注意:
componentWillMount()、componentWillUpdate()、componentWillReceiveProps() 即将被废弃,请不要再在组件中进行使用。因此本文不做讲解,避免混淆。
生命周期执行顺序
挂载时
constructor()
static getDerivedStateFromProps()
render()
componentDidMount()
更新时
static getDerivedStateFromProps()
shouldComponentUpdate()
render()
getSnapshotBeforeUpdate()
componentDidUpdate()
卸载时
- componentWillUnmount()
生命周期中是否可调用 setState()
初始化 state
- constructor()
可以调用 setState()
- componentDidMount()
根据判断条件可以调用 setState()
- componentDidUpdate()
禁止调用 setState()
shouldComponentUpdate()
getSnapshotBeforeUpdate()
render()
componentWillUnmount()
实例演示
源码地址
下面根据一个父子组件的props 改变、state 改变以及子组件的挂载/卸载等事件,对各生命周期执行顺序进行理解,有兴趣的同学可以一起看一下,也可以下载代码自己进行测试。
编写组件代码
父组件:Parent.js
import React, { Component } from 'react';import Child from './Child.js';
const parentStyle = {
padding: 40,
margin: 20,
border: '1px solid pink'
}
const TAG = "Parent 组件:"
export default class Parent extends Component {
constructor(props) {
super(props);
console.log(TAG, 'constructor');
this.state = {
num: 0,
mountChild: true
}
}
static getDerivedStateFromProps(nextProps, prevState) {
console.log(TAG, 'getDerivedStateFromProps');
return null;
}
componentDidMount() {
console.log(TAG, 'componentDidMount');
}
shouldComponentUpdate(nextProps, nextState) {
console.log(TAG, 'shouldComponentUpdate');
return true;
}
getSnapshotBeforeUpdate(prevProps, prevState) {
console.log(TAG, 'getSnapshotBeforeUpdate');
return null;
}
componentDidUpdate(prevProps, prevState, snapshot) {
console.log(TAG, 'componentDidUpdate');
}
componentWillUnmount() {
console.log(TAG, 'componentWillUnmount');
}
/**
* 修改传给子组件属性 num 的方法
*/
changeNum = () => {
let { num } = this.state;
this.setState({
num: ++ num
});
}
/**
* 切换子组件挂载和卸载的方法
*/
toggleMountChild = () => {
let { mountChild } = this.state;
this.setState({
mountChild: !mountChild
});
}
render() {
console.log(TAG, 'render');
const { num, mountChild } = this.state;
return (
<div style={ parentStyle }>
<div>
<p>父组件</p>
<button onClick={ this.changeNum }>改变传给子组件的属性 num</button>
<br />
<br />
<button onClick={ this.toggleMountChild }>卸载 / 挂载子组件</button>
</div>
{
mountChild ? <Child num={ num } /> : null
}
</div>
)
}
}
子组件:Child.js
import React, { Component } from 'react'const childStyle = {
padding: 20,
margin: 20,
border: '1px solid black'
}
const TAG = 'Child 组件:'
export default class Child extends Component {
constructor(props) {
super(props);
console.log(TAG, 'constructor');
this.state = {
counter: 0
};
}
static getDerivedStateFromProps(nextProps, prevState) {
console.log(TAG, 'getDerivedStateFromProps');
return null;
}
componentDidMount() {
console.log(TAG, 'componentDidMount');
}
shouldComponentUpdate(nextProps, nextState) {
console.log(TAG, 'shouldComponentUpdate');
return true;
}
getSnapshotBeforeUpdate(prevProps, prevState) {
console.log(TAG, 'getSnapshotBeforeUpdate');
return null;
}
componentDidUpdate(prevProps, prevState, snapshot) {
console.log(TAG, 'componentDidUpdate');
}
componentWillUnmount() {
console.log(TAG, 'componentWillUnmount');
}
changeCounter = () => {
let { counter }= this.state;
this.setState({
counter: ++ counter
});
}
render() {
console.log(TAG, 'render');
const { num } = this.props;
const { counter } = this.state;
return (
<div style={ childStyle }>
<p>子组件</p>
<p>父组件传过来的属性 num : { num }</p>
<p>自身状态 counter : { counter }</p>
<button onClick={ this.changeCounter }>改变自身状态 counter</button>
</div>
)
}
}
从五种组件状态改变的时机来探究生命周期的执行顺序
一、父子组件初始化
父子组件第一次进行渲染加载时,界面展示为:
控制台中的 log 打印顺序为:
- Parent 组件: constructor()
- Parent 组件: getDerivedStateFromProps()
- Parent 组件: render()
- Child 组件: constructor()
- Child 组件: getDerivedStateFromProps()
- Child 组件: render()
- Child 组件: componentDidMount()
- Parent 组件: componentDidMount()
二、修改子组件自身状态 state 时
点击子组件中的 改变自身状态 按钮,则界面上 自身状态 counter: 的值会 + 1,控制台中的 log 打印顺序为:
- Child 组件: getDerivedStateFromProps()
- Child 组件: shouldComponentUpdate()
- Child 组件: render()
- Child 组件: getSnapshotBeforeUpdate()
- Child 组件: componentDidUpdate()
三、修改父组件中传入子组件的 props 时
点击父组件中的 改变传给子组件的属性 num 按钮,则界面上 父组件传过来的属性 num: 的值会 + 1,控制台中的 log 打印顺序为:
- Parent 组件: getDerivedStateFromProps()
- Parent 组件: shouldComponentUpdate()
- Parent 组件: render()
- Child 组件: getDerivedStateFromProps()
- Child 组件: shouldComponentUpdate()
- Child 组件: render()
- Child 组件: getSnapshotBeforeUpdate()
- Parent 组件: getSnapshotBeforeUpdate()
- Child 组件: componentDidUpdate()
- Parent 组件: componentDidUpdate()
四、卸载子组件
点击父组件中的 卸载 / 挂载子组件 按钮,则界面上子组件会消失,控制台中的 log 打印顺序为:
- Parent 组件: getDerivedStateFromProps()
- Parent 组件: shouldComponentUpdate()
- Parent 组件: render()
- Parent 组件: getSnapshotBeforeUpdate()
- Child 组件: componentWillUnmount()
- Parent 组件: componentDidUpdate()
五、重新挂载子组件
再次点击父组件中的 卸载 / 挂载子组件 按钮,则界面上子组件会重新渲染出来,控制台中的 log 打印顺序为:
- Parent 组件: getDerivedStateFromProps()
- Parent 组件: shouldComponentUpdate()
- Parent 组件: render()
- Child 组件: constructor()
- Child 组件: getDerivedStateFromProps()
- Child 组件: render()
- Parent 组件: getSnapshotBeforeUpdate()
- Child 组件: componentDidMount()
- Parent 组件: componentDidUpdate()
父子组件生命周期执行顺序总结:
当子组件自身状态改变时,不会对父组件产生副作用的情况下,父组件不会进行更新,即不会触发父组件的生命周期
当父组件中状态发生变化(包括子组件的挂载以及)时,会触发自身对应的生命周期以及子组件的更新
render 以及 render 之前的生命周期,则 父组件 先执行
render 以及 render 之后的声明周期,则子组件先执行,并且是与父组件交替执行
当子组件进行卸载时,只会执行自身的 componentWillUnmount 生命周期,不会再触发别的生命周期
可能总结的不好,不是很完整。只是根据一般情况进行的总结。有不妥之处,希望各位朋友能够多多指正。
示例代码下载
源码地址
还没看够?移步至:React Component 官网
以上是 React 组件生命周期详解 的全部内容, 来源链接: utcz.com/z/384150.html