【React】知识点归纳:组件生命周期

React:组件生命周期
- 案例效果
- 组件生命周期的理解
- 生命周期流程图
- 生命周期详述
- 重要的勾子
- 源代码
- 运行效果
- 总结
案例效果
- 需求: 自定义组件
- 让指定的文本做显示/隐藏的渐变动画
- 切换持续时间为 2S
- 点击按钮从界面中移除组件界面
组件生命周期的理解
- 组件对象从创建到死亡它会经历特定的生命周期阶段
- React 组件对象包含一系列的勾子函数(生命周期回调函数), 在生命周期特定时刻回调
- 我们在定义组件时, 可以重写特定的生命周期回调函数, 做特定的工作
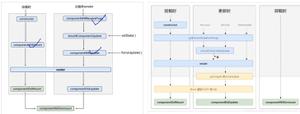
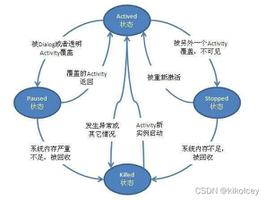
生命周期流程图
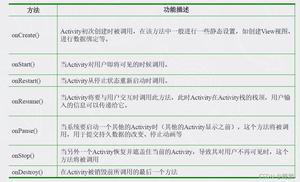
生命周期详述
- 组件的三个生命周期状态:
Mount:插入真实 DOM
Update:被重新渲染
Unmount:被移出真实 DOM
- React 为每个状态都提供了勾子(hook)函数
componentDidMount()
componentWillUpdate()
componentDidUpdate()
componentWillUnmount()
- 生命周期流程:
a. 第一次初始化渲染显示: ReactDOM.render()
* constructor(): 创建对象初始化 state *
* componentWillMount() : 将要插入回调
* render() : 用于插入虚拟 DOM 回调
* componentDidMount() : 已经插入回调
b. 每次更新 state: this.setSate()
* componentWillUpdate() : 将要更新回调
* render() : 更新(重新渲染)
* componentDidUpdate() : 已经更新回调
c. 移除组件:ReactDOM.unmountComponentAtNode(containerDom)
* componentWillUnmount() : 组件将要被移除回调
重要的勾子
- render(): 初始化渲染或更新渲染调用
- componentDidMount(): 开启监听, 发送 ajax 请求
- componentWillUnmount(): 做一些收尾工作, 如: 清理定时器
- componentWillReceiveProps():当props发生变化时执行,初始化render时不执行(后面祥讲)
源代码
<!DOCTYPE html><html>
<head>
<meta charset="UTF-8">
<title>10_ComponentLife</title>
</head>
<body>
<div id="example"></div>
<script type="text/javascript" src="../js/react.development.js"></script>
<script type="text/javascript" src="../js/react-dom.development.js"></script>
<script type="text/javascript" src="../js/babel.min.js"></script>
<script type="text/babel">
/*
需求: 自定义组件
1. 让指定的文本做显示/隐藏的动画
2. 切换时间为2S
3. 点击按钮从界面中移除组件界面
*/
class Like extends React.Component{
constructor(props){
super(props)
this.state = {
opacity: 1
}
this.distoryComponent = this.distoryComponent.bind(this)
}
componentWillMount(){
console.log('componentWillMount()')
}
componentDidMount(){
console.log('componentDidMount()')
//启动定时器setInterval
//this.interval 用this 是为了在两个不同函数中 不同作用域下都能看到,所以用组件对象this
this.intervalId = setInterval(function () {
let {opacity} = this.state
console.log("定时器执行")
//一直能够执行 要用函数清理定时器 不然那占内存呢
//opacity: value|inherit; value指定不透明度,从0.0(完全透明)到1.0(完全不透明)。
//inherit:Opacity属性的值应该从父元素继承。opacity css设置div透明度级别
opacity -= 0.1
if(opacity <= 0){
opacity = 1
}
this.setState({opacity})
}.bind(this),200)
}
distoryComponent(){
//销毁组件
ReactDOM.unmountComponentAtNode(document.getElementById("example"))
}
componentWillUpdate(){
console.log(' componentWillUpdate()')
}
componentDidUpdate(){
console.log('componentDidUpdate()')
}
componentWillUnmount(){
console.log('componentWillUnmount()')
//清理定时器
clearInterval(this.intervalId)
}
//<h2>的两个{} 意义不同 外围:里面要写js代码 里面的:是js对象
render (){
console.log('render ()')
const {opacity} = this.state
return(
<div>
<h2 style={{opacity:opacity}}>{this.props.msg}</h2>
<button onClick={this.distoryComponent}>不活了</button>
</div>
)
}
}
ReactDOM.render(<Like msg="react太难了!"/>,document.getElementById("example"))
</script>
</body>
</html>
运行效果
点击按钮:从界面中移除组件界面
总结
- 销毁组件:
distoryComponent(){ //销毁组件
ReactDOM.unmountComponentAtNode(document.getElementById("example"))
}
- 设置定时器
componentDidMount(){ console.log('componentDidMount()')
//启动定时器setInterval
//this.interval 用this 是为了在两个不同函数中 不同作用域下都能看到,所以用组件对象this
this.intervalId = setInterval(function () {
let {opacity} = this.state
console.log("定时器执行")
//一直能够执行 要用函数清理定时器 不然占内存呢
opacity -= 0.1
if(opacity <= 0){
opacity = 1
}
this.setState({opacity})
}.bind(this),200)
}
- opacity :css设置div透明度级别
语法:opacity: value|inherit; value指定不透明度,从0.0(完全透明)到1.0(完全不透明);inherit:Opacity属性的值应该从父元素继承。
以上是 【React】知识点归纳:组件生命周期 的全部内容, 来源链接: utcz.com/z/381131.html

