一、vue的数据双向绑定的实现

响应式系统
一、概述
Vue通过设定对象属性的 setter/getter 方法来监听数据的变化,通过getter进行依赖收集,而每个setter方法就是一个观察者,在数据变更的时候通知订阅者更新视图。
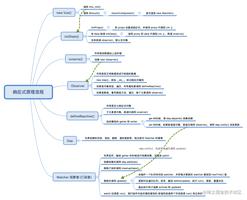
双向数据绑定,简单点来说分为三个部分:
1、Observer。这里的主要工作是递归地监听对象上的所有属性,在属性值改变的时候,触发相应的watcher。
2、Watcher。观察者,当监听的数据值修改时,执行响应的回调函数(Vue里面的更新模板内容)。
3、Dep。连接Observer和Watcher的桥梁,每一个Observer对应一个Dep,它内部维护一个数组,保存与该Observer相关的Watcher。
Object.defineProperty,Vue.js就是基于它实现「响应式系统」
Vue通过设定对象属性的 setter/getter 方法来监听数据的变化,通过getter进行依赖收集,而每个setter方法就是一个观察者(dep),在数据变更的时候通知订阅者更新视图。
/* obj: 目标对象
prop: 需要操作的目标对象的属性名
descriptor: 描述符
return value 传入对象
*/
Object.defineProperty(obj, prop, descriptor)
enumerable,属性是否可枚举,默认 false。
configurable,属性是否可以被修改或者删除,默认 false。
get,获取属性的方法。
set,设置属性的方法
响应系统的实现
function observe(value, cb) { Object.keys(value).forEach((key) => defineReactive(value, key, value[key] , cb))
}
function defineReactive (obj, key, val, cb) {
Object.defineProperty(obj, key, {
enumerable: true,
configurable: true,
get: ()=>{
/*....依赖收集等....*/
/*Github:https://github.com/answershuto*/
},
set:newVal=> {
cb();/*订阅者收到消息的回调*/
}
})
}
class Vue {
constructor(options) {
this._data = options.data;
observe(this._data, options.render)
}
}
let app = new Vue({
el: '#app',
data: {
text: 'text',
text2: 'text2'
},
render(){
console.log("render");
}
})
二、依赖收集
为什么要依赖收集
先看下面这段代码
new Vue({ template:
`<div>
<span>text1:</span> {{text1}}
<span>text2:</span> {{text2}}
<div>`,
data: {
text1: 'text1',
text2: 'text2',
text3: 'text3'
}
});
按照之前响应式原理中的方法进行绑定则会出现一个问题——text3在实际模板中并没有被用到,然而当text3的数据被修改的时候(this.text3 = 'test')的时候,同样会触发text3的setter导致重新执行渲染,这显然不正确。
先说说Dep
当对data上的对象进行修改值的时候会触发它的setter,那么取值的时候自然就会触发getter事件,所以我们只要在最开始进行一次render,那么所有被渲染所依赖的data中的数据就会被getter收集到Dep的subs中去。在对data中的数据进行修改的时候setter只会触发Dep的subs的函数。
定义一个依赖收集类Dep。
class Dep () { constructor () {
this.subs = [];
}
addSub (sub: Watcher) {
this.subs.push(sub)
}
removeSub (sub: Watcher) {
remove(this.subs, sub)
}
/*Github:https://github.com/answershuto*/
notify () {
// stabilize the subscriber list first
const subs = this.subs.slice()
for (let i = 0, l = subs.length; i < l; i++) {
subs[i].update()
}
}
}
Watcher
订阅者,当依赖收集的时候会addSub到sub中,在修改data中数据的时候会触发dep对象的notify,通知所有Watcher对象去修改对应视图。
class Watcher () { constructor (vm, expOrFn, cb, options) {
this.cb = cb;
this.vm = vm;
/*在这里将观察者本身赋值给全局的target,只有被target标记过的才会进行依赖收集*/
Dep.target = this;
/*Github:https://github.com/answershuto*/
/*触发渲染操作进行依赖收集*/
this.cb.call(this.vm);
}
update () {
this.cb.call(this.vm);
}
}
开始依赖收集
class Vue { constructor(options) {
this._data = options.data;
observer(this._data, options.render);
let watcher = new Watcher(this, );
}
}
function defineReactive (obj, key, val, cb) {
/*在闭包内存储一个Dep对象*/
const dep = new Dep();
Object.defineProperty(obj, key, {
enumerable: true,
configurable: true,
get: ()=>{
if (Dep.target) {
/*Watcher对象存在全局的Dep.target中*/
dep.addSub(Dep.target);
}
},
set:newVal=> {
/*只有之前addSub中的函数才会触发*/
dep.notify();
}
})
}
Dep.target = null;
将观察者Watcher实例赋值给全局的Dep.target,然后触发render操作只有被Dep.target标记过的才会进行依赖收集。有Dep.target的对象会将Watcher的实例push到subs中,在对象被修改出发setter操作的时候dep会调用subs中的Watcher实例的update方法进行渲染。
三、完整的小例子
第一部分是Observer。
function Observer(obj, key, value){ var dep = new Dep();
if (Object.prototype.toString.call(value) == '[object Object]') {
Object.keys(value).forEach(function(key){
new Observer(value,key,value[key])
})
};
Object.defineProperty(obj, key, {
enumerable: true,
configurable: true,
get: function(){
if (Dep.target) {
dep.addSub(Dep.target);
};
return value;
},
set: function(newVal){
value = newVal;
dep.notify();
}
})
}
我们先略过对数组的处理等。递归地为obj的每个属性添加getter和setter。在getter中,我们把watcher添加到dep中。setter中,触发watcher执行回调。
第二部分是Watcher。
function Watcher(fn){ this.update = function(){
Dep.target = this;
fn();
Dep.target = null;
}
this.update();
}
极其简单的几行代码,fn是数据变化后要执行的回调函数,一般是获取数据渲染模板。默认执行一遍update方法是为了在渲染模板过程中,调用数据对象的getter时建立两者之间的关系。因为同一时刻只有一个watcher处于激活状态,把当前watcher绑定在Dep.target(方便在Observer内获取)。回调结束后,销毁Dep.target。
最后是Dep。
function Dep(){ this.subs = [];
this.addSub = function (watcher) {
this.subs.push(watcher);
}
this.notify = function(){
this.subs.forEach(function(watcher){
watcher.update();
});
}
}
内部一个存放watcher的数组subs。addSub用于向数组中添加watcher(getter时)。notify用于触发watcher的更新(setter时)。
以上就是我们简易的双向数据绑定demo。我们看看用起来是什么样的。
<div ></div><script type="text/javascript">
var obj = {
a: 1,
b: 2,
c: 3
}
Object.keys(obj).forEach(function(key){
new Observer(obj, key, obj[key])
});
new Watcher(function(){
document.querySelector("#test").innerHTML = obj.a;
})
</script>
首先,我们给obj的每一个属性都添加getter和setter。创建一个Watcher对象,回调函数是使#test的内容为obj.a,这里是1。
打开控制太,我们修改obj.a == 22。我们发现页面中显示的内容也变成了22。相关代码见这里。
以上知识我们的开胃小菜,Vue中对数组做了处理,而且页面的更新是异步执行的,所以会有许许多多的处理,接下来我们慢慢分解。
四、Vue的实现
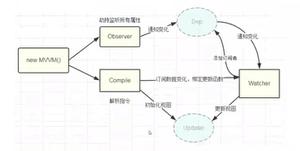
我们先看一张图,这是Vue文档中的一张图,解释的就是Vue的响应式原理。
整体上和我们之前的demo一样,我们之前说过,Vue的更新是生成render函数,然后生成虚拟dom,映射到页面上。左侧的部分其实就是我们watcher的回调,右下角的data就是通过我们上面说的Observer来添加getter和setter。watcher通过dependency和data联系在一起,并触发re-render。
Vue中的Observer
接着,我们来看源码,打开src/core/observer/index.js。
首先是我们的Observer对象。
export class Observer { value: any;
dep: Dep;
vmCount: number; // 把该对象作为root $data的vm个数
constructor (value: any) {
this.value = value
this.dep = new Dep()
this.vmCount = 0
// 添加__ob__来标示value有对应的Observer
def(value, '__ob__', this)
// 对数组的处理
if (Array.isArray(value)) {
const augment = hasProto
? protoAugment
: copyAugment
augment(value, arrayMethods, arrayKeys)
this.observeArray(value)
// 处理对象
} else {
this.walk(value)
}
}
// 给每个属性添加getter/setters
walk (obj: Object) {
const keys = Object.keys(obj)
for (let i = 0; i < keys.length; i++) {
defineReactive(obj, keys[i], obj[keys[i]])
}
}
// 观察数组的每一项
observeArray (items: Array<any>) {
for (let i = 0, l = items.length; i < l; i++) {
observe(items[i])
}
}
}
整体上,value分为对象或数组两种情况。在这之前,我们先来说一下defineReactive和observe这两个比较重要的函数。
export function defineReactive ( obj: Object,
key: string,
val: any,
customSetter?: Function
) {
const dep = new Dep()
const property = Object.getOwnPropertyDescriptor(obj, key)
if (property && property.configurable === false) {
return
}
const getter = property && property.get
const setter = property && property.set
let childOb = observe(val)
Object.defineProperty(obj, key, {
enumerable: true,
configurable: true,
get: function reactiveGetter () {
const value = getter ? getter.call(obj) : val
if (Dep.target) {
dep.depend()
if (childOb) {
childOb.dep.depend()
}
if (Array.isArray(value)) {
dependArray(value)
}
}
return value
},
set: function reactiveSetter (newVal) {
const value = getter ? getter.call(obj) : val
/* eslint-disable no-self-compare */
if (newVal === value || (newVal !== newVal && value !== value)) {
return
}
if (process.env.NODE_ENV !== 'production' && customSetter) {
customSetter()
}
if (setter) {
setter.call(obj, newVal)
} else {
val = newVal
}
childOb = observe(newVal)
dep.notify()
}
})
}
这个方法,是具体为obj的key值添加装饰器的地方。它会为每个值创建一个dep,如果用户为这个值传入getter和setter,则暂时保存。observe方法稍后介绍。之后通过Object.defineProperty,重新添加装饰器。在getter中,dep.depend其实做了两件事,一是向Dep.target内部的deps添加dep,二是将Dep.target添加到dep内部的subs,也就是建立它们之间的联系。在setter中,如果新旧值相同,直接返回,不同则调用dep.notify来更新与之相关的watcher。customSetter在开发过程中输出错误用。
export function observe (value: any, asRootData: ?boolean): Observer | void { if (!isObject(value)) {
return
}
let ob: Observer | void
if (hasOwn(value, '__ob__') && value.__ob__ instanceof Observer) {
ob = value.__ob__
} else if (
observerState.shouldConvert &&
!isServerRendering() &&
(Array.isArray(value) || isPlainObject(value)) &&
Object.isExtensible(value) &&
!value._isVue
) {
ob = new Observer(value)
}
if (asRootData && ob) {
ob.vmCount++
}
return ob
}
该方法用于观察一个对象,返回与对象相关的Observer对象,如果没有则为value创建一个对应的Observer。defineReactive中调用该方法,其实就是为所有value为对象的值递归地观察。
我们再回到Observer,如果传入的是对象,我们就调用walk,该方法就是遍历对象,对每个值执行defineReactive。
另一种情况是传入的对象是数组,因为数组本身只引用了一个地址,所以对数组进行push、splice、sort等操作,我们是无法监听的。所以,Vue中改写value的__proto__(如果有),或在value上重新定义这些方法。augment在环境支持__proto__时是protoAugment,不支持时是copyAugment。
function protoAugment (target, src: Object) { target.__proto__ = src
}
function copyAugment (target: Object, src: Object, keys: Array<string>) {
for (let i = 0, l = keys.length; i < l; i++) {
const key = keys[i]
def(target, key, src[key])
}
}
protoAugment很简单,其实就是执行了value.__proto__ = arrayMethods。
copyAugment中循环把arrayMethods上的arrayKeys方法添加到value上。
arrayMethods其实是改写了数组方法的新对象。arrayKeys是arrayMethods中的方法列表。我们一起来看看arrayMethods。
const arrayProto = Array.prototypeexport const arrayMethods = Object.create(arrayProto)
;[
'push',
'pop',
'shift',
'unshift',
'splice',
'sort',
'reverse'
]
.forEach(function (method) {
const original = arrayProto[method]
def(arrayMethods, method, function mutator () {
let i = arguments.length
const args = new Array(i)
while (i--) {
args[i] = arguments[i]
}
const result = original.apply(this, args)
const ob = this.__ob__
let inserted
switch (method) {
case 'push':
inserted = args
break
case 'unshift':
inserted = args
break
case 'splice':
inserted = args.slice(2)
break
}
if (inserted) ob.observeArray(inserted)
ob.dep.notify()
return result
})
})
整体上其实还是调用数组相应的方法来操作value,只不过操作之后,添加了相关watcher的更新。这里解释一下为什么push、unshift、splice参数大于2时,要重新调用ob.observeArray,因为这三种情况都是像数组中添加新的元素,所以需要重新观察每个子元素。
Vue中的Dep
let uid = 0export default class Dep {
static target: ?Watcher;
id: number;
subs: Array<Watcher>;
constructor () {
this.id = uid++
this.subs = []
}
addSub (sub: Watcher) {
this.subs.push(sub)
}
removeSub (sub: Watcher) {
remove(this.subs, sub)
}
depend () {
if (Dep.target) {
Dep.target.addDep(this)
}
}
notify () {
const subs = this.subs.slice()
for (let i = 0, l = subs.length; i < l; i++) {
subs[i].update()
}
}
}
Dep对象比较简单,内部有一个为一个id,用于作为Dep对象的唯一标识,还有一个保存watcher的数组subs。相比于我们之前的小demo,这里多了removeSub和depend。removeSub是从数组中移除某一watcher,depend是调用了watcher的addDep,等会讲解。
Vue中的Watcher
let uid = 0export default class Watcher {
constructor (
vm: Component,
expOrFn: string | Function,
cb: Function,
options?: Object
) {
this.vm = vm
vm._watchers.push(this)
...
this.cb = cb
this.id = ++uid
...
this.expression = process.env.NODE_ENV !== 'production'
? expOrFn.toString()
: ''
if (typeof expOrFn === 'function') {
this.getter = expOrFn
} else {
this.getter = parsePath(expOrFn)
if (!this.getter) {
this.getter = function () {}
}
}
this.value = this.get()
}
get () {
pushTarget(this)
let value
const vm = this.vm
...
value = this.getter.call(vm, vm)
...
popTarget()
this.cleanupDeps()
return value
}
...
update () {
...
queueWatcher(this)
}
run () {
if (this.active) {
const value = this.get()
if (
value !== this.value ||
isObject(value) ||
this.deep
) {
// set new value
const oldValue = this.value
this.value = value
if (this.user) {
try {
this.cb.call(this.vm, value, oldValue)
} catch (e) {
handleError(e, this.vm, `callback for watcher "${this.expression}"`)
}
} else {
this.cb.call(this.vm, value, oldValue)
}
}
}
}
...
}
这里我们只说最普通的情况,deep、lazy等就不多说了,大家有时间自己看一看就行。
创建Watcher对象时,有两个比较重要的参数,一个是expOrFn,一个是cb。
在Watcher创建时,会调用的this.get,里面会执行根据expOrFn解析出来的getter。在这个getter中,我们或渲染页面,或获取某个数据的值。总之,会调用相关data的getter,来建立数据的双向绑定。
当相关的数据改变时,会调用watcher的update方法,进而调用run方法。我们看到,run中还会调用this.get来获取修改之后的value值。update中的queueWatcher方法稍后解释。
我们先来看看Watcher的两种主要用途:一种是更新模板,另一种就是监听某个值的变化。
** 模板更新 **
我们之前讲Vue声明周期时讲到挂载元素时,我们是通过创建Watcher对象,然后调用updateComponent来更新渲染模板的。
vm._watcher = new Watcher(vm, updateComponent, noop)这是因为创建Watcher会调用this.get,也就是这里的updateComponent。在render的过程中,会调用data的getter方法,以此来建立数据的双向绑定,当数据改变是,会重新触发updateComponent。在这里this.get的返回值是undefined,所以主要是用于渲染模板。
** 监听数据 **
另一个用途就是我们的computed、watch等,即监听数据的变化来执行响应的操作。
此时this.get返回的是要监听数据的值。初始化过程中,调用this.get会拿到初始值保存为this.value,监听的数据改变后,会再次调用this.get并拿到修改之后的值,将旧值和新值传给cb并执行响应的回调。
接下来我们谈谈queueWatcher,从函数名我们大致可以猜出,它是把当前的watcher添加到一个队列中。我们知道,Vue中页面的更新是异步的,所以一系列数据的变化,会在之后的某一时刻统一更新。我们来看看该方法的代码。
export function queueWatcher (watcher: Watcher) { const id = watcher.id
if (has[id] == null) {
has[id] = true
if (!flushing) {
queue.push(watcher)
} else {
// if already flushing, splice the watcher based on its id
// if already past its id, it will be run next immediately.
let i = queue.length - 1
while (i >= 0 && queue[i].id > watcher.id) {
i--
}
queue.splice(Math.max(i, index) + 1, 0, watcher)
}
// queue the flush
if (!waiting) {
waiting = true
nextTick(flushSchedulerQueue)
}
}
}
我们的watcher有从小到大的唯一id,在页面更新时,会按照一定的顺序依次更新,这里做了一个判断,如果watcher列表正在更新,则把新的watcher添加到对应的位置,并更新。否则,在下一个nextTick中执行flushSchedulerQueue。
function flushSchedulerQueue () { flushing = true
let watcher, id, vm
queue.sort((a, b) => a.id - b.id)
for (index = 0; index < queue.length; index++) {
watcher = queue[index]
id = watcher.id
has[id] = null
watcher.run()
}
const oldQueue = queue.slice()
resetSchedulerState() // 重置队列
index = oldQueue.length
while (index--) {
watcher = oldQueue[index]
vm = watcher.vm
if (vm._watcher === watcher && vm._isMounted) {
callHook(vm, 'updated')
}
}
}
该方法首先按照从小到大将watcher排序,并依次执行它的run方法。vm._watcher保存的是渲染模板时创建的watcher,所以如果队列中有该watcher,则说明模板有变化,随之调用'updated'钩子函数。
Watcher对象中还有一些销毁watcher等方法,这里就不再赘述,感兴趣的大家可以自己看一看。
以上是 一、vue的数据双向绑定的实现 的全部内容, 来源链接: utcz.com/z/378559.html