vue开发中的"骚操作"

前言
在与同事协作开发的过程中,见识到了不少“骚操作”。因为之前都没用过,所以我愿称之为“高级技巧”!
Vue.extend
在交互过程中,有个需求就是点击图标弹出相关信息的弹窗,并且能够同时打开多个。这时就可以用Vue.extend方法手动挂载弹窗组件。
举例:
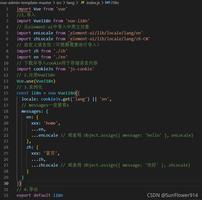
// 目录结构/registry
/videoDialog
videoDialog.vue
index.js
/XXXDialog
···
index.js
// videoDialog/index.js
import Vue from 'vue';
import videoDialog from './videoDialog.vue';
const videoDialogConstructor = Vue.extend(videoDialog);
function videoDialogInstance (data) {
const dialogInstance = new videoDialogConstructor({
el: document.createElement('div'),
data () ({
...data
})
});
document.body.appendChild(dialogInstance.$el);
}
export default function videoDialogDom () {
Vue.prototype.$videoDom = videoDialogInstance
}
/index.js
import videoDialog from './videoDialog';
Vue.use(videoDialog);
// 用法
// video.vue
export default {
method: {
click() {
this.$video();
}
}
}
在css中使用相对路径
在vue项目中,通过在webpack配置文件中配置alias属性增加文件路径的别名
// webpack.config.jsresolve: {
alias: {
'@': resolve('src'),
'@assets': resolve('src/assets')
}
}
// 在js文件中可以使用
import component from '@/component/xxx'
// 但是在css文件中使用'@assets/images/xxx.png'却会报错
background-image: url(@assets/images/xxx.png)
在css文件使用@assets/images/xxx.png的语法引用相对@assets的目录会报错。说明webpack没有正确识别资源的相对路径。
这是因为css文件是被css-loader所处理,url()中的路径会被css-loader视为绝对路径。因为并没有在css-loader中配置alias属性,所以会找不到@assets。
解决方法有两种:
- 在
css-loader中配置alias,但是相同的别名却要配置两份,会显得冗余。 - 在引用路径之前添加~符号。
background-image: url(~@assets/images/xxx.png);webpack会将以~符号作为前缀的路径视作依赖模块去解析,这样alias配置就生效了。
同样的方法也可以用于非JS文件中。
自动加载模块
有些库会在项目里频繁用到,比如说lodash。而每次使用都得引用一次import _ from 'lodash'麻烦的很!
有一个方法可以自动加载模块:使用ProvidePlugin
new webpack.ProvidePlugin({ _: 'lodash',
// ...
})
// 或者只使用单个方法
new webpack.ProvidePlugin({
_map: ['lodash', 'map']
// ...
})
任何时候,当_被当作未赋值的变量时,lodash就会自动被加载,并且_会被这个 lodash输出的内容所赋值。
指定vue的时候要注意, 对于ES2015模块的default export,必须指定模块的default属性。
new webpack.ProvidePlugin({ Vue: ['vue/dist/vue.esm.js', 'default']
})
公共组件、公共方法与公共指令的注入
在项目的开发中,一般都把重复使用的组件、方法抽象出来放到例如叫common的文件夹中。例如
/common/components
index.js
/utils
index.js
/directives
index.js
index.js
在前面这三个index.js文件中,一般是export出各个类型的函数,例如:
// components/index,jsexport { component1 } from './component1.vue'
export { component2 } from './component2.vue'
// utils/index.js
export { method1 } from './method1.js'
export { method2 } from './method2.js'
// directives/index.js
export { directive1 } from './directive1.js'
export { directive2 } from './directive2.js'
然后统一在第四个index.js中,暴露一个install方法,在install里注入到全局
import * as Directives from './directives';import * as Components from './components';
import * as Utils from './utils';
export default {
install: (Vue) => {
for (let name of Object.keys(Components)) {
Vue.component(Components[name]['name'], Components[name]);
}
for (let name in Directives) {
Vue.directive(name, Directives[name]);
}
Object.assign(Vue.prototype.$utils ? Vue.prototype.$utils : {}, Utils);
}
};
只需在main.js文件中,使用vue.use方法
// main.jsimport common from './common';
Vue.use(common);
干净利落!
Gzip加速
最后介绍一个插件:CompressionWebpackPlugin。它可以提供gzip压缩, 优化http请求, 提高加载速度。
// vue.config.jsconst CompressionPlugin = require("compression-webpack-plugin");
configureWebpack:config => {
if (process.env.NODE_ENV === 'production') {
// 开启gzip压缩
config.plugins.push(new CompressionPlugin({
algorithm: 'gzip',
test: /\.js$|\.css$/,
threshold: 10240, // 对超过10k的数据进行压缩
cache: true, // 是否需要缓存
deleteOriginalAssets:false // 不删除源文件
}))
}
}
作者: zhangwinwin
链接:vue开发中的"骚操作"
来源:github
以上是 vue开发中的"骚操作" 的全部内容, 来源链接: utcz.com/z/376491.html