第七节:组件入门使用、组件通讯剖析(父传子、子传父、爷传孙、兄弟/任意组件)、对比Vue2.x的传值

一. 组件入门
1. 命名方式
(1). 使用kebab-case(短横线分割符)【推荐!】
当使用 kebab-case (短横线分隔命名) 定义一个组件时,你也必须在引用这个自定义元素时使用 kebab-case,例如 <my-component-name>;
(2). 使用PascalCase(驼峰标识符)
当使用 PascalCase (首字母大写命名) 定义一个组件时,你在引用这个自定义元素时两种命名法都可以使用。也就是说 <my-component-name> 和 <MyComponentName> 都是可接受的;
2. 父组件、子组件、兄弟组件等
如下图:App组件中调用Header、Main、Footer组件,Main组件中调用Banner、ProductList组件,那么:
(1). App组件是Header、Main、Footer组件的父组件;(Header、Main、Footer组件是App组件的子组件)
(2). Main组件是Banner、ProductList组件的父组件;(Banner、ProductList组件是Main组件的子组件)
3. 全局组件
全局组件往往是在应用程序一开始就会全局组件完成,那么就意味着如果某些组件我们并没有用到,也会一起被注册:
代码分享:
<body><div id="app"></div>
<template id="myApp">
<div>
{{msg}}
</div>
<!-- 使用组件 -->
<ypf-a></ypf-a>
<ypf-b></ypf-b>
</template>
<template id="myApp1">
<div>
{{msg1}}
</div>
</template>
<template id="myApp2">
<div>
{{msg2}}
</div>
</template>
<script src="../js/vue3.js"></script>
<script>
const app = Vue.createApp({
template: '#myApp',
data() {
return {
msg: 'Hello Vue3!'
}
}
});
// 注册全局组件
app.component("ypf-a", {
template: "#myApp1",
data() {
return {
msg1: "组件1",
};
}
});
app.component("ypf-b", {
template: "#myApp2",
data() {
return {
msg2: "组件2",
};
},
});
app.mount('#app');
</script>
</body>
View Code
4. 局部组件
局部注册是在我们需要使用到的组件中,通过components属性选项来进行注册;
代码分享:
<body><div id="app"></div>
<template id="myApp">
<div>
{{msg}}
</div>
<!-- 使用组件 -->
<ypf-a></ypf-a>
<ypf-b></ypf-b>
</template>
<template id="myApp1">
<div>
{{msg1}}
</div>
</template>
<template id="myApp2">
<div>
{{msg2}}
</div>
</template>
<script src="../js/vue3.js"></script>
<script>
// 注册局部组件
const ypf1 = {
template: "#myApp1",
data() {
return {
msg1: "组件1",
};
}
};
const ypf2 = {
template: "#myApp2",
data() {
return {
msg2: "组件2",
};
},
};
Vue.createApp({
template: '#myApp',
components: {
// key: 组件名称
// value: 组件对象
'ypf-a': ypf1,
'ypf-b': ypf2
},
data() {
return {
msg: 'Hello Vue3!'
}
}
}).mount('#app');
</script>
</body>
View Code
5. 单文件vue组件的使用
App组件
<template><div>
<Header></Header>
<Main></Main>
<Footer></Footer>
</div>
</template>
<script>
import Header from './Header.vue';
import Footer from './Footer.vue';
import Main from './Main.vue';
export default {
components: {
Header,
Footer,
Main
},
data() {
return {};
}
}
</script>
<style scoped>
</style>
View Code
Header组件
<template><div>
我是Header组件
</div>
</template>
<script>
export default {
components: {
},
data() {
return {};
}
}
</script>
<style scoped>
</style>
View Code
Main组件
<template><div>
<main-banner></main-banner>
<main-product-list></main-product-list>
</div>
</template>
<script>
import MainBanner from './MainBanner.vue';
import MainProductList from './MainProductList.vue';
export default {
components: {
MainBanner,
MainProductList
},
data() {
return {};
}
}
</script>
<style scoped>
</style>
View Code
Footer组件
<template><div>
我是Footer组件
</div>
</template>
<script>
export default {
components: {
},
data() {
return {};
}
}
</script>
<style scoped>
</style>
View Code
MainBanner组件
<template><div>
我是MainBanner组件
</div>
</template>
<script>
export default {
components: {
},
data() {
return {};
}
}
</script>
<style scoped>
</style>
View Code
MainProductList组件
<template><div>
<ul>
<li>产品1</li>
<li>产品2</li>
<li>产品3</li>
<li>产品4</li>
<li>产品5</li>
</ul>
</div>
</template>
<script>
export default {
components: {
},
data() {
return {};
}
}
</script>
<style scoped>
</style>
View Code
1. 补充组件声明调用的几种方式
(1). 组件文件的命名可以 驼峰 和 短横线。
(2). 导入并声明
<script>// 导入组件(此处的名称不能写 分隔符!!)
import GetMsg1 from './component/GetMsg1.vue';
import GetMsg2 from './component/get-msg2.vue';
export default {
components: {
// 下面写法在调用的时候支持 驼峰 和 短横线分隔符
GetMsg1,
GetMsg2,
// 强制写成短横线分隔符
'my-get-msg1': GetMsg1,
'my-get-msg2': GetMsg2,
},
}
</script>
(3). 调用
<template><div>
<!-- 可以直接使用驼峰 或者 使用短横线分割符 -->
<get-msg1></get-msg1>
<GetMsg1></GetMsg1>
<!-- 可以直接使用驼峰 或者 使用短横线分割符 -->
<get-msg2></get-msg2>
<GetMsg2></GetMsg2>
<!-- 直接使用短横线分隔符-->
<my-get-msg1></my-get-msg1>
<my-get-msg2></my-get-msg2>
</div>
</template>
2. 补充UniApp中组件的调用规范
(1). 传统用法(不推荐)
A. 局部组件
B. 全局组件
(2). 特有easycom用法
uni-app 2.7以后推出了更简单的组件使用技术easycom,无需引用和注册组件,直接在template区域使用组件即可。
传统vue组件,需要安装、引用、注册,三个步骤后才能使用组件。easycom将其精简为一步。 只要组件安装在项目的components目录下,并符合components/组件名称/组件名称.vue目录结构。就可以不用引用、注册,直接在页面中使用。
二. 父传子
1. 说明
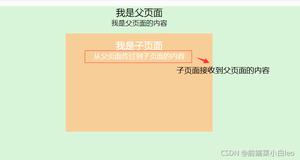
(1). 父组件向子组件传值,主要通过props来完成组件之间的通信。 即在子组件的props中声明一些属性,父组件给这些属性赋值,子组件通过属性的名称获取到对应的值。
(2). Props有两种常见的用法:
方式一:字符串数组,数组中的字符串就是attribute的名称;
方式二:对象类型,对象类型我们可以在指定attribute名称的同时,指定它需要传递的类型、是否是必须的、默认值等等;
2. props为字符串数组
子组件代码:
<template><div>
<h5>我是ChildMsg1组件</h5>
<h5 class="c1">title的为:{{title}}</h5>
<h5 class="c1">content的为:{{content}}</h5>
</div>
</template>
<script>
export default {
props: ['title', 'content'],
// 禁用根元素继承非prop和emit的属性
inheritAttrs: false,
data() {
return {};
}
}
</script>
父组件代码
<template><div>
<!-- 调用ChildMsg1组件 -->
<child-msg1 title='西游记' content='真假美猴王'></child-msg1>
<child-msg1 :title='myTitle' :content='myContent'></child-msg1>
</div>
</template>
<script>
export default {
data() {
return {
myTitle: '水浒传',
myContent: '智取生辰纲',
};
}
}
</script>
运行效果:
3. props为对象
(1). 使用对象语法的时候,我们可以对传入的内容限制,比如类型限制、必填限制、默认值等。
(2). type的类型都可以是哪些呢?String、Number、Boolean、Array、Object、Date、Function、Symbol。
(3). HTML 中的 attribute 名是大小写不敏感的,所以浏览器会把所有大写字符解释为小写字符;
子组件:
<template><div>
<h5>我是ChildMsg2组件</h5>
<h5 class="c1">messageInfo的为:{{messageInfo}}</h5>
<h5 class="c1">messageInfo2的为:{{messageInfo2}}</h5>
<h5 class="c1">propA的为:{{propA}}</h5>
<h5 class="c1">propB的为:{{propB}}</h5>
<h5 class="c1">message的为:{{propC.message}}</h5>
</div>
</template>
<script>
export default {
props: {
// 基础类型检查
messageInfo: String,
// 多个可能的类型
messageInfo2: [String, Number],
// 必填字符串
propA: {
type: String,
required: true
},
// 含有默认值的字符串
propB: {
type: String,
default: '我是content的默认值哦'
},
// 含默认值的对象
propC: {
type: Object,
// 引用类型(对象、数组)默认值必须从一个工厂函数中获取
//引用类型指向同一个地址,修改会相互覆盖
default () {
return { message: 'hello component' }
}
},
// 自定义验证函数
propF:{
validator(value){
return ['success','warning','danger'].includes(value);
}
},
// 具有默认值的函数
propG:{
type:Function,
// 注:与对象或数组的默认值不同,这不是一个工厂函数,而是一个用作默认值的函数。
default(){
return 'Default function';
}
}
},
data() {
return {};
}
}
</script>
View Code
父组件:
<template><div>
<!-- 调用ChildMsg2组件 -->
<child-msg2 messageInfo="你好1" message-info2="你好2" :propA="myObj.propA" :propB="myObj.propB" :propC="myObj.propC"></child-msg2>
</div>
</template>
<script>
export default {
data() {
return {
myObj: {
propA: 'hello propA',
propB: 'hello propB',
propC: { message: 'hello propC' }
}
};
}
}
</script>
运行效果:
4. 非props的属性说明
如何禁用呢?
在子组件中使用inheritAttrs属性。
<script>export default {
props: ['title', 'content'],
// 禁用根元素继承非prop和emit的属性
inheritAttrs: false,
data() {
return {};
}
}
</script>
三. 子传父
1. 说明
(1). 背景
子组件有一些内容想要传递给父组件的时候,再比如,当子组件有一些事件发生的时候,在组件中发生了点击,父组件需要根据子组件传递的信息切换内容;
(2). 实现思路
A. 我们需要在子组件中定义好在某些情况下触发的事件名称;先使用 emits属性声明对外暴露的方法 → 再使用$emit对声明的方法对外传递。
PS:在Vue2.x中,可以不用emits事先声明,但Vue3.x中需要,否则会报警告。
B. 在父组件中以v-on的方式(简写@)传入要监听的事件名称,并且绑定到对应的方法中;
C. 在子组件中发生某个事件的时候,根据事件名称触发对应的事件;
2. 实战
(1). 子组件
通过$emit方法,可以向外声明暴露的方法,同时还可以传递1个或多个参数。
<template><div>
<button @click="increment">增加</button>
<button @click="decrement">减少</button>
<button @click="cdMany">测试传递多个参数</button>
</div>
</template>
<script>
export default {
// 写法1
emits: ['addN', 'subN', 'cdN'],
methods: {
increment() {
this.$emit('addN', 2);
},
decrement() {
this.$emit('subN', 5);
},
// 传递多个参数
cdMany() {
this.$emit('cdN', 'ypf1', 20, '哈哈');
}
}
}
</script>
(2). 父组件
通过@符号,调用子组件$emits传递出来的方法,进而和自己声明的方法进行绑定,同时接收参数。
<template><div>
<div>{{count}}</div>
<child-msg1 @addN='add' @subN='sub' @cdN='testCdN'></child-msg1>
</div>
</template>
<script>
import ChildMsg1 from './ChildMsg1.vue';
export default {
components: {
ChildMsg1
},
data() {
return {
count: 0,
};
},
methods: {
add(n) {
this.count += n;
},
sub(n) {
this.count -= n;
},
testCdN(name, age, msg) {
console.log(name, age, msg);
}
}
}
</script>
(3). 运行结果
3. 参数验证
子组件中的emits可以声明成对象,可以对其增加验证。
<template><div>
<button @click="increment">增加</button>
<button @click="decrement">减少</button>
<button @click="cdMany">测试传递多个参数</button>
</div>
</template>
<script>
export default {
// 写法2(自定义参数和验证)
emits: {
addN: null,
subN: null,
// 不符合的话,会有警告提示
cdN: (name, age, msg) => {
if (age>10) {
return true;
} else{
return false;
}
}
},
data() {
return {};
},
methods: {
increment() {
this.$emit('addN', 2);
},
decrement() {
this.$emit('subN', 5);
},
// 传递多个参数
cdMany() {
this.$emit('cdN', 'ypf1', 20, '哈哈');
}
}
}
</script>
四. 爷传孙
1. 说明
比如我们现在结构是 App→FatherMsg→ChildMsg1 的调用关系, App和ChildMsg1组件中并不是直接的父子关系,App组件想直接向ChildMsg1组件中传值,这个使用就需要通过 Provide 和 Inject 来实现了。
通过嵌套层次有多深,都可以通过:
上级组件(App)有一个 provide 选项来提供数据;
下级组件(ChildMsg1)有一个 inject 选项来开始使用这些数据;
2. 实战
(1). App组件代码
<template><div>
<father-msg></father-msg>
<div><button type="button" @click="addItem">增加数据</button></div>
</div>
</template>
<script>
import FatherMsg from './FatherMsg.vue';
import { computed } from 'vue';
export default {
provide() {
return {
name: 'ypf',
age: 18,
// length: this.arry1.length
length: computed(() => this.arry1.length)
}
},
components: {
FatherMsg
},
data() {
return {
arry1: ['t1', 't2', 't3']
};
},
methods: {
addItem() {
this.arry1.push('t4');
}
}
}
</script>
(2). FatherMsg组件代码
<template><div>
<child-msg1></child-msg1>
</div>
</template>
<script>
import ChildMsg1 from './ChildMsg1.vue';
export default {
components: {
ChildMsg1
},
data() {
return {};
}
}
</script>
(3). ChildMsg1组件代码
<template><div>
<!-- {{name}}--{{age}}--{{length}} -->
<!-- 响应式显示 -->
{{name}}--{{age}}--{{length.value}}
</div>
</template>
<script>
export default {
inject: ['name', 'age', 'length']
}
</script>
补充:处理响应式数据
给数组添加内容,想让inject中的length跟着变化,这个时候需要使用响应式api,如:computed,computed返回的是一个ref对象,需要取出其中的value来使用 。
五. 兄弟/任意组件
1. 说明
在Vue2.x中,兄弟组件或者任意两个组件之间的传值可以使用 $emit发送 和 $on接收 来实现,但在Vue3从实例中移除了 $on、$off 和 $once 方法,所以我们如果希望继续使用全局事件总线,要通过第三方的库:mitt 库。
2. 实战
(1). 安装mitt库,生产依赖,并进行简单封装
【npm install mitt -S】
封装为eventbus.js
import mitt from 'mitt';const emitter = mitt();
export default emitter;
(2). 通过mitt库中 emit 方法发送信息,on方法接收信息。 这两个方法之间是通过其中的参数 key 来建立联系的。
child1组件发送消息
<template><div>
我是child1组件哦
<button @click="mySend">测试发送啊</button>
</div>
</template>
<script>
import emitter from './utils/eventbus.js';
export default {
methods: {
mySend() {
console.log('child1组件点击发送')
// 发送1
emitter.emit('userInfo1', { name: 'lmr1', age: 20 });
// 发送2
emitter.emit('userInfo2', { name: 'lmr2', age: 100 });
}
}
}
</script>
child2组件接收消息(可以单个接收,也可以全部接收)
单个监听
<script>import emitter from './utils/eventbus.js';
export default {
created() {
// 1. 单个监听
{
// 监听1
emitter.on('userInfo1', (item) => {
console.log('userInfo1监听到的内容如下:');
console.log(item);
});
// 监听2
emitter.on('userInfo2', (item) => {
console.log('userInfo2监听到的内容如下:');
console.log(item);
});
}
}
}
</script>
全部监听
<script>import emitter from './utils/eventbus.js';
export default {
created() {// 2. 全部监听(类似遍历,监听到1次,执行一次下面代码)
emitter.on('*', (type, info) => {
console.log('下面是全部监听哦:');
console.log(type);
console.log(info);
});
}
}
</script>
(3). 测试
单个监听
全部监听
(4). 补充-取消监听
六. 对比Vue2.x的传值方式
1. 父传子
Vue2.x中的传递方式和Vue3.x中的相同,都是通过Props属性传递。
2. 子传父
和Vue3.x相同的是,Vue2.x也是通过 $emit对外传递方法,但是Vue2.x中可以不用事先通过emits属性声明,Vue2.x中不声明不报警告,但是Vue3.x中不声明,则报警告。
下面是子组件代码:
<template><div>
<button @click="increment">增加</button>
<button @click="decrement">减少</button>
<button @click="cdMany">测试传递多个参数</button>
</div>
</template>
<script>
export default {
// Vue2.x中不涉及提前emits声明,也不会报警告
// emits: ['addN', 'subN', 'cdN'],
data() {
return {};
},
methods: {
increment() {
this.$emit('addN', 2);
},
decrement() {
this.$emit('subN', 5);
},
// 传递多个参数
cdMany() {
this.$emit('cdN', 'ypf1', 20, '哈哈');
}
}
}
</script>
3. 爷传孙
Vue2.x中没有provide和inject选项。
4. 兄弟/任意组件
Vue2.x中提供 $emit对外发送函数 和 $on监听函数。
封装eventbus.js
import Vue from 'vue';export default new Vue();
兄弟组件1-发送方
<template><div>
我是child1组件哦
<button @click="mySend">测试发送啊</button>
</div>
</template>
<script>
import vm from './utils/eventbus.js'
export default {
methods: {
mySend() {
console.log('child1组件点击发送')
// 发送1
vm.$emit('userInfo1', { name: 'lmr1', age: 20 });
// 发送2
vm.$emit('userInfo2', { name: 'lmr2', age: 100 });
}
}
}
</script>
兄弟组件2-监听方
<template><div>
我是child2组件,我就接受消息哦。
</div>
</template>
<script>
import vm from './utils/eventbus.js'
export default {
mounted() {
// 1. 单个监听
{
// 监听1
vm.$on('userInfo1', (item) => {
console.log('userInfo1监听到的内容如下:');
console.log(item);
});
// 监听2
vm.$on('userInfo2', (item) => {
console.log('userInfo2监听到的内容如下:');
console.log(item);
});
}
// 2. 全部监听(没有这种用法)
// 3.取消监听,需要配合封装函数
// vm.$off()
}
}
</script>
父组件
<template><div>
<!-- child1组件发送 -->
<child1></child1>
<!-- child2组件接收 -->
<child2></child2>
</div>
</template>
<script>
import child1 from './child1.vue';
import child2 from './child2.vue';
export default {
components: {
child1,
child2
},
data() {
return {};
}
}
</script>
!
- 作 者 : Yaopengfei(姚鹏飞)
- 博客地址 : http://www.cnblogs.com/yaopengfei/
- 声 明1 : 如有错误,欢迎讨论,请勿谩骂^_^。
- 声 明2 : 原创博客请在转载时保留原文链接或在文章开头加上本人博客地址,否则保留追究法律责任的权利。
以上是 第七节:组件入门使用、组件通讯剖析(父传子、子传父、爷传孙、兄弟/任意组件)、对比Vue2.x的传值 的全部内容, 来源链接: utcz.com/z/374818.html

