vue-cli4 创建多页面项目

使用vue cli进行开发,所有表现都会通过注入在index.html表现。
如果要实现多个页面节点,一般通过路由来实现,路由有两种模式,分别是默认的hash模式,History模式,它们的区别是:
hash模式,产生的目录结构为:www.doamin.com/#/good
history模式,产生的目录结构为:www.doamin.com/good/
配置的方法是定义router/router.js文件
const router = new Router({ mode: \'history\',
routers,
});
即使是上面的方法,但对传统网页有所爱好者依然会不满意,比如会网友问:
当前目前如果有多个页面怎么办?
比如是否能实现这样的网页结构:
www.z01.com/pub/index.html
www.z01.com/pub/listpage.shtml
答案是有的,伟大领袖告诉我们自力更生丰衣足食,让我们动起手来!
1 准备工作
1.1 先查看版本
npm -Vnpm@6.12.0 C:\Program Files\nodejs\node_modules\npm
vue -V
@vue/cli 4.1.2
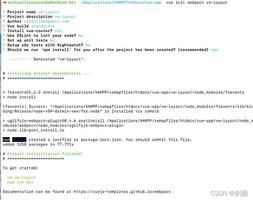
1.2 创建项目
vue create templates会创建一个名为templates的项目
目录结构为:
初始结构.png
npm run serveApp running at:
- Local: http://localhost:8080/
- Network: http://192.168.43.36:8080/
Note that the development build is not optimized.
To create a production build, run npm run build.
运行npm run serve,可以在
http://localhost:8080/http://192.168.43.36:8080/
看到这个页面:
初始index.png
2 多页面配置
2.1 修改目录
1、在src目录下创建一个pages文件夹,
2、在pages文件夹下面创建index文件夹,
修改之后文件夹结构为:
第一次修改目录结构.jpg
3、把public文件夹下的index.html移到index文件夹,
4、把components文件夹下面的HelloWorld.vue移到index文件夹,(这里可以不移动,因为这个是默认生成的一个例子,实际开发中,创建项目生成的这个页面我们根本用不到,移动只是为了方便做例子,不另外写一个index页面)
5、把src文件夹下的App.vue和main.js都移到index文件夹下面
这时候目录结构:
第一次移动文件.png
2.2 理一下逻辑
index.html
这个文件便是打开首页显示的文件。
<!DOCTYPE html><html lang="en">
<head>
<meta charset="utf-8">
<meta http-equiv="X-UA-Compatible" content="IE=edge">
<meta name="viewport" content="width=device-width,initial-scale=1.0">
<link rel="icon" href="<%= BASE_URL %>favicon.ico">
<title>templates</title>
</head>
<body>
<noscript>
<span>We\'re sorry but templates doesn\'t work properly without JavaScript enabled. Please enable it to continue.</span>
</noscript>
<div id="app"></div> <!-- 记住这里!!!!-->
<!-- built files will be auto injected -->
</body>
</html>
记住 id="app"这行
App.vue
内容如下:
<template> <div id="app">
<img alt="Vue logo" src="./assets/logo.png">
<HelloWorld msg="Welcome to Your Vue.js App"/>
</div>
</template>
<script>
import HelloWorld from \'./components/HelloWorld.vue\'
export default {
name: \'app\',
components: {
HelloWorld
}
}
</script>
<style>
#app {
font-family: \'Avenir\', Helvetica, Arial, sans-serif;
-webkit-font-smoothing: antialiased;
-moz-osx-font-smoothing: grayscale;
text-align: center;
color: #2c3e50;
margin-top: 60px;
}
</style>
这里就是写index.html中id="app"这个div的内容。
并且引入了HelloWorld.vue
在
components: { HelloWorld
}
包含了这个组件
在
<HelloWorld msg="Welcome to Your Vue.js App"/>给HelloWorld.vue传入了一个msg变量
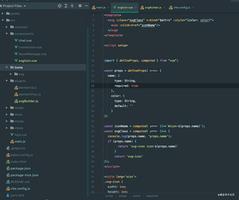
HelloWorld.vue
<template><div class="hello">
<h1>{{ msg }}</h1> <!--传入的msg变量在这里 -->
<p>
For a guide and recipes on how to configure / customize this project,<br>
check out the
<a href="https://cli.vuejs.org" target="_blank" rel="noopener">vue-cli documentation</a>.
</p>
<h3>Installed CLI Plugins</h3>
<ul>
<li><a href="https://github.com/vuejs/vue-cli/tree/dev/packages/%40vue/cli-plugin-babel" target="_blank" rel="noopener">babel</a></li>
<li><a href="https://github.com/vuejs/vue-cli/tree/dev/packages/%40vue/cli-plugin-eslint" target="_blank" rel="noopener">eslint</a></li>
</ul>
<h3>Essential Links</h3>
<ul>
<li><a href="https://vuejs.org" target="_blank" rel="noopener">Core Docs</a></li>
<li><a href="https://forum.vuejs.org" target="_blank" rel="noopener">Forum</a></li>
<li><a href="https://chat.vuejs.org" target="_blank" rel="noopener">Community Chat</a></li><li><a href="https://twitter.com/vuejs" target="_blank" rel="noopener">Twitter</a></li
><li><a href="https://news.vuejs.org" target="_blank" rel="noopener">News</a></li>
</ul>
<h3>Ecosystem</h3>
<ul>
<li><a href="https://router.vuejs.org" target="_blank" rel="noopener">vue-router</a></li>
<li><a href="https://vuex.vuejs.org" target="_blank" rel="noopener">vuex</a></li>
<li><a href="https://github.com/vuejs/vue-devtools#vue-devtools" target="_blank" rel="noopener">vue-devtools</a></li>
<li><a href="https://vue-loader.vuejs.org" target="_blank" rel="noopener">vue-loader</a></li>
<li><a href="https://github.com/vuejs/awesome-vue" target="_blank" rel="noopener">awesome-vue</a></li>
</ul>
</div>
</template>
<script>
export default {
name: \'HelloWorld\',
props: {
msg: String
}
}
</script>
<!-- Add "scoped" attribute to limit CSS to this component only -->
<style scoped>
h3 {
margin: 40px 0 0;
}
ul {
list-style-type: none;
padding: 0;
}
li {
display: inline-block;
margin: 0 10px;
}
a {
color: #42b983;
}
</style>
main.js
import Vue from \'vue\'import App from \'./App.vue\'
Vue.config.productionTip = false
new Vue({
render: h => h(App),
}).$mount(\'#app\')
render: h => h(App)这句话的意思是创建 App element
就是下面这个函数的意思
render: function (createElement) { return createElement(App);
}
2.3 修改文件名称
App.vue改为index.vue;
main.js改为index.js
2.4 修改文件内容
index.vue
<template> <div id="app">
<img alt="Vue logo" src="../../assets/logo.png"> 修改这里
<HelloWorld msg="Welcome to Your Vue.js App"/>
</div>
</template>
<script>
import HelloWorld from \'./HelloWorld.vue\' 修改这里
export default {
name: \'app\',
components: {
HelloWorld
}
}
</script>
<style>
#app {
font-family: \'Avenir\', Helvetica, Arial, sans-serif;
-webkit-font-smoothing: antialiased;
-moz-osx-font-smoothing: grayscale;
text-align: center;
color: #2c3e50;
margin-top: 60px;
}
</style>
index.js
import Vue from \'vue\'import App from \'./index.vue\' 修改这里
Vue.config.productionTip = false
new Vue({
render: h => h(App),
}).$mount(\'#app\')
3 配置vue.config.js
在src文件夹同一级目录添加一个名为vue.config.js的js文件。
添加vue.config.js.png
内容如下:
module.exports = { publicPath: \'/\',
outputDir: \'dist\',
assetsDir: \'assets\',
indexPath: \'index.html\',
filenameHashing:true,
pages: {
index: {
entry: "./src/pages/index/index.js", // 配置入口js文件
template: "./src/pages/index/index.html", // 主页面
filename: "index.html", // 打包后的html文件名称
title: "首页", // 打包后的.html中<title>标签的文本内容
// 在这个页面中包含的块,默认情况下会包含
// 提取出来的通用 chunk 和 vendor chunk。
chunks: [\'chunk-vendors\', \'chunk-common\', \'index\']
}
},
}
具体配置请查看官方文档
启动 npm run serve
这时候可以重新打开首页。
我们做到这里就完成了首页页面配置。
4 新增一个页面
新增一个页面,随便取个名字 baicai
在pages文件夹下新增一个baicai文件夹
在白菜文件夹下新建几个文件
baicai.htmlbaicai.vue
baicai.js
新增baicai.jpg
编辑文件内容
baicai.html
<!DOCTYPE html><html lang="en">
<head>
<meta charset="utf-8">
<meta http-equiv="X-UA-Compatible" content="IE=edge">
<meta name="viewport" content="width=device-width,initial-scale=1.0">
<link rel="icon" href="<%= BASE_URL %>favicon.ico">
<title>baicai</title>
</head>
<body>
<noscript>
<span>We\'re sorry but templates doesn\'t work properly without JavaScript enabled. Please enable it to continue.</span>
</noscript>
<div id="app"></div>
<!-- built files will be auto injected -->
</body>
</html>
baicai.vue
<template> <div id="app">
<img alt="Vue logo" src="../../assets/logo.png">
<h1>一颗数据小白菜</h1>
</div>
</template>
<script>
export default {
name: \'app\',
}
</script>
<style>
#app {
font-family: \'Avenir\', Helvetica, Arial, sans-serif;
-webkit-font-smoothing: antialiased;
-moz-osx-font-smoothing: grayscale;
text-align: center;
color: #2c3e50;
margin-top: 60px;
}
</style>
baicai.js
import Vue from \'vue\'import App from \'./baicai.vue\'
Vue.config.productionTip = false
new Vue({
render: h => h(App),
}).$mount(\'#app\')
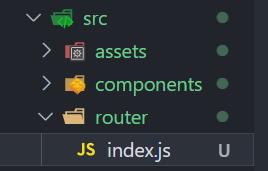
5 配置router
在src下创建router文件夹,在router文件夹下创建router.js
修改内容为:
import Vue from \'vue\'import Router from \'vue-router\'
import index from \'../pages/index/index.vue\';
import baicai from \'../pages/baicai/baicai.vue\';
Vue.use(Router);
const routers = [
{
path: \'/\',
redirect: \'/index\',
component: index,
meta: {requiresAuth: false}
},
{
path: \'/index\',
name: \'index\',
component: index,
meta: { requiresAuth: false },
},
{
path: \'/baicai\',
name: \'baicai\',
component: baicai,
meta: { requiresAuth: false },
},
];
const router = new Router({
mode: \'history\',
routers,
});
export default router;
6 定义vue.config.js
如果只增加了前面几步,访问是可以,但页面不会生效,还需要定义全局使该页生效。
回到项目的根目录,打开vue.config.js,增加baicai一段资源引用,完整代码如下:
module.exports = { publicPath: \'/\',
outputDir: \'dist\',
assetsDir: \'assets\',
indexPath: \'index.html\',
filenameHashing:true,
pages: {
index: {
entry: "./src/pages/index/index.js", // 配置入口js文件
template: "./src/pages/index/index.html", // 主页面
filename: "index.html", // 打包后的html文件名称
title: "首页", // 打包后的.html中<title>标签的文本内容
// 在这个页面中包含的块,默认情况下会包含
// 提取出来的通用 chunk 和 vendor chunk。
chunks: [\'chunk-vendors\', \'chunk-common\', \'index\']
},
baicai: {//新增的部份
entry: "./src/pages/baicai/baicai.js", // 配置入口js文件
template: "./src/pages/baicai/baicai.html", // 主页面
filename: "baicai.html", // 打包后的html文件名称
title: "首页", // 打包后的.html中<title>标签的文本内容
// 在这个页面中包含的块,默认情况下会包含
// 提取出来的通用 chunk 和 vendor chunk。
chunks: [\'chunk-vendors\', \'chunk-common\', \'baicai\']
},
},
}
7 重启服务
打开http://localhost:8080/baicai
baicai.png
8 首页跳转
修改index文件夹下的 index.vue
<template> <div id="app">
<img alt="Vue logo" src="../../assets/logo.png">
<div>
<a href="baicai.html">跳转到白菜页面</a> 修改这里
</div>
<HelloWorld msg="Welcome to Your Vue.js App"/>
</div>
</template>
<script>
import HelloWorld from \'./HelloWorld.vue\'
export default {
name: \'app\',
components: {
HelloWorld
}
}
</script>
<style>
#app {
font-family: \'Avenir\', Helvetica, Arial, sans-serif;
-webkit-font-smoothing: antialiased;
-moz-osx-font-smoothing: grayscale;
text-align: center;
color: #2c3e50;
margin-top: 60px;
}
</style>
重启服务,打开http://localhost:8080
跳转到白菜页面.png
点击跳转到白菜页面
就会跳转到http://localhost:8080/baicai.html
一颗数据小白菜.png
最后你可以运行npm run bulid编译,最后结构如下所示:
最后发布出来的格式
9 总结
手工多页面配置其实就是2个步骤:
1、配置vue.config.js中的pages
2、配置router
项目最后实例可参见github:
https://github.com/zoomla/vue-cli4-multipage
注:此文有参照引用https://www.jianshu.com/p/3a27c5c4da18
作者:zoomlaCMS
链接:https://www.jianshu.com/p/5361fb716df2
来源:简书
著作权归作者所有。商业转载请联系作者获得授权,非商业转载请注明出处。
以上是 vue-cli4 创建多页面项目 的全部内容, 来源链接: utcz.com/z/374570.html