图文详解如何在vue3+vite项目中使用svg
今天在vue3+vite项目练习中,在使用svg时,发现之前的写法不能用,之前的使用方法参考vue2中优雅的使用svg
const req = require.context('./icons/svg', false, /\.svg$/)
const requireAll = requireContent => requireContent.keys().map(requireContent)
requireAll(req)
然后就各种资料查找,终于实现了,废话不多说,直接上代码:
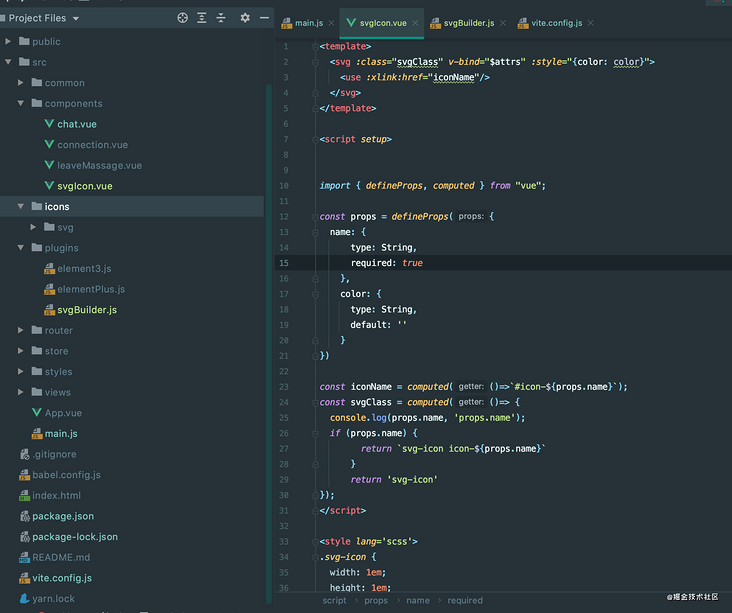
stept1: 文件目录
stept2: 安装 svg-sprite-loader
npm install svg-sprite-loader -D
# via yarn
yarn add svg-sprite-loader -D
stept3: 创建svgIcon.vue文件
<template>
<svg :class="svgClass" v-bind="$attrs" :style="{color: color}">
<use :xlink:href="iconName" rel="external nofollow" />
</svg>
</template>
<script setup>
import { defineProps, computed } from "vue";
const props = defineProps({
name: {
type: String,
required: true
},
color: {
type: String,
default: ''
}
})
const iconName = computed(()=>`#icon-${props.name}`);
const svgClass = computed(()=> {
console.log(props.name, 'props.name');
if (props.name) {
return `svg-icon icon-${props.name}`
}
return 'svg-icon'
});
</script>
<style lang='scss'>
.svg-icon {
width: 1em;
height: 1em;
fill: currentColor;
vertical-align: middle;
}
</style>
stept4: 创建icons文件夹,存放svg文件
stept5: 在main.js里面全局注入svg-icon组件
import { createApp } from 'vue'
import App from './App.vue'
import svgIcon from './components/svgIcon.vue'
createApp(App).component('svg-icon', svgIcon).mount('#app');
stept6: 在plugins文件夹创建svgBuilder.js(重点来了), ts版本参考:https://github.com/JetBrains/svg-sprite-loader/issues/434
import { readFileSync, readdirSync } from 'fs'
let idPerfix = ''
const svgTitle = /<svg([^>+].*?)>/
const clearHeightWidth = /(width|height)="([^>+].*?)"/g
const hasViewBox = /(viewBox="[^>+].*?")/g
const clearReturn = /(\r)|(\n)/g
function findSvgFile(dir) {
const svgRes = []
const dirents = readdirSync(dir, {
withFileTypes: true
})
for (const dirent of dirents) {
if (dirent.isDirectory()) {
svgRes.push(...findSvgFile(dir + dirent.name + '/'))
} else {
const svg = readFileSync(dir + dirent.name)
.toString()
.replace(clearReturn, '')
.replace(svgTitle, ($1, $2) => {
// console.log(++i)
// console.log(dirent.name)
let width = 0
let height = 0
let content = $2.replace(
clearHeightWidth,
(s1, s2, s3) => {
if (s2 === 'width') {
width = s3
} else if (s2 === 'height') {
height = s3
}
return ''
}
)
if (!hasViewBox.test($2)) {
content += `viewBox="0 0 ${width} ${height}"`
}
return `<symbol id="${idPerfix}-${dirent.name.replace(
'.svg',
''
)}" ${content}>`
})
.replace('</svg>', '</symbol>')
svgRes.push(svg)
}
}
return svgRes
}
export const svgBuilder = (path, perfix = 'icon') => {
if (path === '') return
idPerfix = perfix
const res = findSvgFile(path)
// console.log(res.length)
// const res = []
return {
name: 'svg-transform',
transformIndexHtml(html) {
return html.replace(
'<body>',
`
<body>
<svg xmlns="http://www.w3.org/2000/svg" xmlns:xlink="http://www.w3.org/1999/xlink" style="position: absolute; width: 0; height: 0">
${res.join('')}
</svg>
`
)
}
}
}
stept7: 最后在vite.config.js修改配置
import { svgBuilder } from './src/plugins/svgBuilder';
export default defineConfig({
plugins: [svgBuilder('./src/icons/svg/')] // 这里已经将src/icons/svg/下的svg全部导入,无需再单独导入
})
总结
到此这篇关于如何在vue3+vite项目中使用svg的文章就介绍到这了,更多相关vue3+vite使用svg内容请搜索以前的文章或继续浏览下面的相关文章希望大家以后多多支持!
以上是 图文详解如何在vue3+vite项目中使用svg 的全部内容, 来源链接: utcz.com/p/240084.html