Spring深入浅出(三),Spring Bean生命周期,BeanPostProcessor(Spring后置处理器)
本文内容纲要:Spring深入浅出(三),Spring Bean生命周期,BeanPostProcessor(Spring后置处理器)
BeanPostProcessor 接口也被称为后置处理器,通过该接口可以自定义调用初始化前后执行的操作方法。postProcessBeforeInitialization 方法是在 Bean 实例化和依赖注入后,自定义初始化方法前执行;而 postProcessAfterInitialization 方法是在自定义初始化方法后执行。两个方法都要将传入的bean返回,而不能返回null,如果返回的是null那么我们通过getBean方法将得不到目标。
如果我们想在Spring容器中完成bean实例化、配置以及其他初始化方法前后要添加一些自己逻辑处理。我们需要定义一个或多个BeanPostProcessor接口实现类,然后注册到Spring IoC容器中。
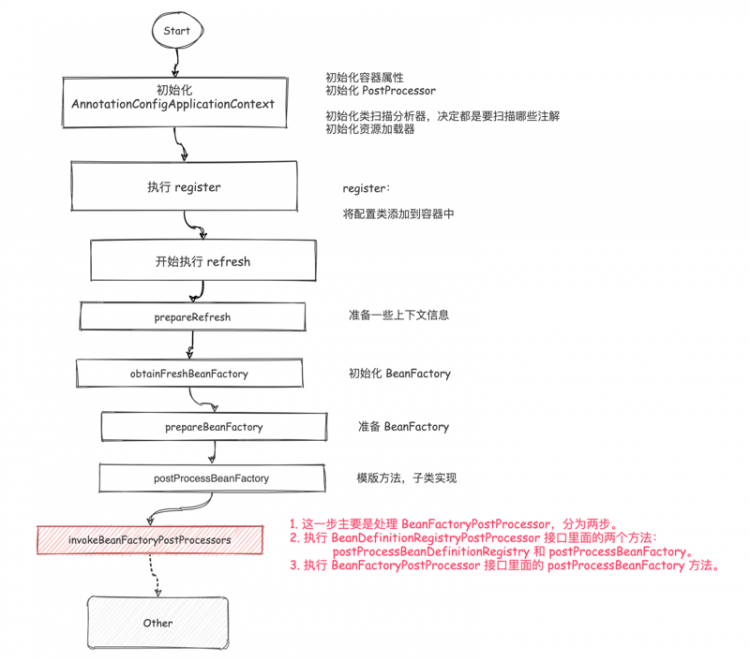
Spring中Bean的实例化过程图示:
ApplicationContext会自动检测在配置文件中实现了BeanPostProcessor接口的所有bean,并把它们注册为后置处理器,然后在容器创建bean的适当时候调用它,因此部署一个后置处理器同部署其他的bean并没有什么区别
1. 创建实体类
package com.clzhang.spring.demo;public class HelloWorld {
private String message;
public void setMessage(String message) {
this.message = message;
}
public void getMessage() {
System.out.println("message : " + message);
}
public void init() {
System.out.println("调用XML配置文件中指定的init方法......");
}
public void destroy() throws Exception {
System.out.println("调用XML配置文件中指定的destroy方法......");
}
}
2. 创建BeanPostProcessor接口实现类
package com.clzhang.spring.demo;import org.springframework.beans.BeansException;
import org.springframework.beans.factory.config.BeanPostProcessor;
public class InitHelloWorld implements BeanPostProcessor {
@Override
public Object postProcessBeforeInitialization(Object bean, String beanName) throws BeansException {
System.out.println("InitHelloWorld Before : " + beanName);
return bean;
}
@Override
public Object postProcessAfterInitialization(Object bean, String beanName) throws BeansException {
System.out.println("InitHelloWorld After : " + beanName);
return bean;
}
}
3. 创建主程序
package com.clzhang.spring.demo;import org.springframework.context.support.AbstractApplicationContext;
import org.springframework.context.support.ClassPathXmlApplicationContext;
public class MainApp {
public static void main(String[] args) {
AbstractApplicationContext context = new ClassPathXmlApplicationContext("Beans.xml");
HelloWorld objA = (HelloWorld) context.getBean("helloWorld");
objA.setMessage("对象A");
objA.getMessage();
context.registerShutdownHook();
}
}
4. 配置文件
<?xml version="1.0" encoding="UTF-8"?><beans xmlns:xsi="http://www.w3.org/2001/XMLSchema-instance"
xmlns="http://www.springframework.org/schema/beans"
xmlns:context="http://www.springframework.org/schema/context"
xsi:schemaLocation="http://www.springframework.org/schema/beans
http://www.springframework.org/schema/beans/spring-beans-3.0.xsd
http://www.springframework.org/schema/context
http://www.springframework.org/schema/context/spring-context-3.0.xsd">
<bean id="helloWorld" class="com.clzhang.spring.demo.HelloWorld" init-method="init" destroy-method="destroy">
<property name="message" value="Hello World!" />
</bean>
<bean class="com.clzhang.spring.demo.InitHelloWorld" />
</beans>
5. 运行
InitHelloWorld Before : helloWorld调用XML配置文件中指定的init方法......
InitHelloWorld After : helloWorld
message : 对象A
调用XML配置文件中指定的destroy方法......
本文参考:
http://c.biancheng.net/spring/bean-post-processor.html
https://blog.csdn.net/geekjoker/article/details/79868945
本文内容总结:Spring深入浅出(三),Spring Bean生命周期,BeanPostProcessor(Spring后置处理器)
原文链接:https://www.cnblogs.com/nayitian/p/14998734.html
以上是 Spring深入浅出(三),Spring Bean生命周期,BeanPostProcessor(Spring后置处理器) 的全部内容, 来源链接: utcz.com/z/362517.html


