详解Angular Reactive Form 表单验证
本文我们将介绍 Reactive Form 表单验证的相关知识,具体内容如下:
- 使用内建的验证规则
- 动态调整验证规则
- 自定义验证器
- 自定义验证器 (支持参数)
- 跨字段验证
基础知识
内建验证规则
Angular 提供了一些内建的 validators,我们可以在 Template-Driven 或 Reactive 表单中使用它们。
目前 Angular 支持的内建 validators 如下:
- required - 设置表单控件值是非空的。
- email - 设置表单控件值的格式是 email。
- minlength - 设置表单控件值的最小长度。
- maxlength - 设置表单控件值的最大长度。
- pattern - 设置表单控件的值需匹配 pattern 对应的模式。
示例
this.signupForm = this.fb.group({
userName: ['', [Validators.required, Validators.minLength(3)]],
email: ['', [Validators.required, Validators.pattern('[a-z0-9._%+_]+@[a-z0-9.-]+')]]
});
动态调整验证规则
myControl.setValidators(Validators.required);
myControl.setValidators([Validators.required, Validators.maxLength(6)]);
myControl.clearValidators();
myControl.updateValueAndValidity();
自定义验证器
function myCustomValidator(c: AbstractControl):
{[key: string]: boolean} | null {
if(somethingIsWrong) {
return { 'myvalidator': true};
}
return null;
}
自定义验证器 (支持参数)
function myCustomValidator(param: any): ValidatorFn {
return (c: AbstractControl): {[key: string]: boolean} | null {
if(somethingIsWrong) {
return { 'myvalidator': true};
}
return null;
}
}
跨字段验证
emailMatcher
function emailMatcher(c: AbstractControl) {
let emailControl = c.get('email');
let confirmControl = c.get('confirmEmail');
if (emailControl.pristine || confirmControl.pristine) {
return null;
}
return emailControl.value === confirmControl.value ? null : { 'match': true };
}
emailGroup
ngOnInit(): void {
this.signupForm = this.fb.group({
userName: ['', [Validators.required, Validators.minLength(6)]],
emailGroup: this.fb.group({
email: ['', [Validators.required, Validators.email]],
confirmEmail: ['', [Validators.required]],
}, { validator: emailMatcher })
});
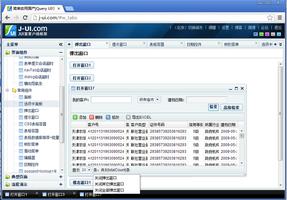
在介绍表单验证前,我们来看一下目前页面的显示效果:
表单验证
表单的内建验证规则,前面章节已经介绍过了,接下来我们来介绍在表单中如何 "动态调整验证规则" 。
动态调整验证规则
为了演示 "动态调整验证规则" 的功能,我新增了两个控件:
- radio - 用于让用户设置是否开启手机登录。
- tel - 当用户开启手机登录功能,用于让用户输入手机号码。
当用户开启手机登录功能,手机号码对应控件的验证规则,必须是必填且格式为合法的手机号码。当用户不开启手机登录功能时,手机号码对应控件将不是必填的。
新增 radio 控件
<div class="form-group">
<div class="col-md-offset-1 col-md-8 checkbox">
开启手机登录
<label>
<input type="radio" value="1"
formControlName="enableMobile">
是
</label>
<label>
<input type="radio" value="0"
formControlName="enableMobile">
否
</label>
</div>
</div>
新增 tel 控件
<div class="form-group"
[ngClass]="{'has-error': (mobile.touched || mobile.dirty) && !mobile.valid }">
<label class="col-md-2 control-label"
for="mobileId">手机号码</label>
<div class="col-md-8">
<input class="form-control"
id="mobileId"
type="text"
placeholder="请输入手机号码"
formControlName="mobile"/>
<span class="help-block" *ngIf="(mobile.touched || mobile.dirty)
&& mobile.errors">
<span *ngIf="mobile.errors.required">
请输入手机号码
</span>
<span *ngIf="mobile.errors.minlength">
手机号码格式不正确
</span>
</span>
</div>
</div>
动态调整验证规则功能
ngOnInit(): void {
...
this.signupForm.get('enableMobile').valueChanges
.subscribe(value => this.checkMobile(value));
}
checkMobile(enableMobile: string): void {
const mobileControl = this.signupForm.get('mobile');
enableMobile === "1" ?
mobileControl.setValidators([Validators.required,
Validators.pattern('1(3|4|5|7|8)\\d{9}')]) :
mobileControl.clearValidators();
mobileControl.updateValueAndValidity();
}
介绍完如何动态调整验证规则,接下来我们来介绍如何 "自定义验证器"。
自定义验证器
为了演示 "自定义验证器" 的功能,我新增了一个控件:
number - 用于让用户设置是年龄信息。
当让用户手动输入年龄信息时,我们需要设置一个有效的年龄范围,比如 (18 - 120)。此时我们就需要通过自定义验证器来实现上述功能。
新增 number 控件
<div class="form-group"
[ngClass]="{'has-error': (age.touched || age.dirty) && !age.valid }">
<label class="col-md-2 control-label"
for="ageId">年龄</label>
<div class="col-md-8">
<input class="form-control"
id="ageId"
type="number"
placeholder="请输入年龄"
formControlName="age"/>
<span class="help-block" *ngIf="(age.touched || age.dirty) && age.errors">
<span *ngIf="age.errors.range">
输入年龄不合法
</span>
</span>
</div>
</div>
自定义验证器模板
function myCustomValidator(c: AbstractControl):
{[key: string]: boolean} | null {
if(somethingIsWrong) {
return { 'myvalidator': true};
}
return null;
}
新增 ageValidator 验证器
function ageValidator(c: AbstractControl): { [key: string]: any } | null {
let age = c.value;
if (age && (isNaN(age) || age < 20 || age > 120)) {
return { 'range': true, min: 20, max: 120 };
}
return null;
}
使用 ageValidator 验证器
ngOnInit(): void {
this.signupForm = this.fb.group({
// ...
age: ['', ageValidator]
});
}
我们的 ageValidator 自定义验证器,虽然已经实现了。细心的读者应该会发现,在 ageValidator 验证器内部,我们写死了年龄的边界值 (最小值与最大值)。理想的情况下,应该能够让用户自行设定边界值。因此接下来,我们来优化一下 ageValidator 验证器。
自定义验证器 (支持参数)
自定义验证器模板 (支持参数)
function myCustomValidator(param: any): ValidatorFn {
return (c: AbstractControl): {[key: string]: boolean} | null {
if(somethingIsWrong) {
return { 'myvalidator': true};
}
return null;
}
}
新增 ageRange 验证器工厂
function ageRange(min: number, max: number): ValidatorFn {
return (c: AbstractControl): { [key: string]: any } | null => {
let age = c.value;
if (age && (isNaN(age) || age < min || age > max)) {
return { 'range': true, min: min, max: max };
}
return null;
}
}
使用 ageRange 验证器工厂
ngOnInit(): void {
this.signupForm = this.fb.group({
// ...
age: ['', ageRange(20, 120)]
});
}
介绍完如何自定义验证器,接下来我们来介绍如何实现 "跨字段验证" 的功能。
跨字段验证
在日常生活中,在注册表单中,经常要让用户再次输入同样的字段值,比如登录密码或邮箱地址的值。针对这种场景,我们就需要验证两个控件的输入值是否一致,这时我们就要引入跨字段验证的功能。
为了演示 "跨字段验证" 的功能,我新增了一个控件:
- email - 用于让用户确认输入的邮箱地址
新增 email 控件
<label class="col-md-2 control-label"
for="emailId">确认邮箱</label>
<div class="col-md-8">
<input class="form-control"
id="confirmEmailId"
type="email"
placeholder="请再次输入邮箱地址"
formControlName="confirmEmail"/>
<span class="help-block" *ngIf="(confirmEmail.touched ||
confirmEmail.dirty)">
<span *ngIf="confirmEmail.errors?.required">
请输入邮箱地址
</span>
<span *ngIf="!confirmEmail.errors?.required &&
emailGroup.errors?.match">
两次输入的邮箱地址不一致
</span>
</span>
</div>
新增 emailMatcher
function emailMatcher(c: AbstractControl) {
let emailControl = c.get('email');
let confirmControl = c.get('confirmEmail');
if (emailControl.pristine || confirmControl.pristine) {
return null;
}
return emailControl.value === confirmControl.value ? null : { 'match': true };
}
新增 emailGroup
ngOnInit(): void {
this.signupForm = this.fb.group({
userName: ['', [Validators.required, Validators.minLength(6)]],
emailGroup: this.fb.group({
email: ['', [Validators.required, Validators.email]],
confirmEmail: ['', [Validators.required]],
}, { validator: emailMatcher }),
// ...
});
更新模板
<div class="form-group"
formGroupName="emailGroup"
[ngClass]="{'has-error': emailGroup.errors }">
<label class="col-md-2 control-label"
for="emailId">邮箱</label>
<div class="col-md-8">
<input class="form-control"
id="emailId"
type="email"
placeholder="请输入邮箱地址"
formControlName="email"/>
<span class="help-block" *ngIf="(email.touched || email.dirty) &&
email.errors">
<span *ngIf="email.errors.required">
请输入邮箱地址
</span>
<span *ngIf="!email.errors.required && email.errors.email">
请输入有效的邮箱地址
</span>
</span>
</div>
<!--其余部分:请参考"新增email控件"的内容-->
</div>
上面代码中,有以下几个问题需要注意:
- Form Group 是可以嵌套使用的。
this.signupForm = this.fb.group({
userName: ['', [Validators.required, Validators.minLength(6)]],
emailGroup: this.fb.group({
email: ['', [Validators.required, Validators.email]],
confirmEmail: ['', [Validators.required]],
}, { validator: emailMatcher })
我们通过 formGroupName="groupName" 语法来绑定内嵌的 Form Group。
<div class="form-group" formGroupName="emailGroup"
[ngClass]="{'has-error': emailGroup.errors }">
邮箱不匹配的信息是存在 emailGroup 对象的 errors 属性中,而不是存在 confirmEmail 对象的 errors 属性中。
<span *ngIf="!confirmEmail.errors?.required && emailGroup.errors?.match">
两次输入的邮箱地址不一致
</span>
我有话说
怎么会监听表单值的变化?
Reactive Form
export class AppComponent {
constructor(private fb: FormBuilder) {
this.form = fb.group({
name: 'semlinker',
age: 31
});
this.form.valueChanges.subscribe(data => {
console.log('Form changes', data)
});
}
}
Template-driven Form
模板
<form #myForm="ngForm" (ngSubmit)="onSubmit()">
<input type="text"
name="name"
class="form-control"
required
[(ngModel)]="user.name">
<input type="number"
name="age"
class="form-control"
required
[(ngModel)]="user.age">
</form>
组件类
class AppComponent implements AfterViewInit {
@ViewChild('myForm') form;
ngAfterViewInit() {
this.form.control.valueChanges
.debounceTime(500)
.subscribe(values => this.doSomething(values));
}
}
以上是 详解Angular Reactive Form 表单验证 的全部内容, 来源链接: utcz.com/z/348367.html