tensorflow模型的save与restore,及checkpoint中读取变量方式
创建一个NN
import tensorflow as tf
import numpy as np
#fake data
x = np.linspace(-1, 1, 100)[:, np.newaxis] #shape(100,1)
noise = np.random.normal(0, 0.1, size=x.shape)
y = np.power(x, 2) + noise #shape(100,1) + noise
tf_x = tf.placeholder(tf.float32, x.shape) #input x
tf_y = tf.placeholder(tf.float32, y.shape) #output y
l = tf.layers.dense(tf_x, 10, tf.nn.relu) #hidden layer
o = tf.layers.dense(l, 1) #output layer
loss = tf.losses.mean_squared_error(tf_y, o ) #compute loss
train_op = tf.train.GradientDescentOptimizer(learning_rate=0.5).minimize(loss)
1.使用save对模型进行保存
sess= tf.Session()
sess.run(tf.global_variables_initializer()) #initialize var in graph
saver = tf.train.Saver() # define a saver for saving and restoring
for step in range(100): #train
sess.run(train_op,{tf_x:x, tf_y:y})
saver.save(sess, 'params/params.ckpt', write_meta_graph=False) # mate_graph is not recommend
生成三个文件,分别是checkpoint,.ckpt.data-00000-of-00001,.ckpt.index
2.使用restore对提取模型
在提取模型时,需要将模型结构再定义一遍,再将各参数加载出来
#bulid entire net again and restore
tf_x = tf.placeholder(tf.float32, x.shape)
tf_y = tf.placeholder(tf.float32, y.shape)
l_ = tf.layers.dense(tf_x, 10, tf.nn.relu)
o_ = tf.layers.dense(l_, 1)
loss_ = tf.losses.mean_squared_error(tf_y, o_)
sess = tf.Session()
# don't need to initialize variables, just restoring trained variables
saver = tf.train.Saver() # define a saver for saving and restoring
saver.restore(sess, './params/params.ckpt')
3.有时会报错Not found:b1 not found in checkpoint
这时我们想知道我在文件中到底保存了什么内容,即需要读取出checkpoint中的tensor
import os
from tensorflow.python import pywrap_tensorflow
checkpoint_path = os.path.join('params','params.ckpt')
# Read data from checkpoint file
reader = pywrap_tensorflow.NewCheckpointReader(checkpoint_path)
var_to_shape_map = reader.get_variable_to_shape_map()
# Print tensor name and value
f = open('params.txt','w')
for key in var_to_shape_map: # write tensors' names and values in file
print(key,file=f)
print(reader.get_tensor(key),file=f)
f.close()
运行后生成一个params.txt文件,在其中可以看到模型的参数。
补充知识:TensorFlow按时间保存检查点
一 实例
介绍一种更简便地保存检查点功能的方法——tf.train.MonitoredTrainingSession函数,该函数可以直接实现保存及载入检查点模型的文件。
演示使用MonitoredTrainingSession函数来自动管理检查点文件。
二 代码
import tensorflow as tf
tf.reset_default_graph()
global_step = tf.train.get_or_create_global_step()
step = tf.assign_add(global_step, 1)
with tf.train.MonitoredTrainingSession(checkpoint_dir='log/checkpoints',save_checkpoint_secs = 2) as sess:
print(sess.run([global_step]))
while not sess.should_stop():
i = sess.run( step)
print( i)
三 运行结果
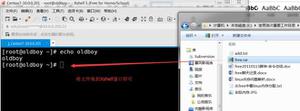
1 第一次运行后,会发现log文件夹下产生如下文件
2 第二次运行后,结果如下:
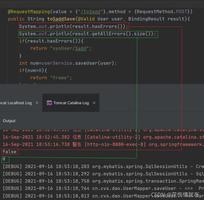
INFO:tensorflow:Create CheckpointSaverHook.
INFO:tensorflow:Restoring parameters from log/checkpoints\model.ckpt-15147
INFO:tensorflow:Saving checkpoints for 15147 into log/checkpoints\model.ckpt.
[15147]
15148
15149
15150
15151
15152
15153
15154
15155
15156
15157
15158
15159
四 说明
本例是按照训练时间来保存的。通过指定save_checkpoint_secs参数的具体秒数,来设置每训练多久保存一次检查点。
可见程序自动载入检查点是从第15147次开始运行的。
五 注意
1 如果不设置save_checkpoint_secs参数,默认的保存时间是10分钟,这种按照时间保存的模式更适合用于使用大型数据集来训练复杂模型的情况。
2 使用该方法,必须要定义global_step变量,否则会报错误。
以上这篇tensorflow模型的save与restore,及checkpoint中读取变量方式就是小编分享给大家的全部内容了,希望能给大家一个参考,也希望大家多多支持。
以上是 tensorflow模型的save与restore,及checkpoint中读取变量方式 的全部内容, 来源链接: utcz.com/z/332239.html