Vue的属性、方法、生命周期实例代码详解
实例
<!DOCTYPE html>
<html lang="en">
<head>
<meta charset="UTF-8">
<meta name="viewport" content="width=device-width, initial-scale=1.0">
<meta http-equiv="X-UA-Compatible" content="ie=edge">
<title>Vue的属性、方法和生命周期</title>
<script src="Vue.min.js"></script>
</head>
<body>
<div id="main">
<span>{{ message }}</span>
<br/>
<span>{{ number }}</span>
<br/>
<button v-on:click="add">add</button>
</div>
</body>
</html>
<script>
const App = new Vue({
// 选择器
el: '#main',
// 数据
data: {
// 在data里面不仅可以定义字符串,我们还可以定义number
message: 'Welcome to Chivalrous Island!',
number: 85,
},
// 如果我们从服务器得到的数据并不是我们需要的,可能是上面数据的结合,这时我们可以用到一个Vue提供的一个属性:计算属性
// 计算属性:可以把data里面的数据计算一下,然后返回一个新的数据,它被叫做computed。
computed: {
// 可以定义函数,然后返回需要的数据,比如下面我们要得到上面number的平方,计算结果为:
getSqure: function () {
return this.number * this.number;
}
},
// 定义函数
methods: {
add: function() {
this.number++;
}
},
// 监听属性(监听器),它可以监听一个函数或者是一个变量
watch: {
// 函数接收两个参数值,afterVal代表改变之后的值,beforeVal表示改变之前的值
number: function(afterVal,beforeVal) {
console.log('beforeVal',beforeVal);
console.log('afterVal',afterVal);
}
}
});
// 打印出来的结果
console.log(App.getSqure);
</script>
属性
从上面的案例可以知道,属性可以分为计算属性(computed)和监听属性(watch)。
计算属性有一个好处在于它有一个缓存机制,因此它不需要每次都重新计算。
监听属性(监听器),它可以监听一个函数或者是一个变量。
方法(methods)
methods常调用的函数。
上面的示例中,getSqure,add,number,像这些都是我们自定义的方法。
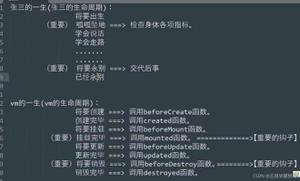
生命周期(钩子函数)
生命周期就是从它开始创建到销毁经历的过程。
这个生命周期也就是Vue的实例,从开始创建,到创建完成,到挂载,再到更新,然后再销毁的一系列过程,这个官方有一个说法也叫作钩子函数。
<script>
window.onload = () => {
const App = new Vue({
......
// 生命周期第一步:创建前(vue实例还未创建)
beforeCreate() {
// %c 相当于给输出结果定义一个样式
console.log('%cbeforeCreate','color:green', this.$el);
console.log('%cbeforeCreate','color:green', this.message);
},
// 创建完成
created() {
console.log('%ccreated','color:red', this.$el);
console.log('%ccreated','color:red', this.message);
},
// 挂载之前
beforeMount() {
console.log('%cbeforeMount','color:blue', this.$el);
console.log('%cbeforeMount','color:blue', this.message);
},
// 已经挂载但是methods里面的方法还没有执行,从创建到挂载全部完成
mounted() {
console.log('%cmounted','color:orange', this.$el);
console.log('%cmounted','color:orange', this.message);
},
// 创建完之后,数据更新前
beforeUpdate() {
console.log('%cbeforeUpdate','color:#f44586', this.$el);
console.log('%cbeforeUpdate','color:#f44586', this.number);
},
// 数据全部更新完成
updated() {
console.log('%cupdated','color:olive', this.$el);
console.log('%cupdated','color:olive', this.number);
},
// 销毁
beforeDestroy() {
console.log('%cbeforeDestroy','color:gray', this.$el);
console.log('%cbeforeDestroy','color:gray', this.number);
},
destroyed() {
console.log('%cdestroyed','color:yellow', this.$el);
console.log('%cdestroyed','color:yellow', this.number);
}
});
// 打印出来的结果
console.log(App.getSqure);
window.App = App;
};
// 销毁vue实例
function destroy() {
App.$destroy();
}
</script>
html:
<body>
<div id="main">
<span>{{ message }}</span>
<br/>
<span>{{ number }}</span>
<br/>
<button v-on:click="add">add</button>
<br />
<button Onclick="destroy()">destroy</button>
</div>
</body>
总结
以上所述是小编给大家介绍的Vue的属性、方法、生命周期实例代码详解,希望对大家有所帮助,如果大家有任何疑问请给我留言,小编会及时回复大家的。在此也非常感谢大家对网站的支持!
如果你觉得本文对你有帮助,欢迎转载,烦请注明出处,谢谢!
以上是 Vue的属性、方法、生命周期实例代码详解 的全部内容, 来源链接: utcz.com/z/312404.html


