使用etcd+confd管理nginx配置
本文内容纲要:使用etcd+confd管理nginx配置
1、前言
最近在项目中用nginx做反向代理,需要动态生成nginx的配置。大概流程是用户在页面上新增域名、http或https协议以及端口信息,后台会根据域名自动生成一个nginx的server配置,在nginx.conf配置文件中使用include将所有的server配置加载进来。遇到一个问题就是如何动态生成nginx的配置,以及配置更新。在此之前也接触过配置生成及更新,当时配置的格式都是基于xml的,使用protobuf与xml结合,先采用protobuf定义好配置的数据结构,然后将protobuf转换为xml配置文件。配置更新通过判断配置文件的md5是否发生变化进行。而如今接触的配置是nginx的配置,是一套自定义的配置。看了一眼nginx的配置源码,用一个void**** conf 来表示,顿时吓死宝宝了,膜拜作者编程技能。nginx配置代码内存组织是相当的牛逼,通用性非常强,有兴趣可以认真研究一下。我要自动生成的配置是如下所示:
upstream www_test { server 196.75.121.112:443; (动态生成)
}
server {
listen 443 ssl; (动态生成)
server_name www.test.com; (动态生成)
ssl_protocols TLSv1 TLSv1.1 TLSv1.2;;
ssl_certificate /home/build/openresty/nginx/cert/dealssl/www.bestenover.com.crt; (动态生成)
location / {
proxy_pass https://www_test; (动态生成)
proxy_set_header Host $host;
proxy_set_header X-Real-IP $remote_addr;
proxy_set_header X-Forwarded-For $proxy_add_x_forwarded_for;
proxy_set_header X-Forwarded-Proto https;
proxy_redirect off;
}
}
2、实现框架
看完nginx的配置不难发现,nginx是一个典型的key value类型的,而且与文件系统的非常类似,一个目录下面可以包含其他配置,目录下还可以有目录,嵌套多层。如今key value类型的数据库非常多,redis、leveldb等,最近新秀etcd也是key-value分布式数据库,提供类似文件系统操作,使用raft协议保持数据一致性,非常适合云计算分布式部署场景,将confd与etcd搭配,非常适合nginx这样的配置格式。
使用etcd新建与nginx配置对应的目录如下:
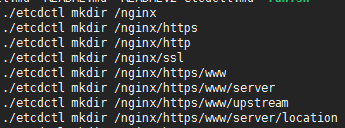
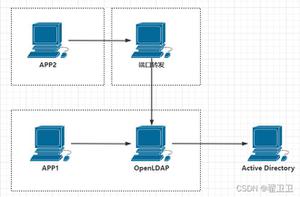
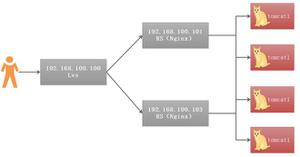
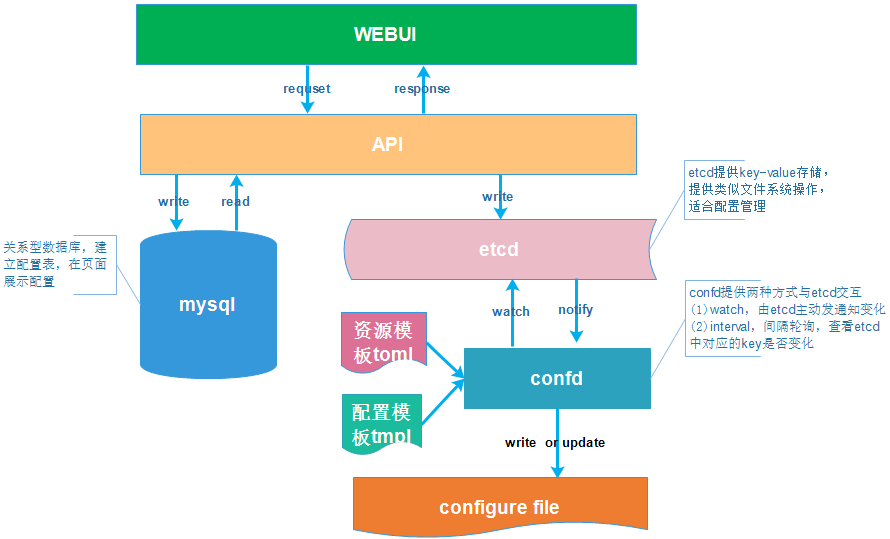
为了配合webui展示配置和后台生成nginx配置,总体的配置流程图如下所示:
3、生成配置
WEBUI通过API将配置写入mysql和etcd,confd注册监控etcd的key为/nginx/,只要发生变化就通知confd根据模板生成配置。confd默认的配置路径为/etc/confd/,创建conf.d和template两个目录,分别存放配置资源和配置模板。
nginx的配置资源如下所示:test.conf.toml
[template]src = "test.conf.tmpl"
dest = "/tmp/test.conf"
keys = [
"/nginx",
]
check_cmd = "/usr/sbin/nginx -t -c {{.src}}"
reload_cmd = "/usr/sbin/service nginx reload"
nginx的配置模板如下所示:test.conf.tmpl
upstream www_{{getv "/nginx/https/www/server/server_name"}} { {{range getvs "/nginx/https/www/upstream/*"}}server {{.}};{{end}}
}
server {
server_name {{getv "/nginx/https/www/server/server_name"}}:443;
ssl on
ssl_certificate {{getv "/nginx/https/www/server/ssl_certificate"}};
ssl_certificate_key {{getv "/nginx/https/www/server/ssl_certificate_key"}};
location / {
proxy_pass http://www_{{getv "/nginx/https/www/server/server_name"}};
proxy_set_header Host $host;
proxy_set_header X-Real-IP $remote_addr;
proxy_set_header X-Forwarded-For $proxy_add_x_forwarded_for;
proxy_set_header X-Forwarded-Proto https;
proxy_redirect off;
}
}
开启confd,执行 ./confd -watch -backend etcd -node http://127.0.0.1:2379
使用ectdctl添加配置如下:
./etcdctl set /nginx/https/www/server/server_name test.com./etcdctl set /nginx/https/www/server/ssl_certificate /home/waf/build/openresty/nginx/cert/client/client.crt
./etcdctl set /nginx/https/www/server/ssl_certificate_key /home/waf/build/openresty/nginx/cert/client/client.key;
/etcdctl set /nginx/https/www/upstream/server1 192.168.1.2:443
./etcdctl set /nginx/https/www/upstream/server2 192.168.4.2:443
confd的执行结果如下所示:

生成位置文件如下所示:
upstream www_test.com { server 192.168.1.2:443;
server 192.168.4.2:443;
}
server {
server_name test.com:443;
ssl on
ssl_certificate /home/waf/build/openresty/nginx/cert/client/client.crt;
ssl_certificate_key /home/waf/build/openresty/nginx/cert/client/client.key;
location / {
proxy_pass http://www_test.com;
proxy_set_header Host $host;
proxy_set_header X-Real-IP $remote_addr;
proxy_set_header X-Forwarded-For $proxy_add_x_forwarded_for;
proxy_set_header X-Forwarded-Proto https;
proxy_redirect off;
}
}
与模板生成的保持一致。
4、参考资料
cond的github上文档介绍
https://github.com/kelseyhightower/confd/blob/master/docs/template-resources.md
etcd与confd实现配置管理
http://xiaorui.cc/2015/01/25/confd%E5%92%8Cetcd%E5%AE%9E%E7%8E%B0%E9%85%8D%E7%BD%AE%E7%AE%A1%E7%90%86%E5%8F%8A%E8%87%AA%E5%8A%A8%E5%8F%91%E7%8E%B0/
http://www.tuicool.com/articles/eeiAve
etcd的参考:
https://github.com/coreos/etcd
https://yq.aliyun.com/articles/11035
http://www.infoq.com/cn/articles/coreos-analyse-etcd/
本文内容总结:使用etcd+confd管理nginx配置
原文链接:https://www.cnblogs.com/Anker/p/6112022.html
以上是 使用etcd+confd管理nginx配置 的全部内容, 来源链接: utcz.com/z/297014.html