SpringDay01
本文内容纲要:
- Spring- 一、Spring概念名词
- 二、第一个IOC/DI实现
- IOC实现步骤:
- DI实现步骤
Spring
一、Spring概念名词
Spring框架:分层架构,7个模块组成。
Spring Tools:一个开发工具。
核心:IOC(IOC容器)、AOP
IOC:控制反转,依赖注入,管理Bean
AOP:面向切面编程集成到Spring框架,
POJO:一个简单的java对象。
Spring上下文:配置文件。
Spring DAO:管理异常。
Spring ORM:对象关系映射。
ORM/DAO:持久层,简化数据库访问。
Spring Web模块:为web应用提供上下文,简化请求以及请求参数绑定域对象工作。
Spring MVC框架:构建Web应用的MVC实现。
Spring体系结构:有20多个模块。
Spring耦合:一个类依赖另一个类。
Spring解耦:降低程序依赖关系
J2EE架构:企业级应用的一种工业标准。
JavaBean:作为值对象传递参数,要求每个属性提供getter和setter方法,不接受任何容器管理生命周期。
Spring的Bean:接受设置注入的属性提供setter方法,Spring管理生命周期,由SpringIOC管理。
DI:依赖注入。spring创建对象A时,会将对象A所依赖的对象B也创建出来,并自动注入到对象A中。有三种方式,接口注入、setter方法注入、构造方法注入
1.接口注入
接口、接口的实现类、Spring中配置bean
2.设值注入
属性、set方法
3.构造器注入
属性、有参构造器
Bean容器:
BeanFactory,提供依赖注入支持。
ApplicationContext,建立在BeanFactory之上增加功能。
ApplicationContext在启动后预加载所有单列bean。
Bean作用域:创建Bean实例时bean指定特定作用域,有5种。比较常用有,SingleTon(单例)--默认、prototype(多实例)。
prototype作用域:Spring容器负责创建,不在跟踪生命周期。
singleton作用域:Spring容器跟踪Bean实例的产生、销毁。
xml配置:
beans:根元素,该元素包含了多个 bean 子元素,每一个 bean 子元素定义了一个 Bean,并描述了该 Bean 如何被装配到 Spring 容器中。
bean:Spring 容器可以被看作一个大工厂,而 Spring 容器中的 Bean 就相当于该工厂的产品,由SpringIOC管理。
id定义bean。
class:指定bean对应实现类。
scope:设置作用域对应上面Bean作用域。
init-method:加载。
destroy-method:销毁。
property:bean元素的子元素,用于调用 Bean 实例中的 Set 方法完成属性赋值,从而完成依赖注入。该元素的 name 属性指定 Bean 实例中的相应属性名
ref:property和 constructor-arg 等元素的 子元索,该元素中的 bean 属性用于指定对 Bean 工厂中某个 Bean 实例的引用
二、第一个IOC/DI实现
IOC控制反转,即将对象的创建交给Spring,我们需要new对象由Spring帮我们创建。
IOC实现步骤:
1.导包
2.编写实体类
package com.pres.entity; public class HelloWorld { public void say(){ System.out.print("Spring大爷你好"); } }
3.编写配置文件,一般在src根目录
<?xml version="1.0" encoding="UTF-8"?><beans xmlns="http://www.springframework.org/schema/beans" xmlns:xsi="http://www.w3.org/2001/XMLSchema-instance" xsi:schemaLocation="http://www.springframework.org/schema/beans http://www.springframework.org/schema/beans/spring-beans.xsd"> //id:定义bean名称。 //class:指定bean对应实现类。 <bean id="hellow" class="com.pres.entity.HelloWorld"></bean> </beans>
3.从spring容器中获取对象
第一种:AppApplicationContext容器
public class ApplicationContextTest { public static void main(String[] args) { //1.ClassPathXmlApplicationContext:加载spring配置文件,创建初始化所有对象 ApplicationContext ac = new ClassPathXmlApplicationContext("beans.xml"); //2.getBean():获取bean,返回值为Object,通过强转得到我们需要的对象类型 HelloWorld helloWorld=(HelloWorld) ac.getBean("hellow"); helloWorld.say(); } }
第二种:BeanFactory容器
// BeanFactory容器: //加载Spring配置文件
Resource resource=new ClassPathResource("beans.xml"); //传递Resource获取容器对象 BeanFactory factory=new XmlBeanFactory(resource); //通过指定id获取需要的对象 HelloWorld helloWorld=(HelloWorld) factory.getBean("hellow"); helloWorld.say();
结果:
总结:
ApplicationContext 接口有两个常用的实现类,具体如下。
1、
ApplicationContext applicationContext = new ClassPathXmlApplicationContext(String configLocation); //String configLocation参数可以指定配置文件类路径2、FileSystemXmlApplicationContext
ApplicationContext applicationContext = new FileSystemXmlApplicationContext(String configLocation); //String configLocation参数可以指定获取类路径之外的资源,如“F:/workspaces/Beans.xml”。BeanFactory 和 ApplicationContext区别:
如果 Bean 的某一个属性没有注入,使用 BeanFacotry 加载后,第一次调用 getBean() 方法时会抛出异常。
而 ApplicationContext 则会在初始化时自检,这样有利于检查所依赖的属性是否注入。
设值注入/setter注入:
指 IoC 容器使用 setter 方法注入被依赖的实例。通过调用无参构造器或无参 static 工厂方法实例化 Bean 后,调用该 Bean 的 setter 方法,即可实现基于 setter 的 DI。
1.编写实体类
package com.pres.entity; public class Person { private int id; private String name; private int age; private double salary; public Person() { } public void setId(int id) { this.id = id; } public void setName(String name) { this.name = name; } public void setAge(int age) { this.age = age; } public void setSalary(double salary) { this.salary = salary; } @Override public String toString() { return "Person{" + "id=" + id + ", name='" + name + '\'' + ", age=" + age + ", salary=" + salary + '}'; } }
2.编写xml配置文件
使用 property 标签实现 setter 注入。
在 property标签中,包含 name、ref、value 等属性。name 用于指定参数名称;value 属性用于注入基本数据类型以及字符串类型的值;ref 属性用于注入已经定义好的 Bean。
<?xml version="1.0" encoding="UTF-8"?><beans xmlns="http://www.springframework.org/schema/beans" xmlns:xsi="http://www.w3.org/2001/XMLSchema-instance" xsi:schemaLocation="http://www.springframework.org/schema/beans http://www.springframework.org/schema/beans/spring-beans.xsd"> 在 property标签中,包含 name、ref、value 等属性。name 用于指定参数名称;value 属性用于注入基本数据类型以及字符串类型的值;ref 属性用于注入已经定义好的 Bean。 <bean id="person" class="com.pres.entity.Person"> //name,指定参数名称 value,注入基本数据类型及字符串类型的值 <property name="age" value="18"/> <property name="id" value="1"/> <property name="name" value="威震天"/> <property name="salary" value="8888"/> </bean> </beans>
3.获取Person对象
//加载spring配置文件 ApplicationContext ac =new ClassPathXmlApplicationContext("beans.xml"); //获取需要的对象 Person person=(Person) ac.getBean("person"); System.out.println(person);
结果:
总:在 Spring 实例化 Bean 的过程中,首先会调用默认的构造方法实例化 Bean 对象,然后通过 Java 的反射机制调用 setXxx() 方法进行属性的注入。因此,setter 注入要求 Bean 的对应类必须满足以下两点要求。
- 必须提供一个默认的无参构造方法。
- 必须为需要注入的属性提供对应的 setter 方法。
构造注入
指 IoC 容器使用构造函数注入被依赖的实例。可以通过调用带参数的构造函数实现依赖注入,每个参数代表一个依赖。
1.编写实体类
在上面属性注入中增加有参构造器测试
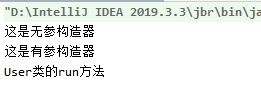
//无参构造器 public Person() {
System.out.println("这是无参构造器"); } //有参构造器 public Person(int id, String name, int age, double salary) { System.out.println("这是有参构造器"); this.id = id; this.name = name; this.age = age; this.salary = salary; }
2.编写xml文件
<?xml version="1.0" encoding="UTF-8"?><beans xmlns="http://www.springframework.org/schema/beans" xmlns:xsi="http://www.w3.org/2001/XMLSchema-instance" xsi:schemaLocation="http://www.springframework.org/schema/beans http://www.springframework.org/schema/beans/spring-beans.xsd"> <!-- 构造注入--> <!--在 <constructor-arg> 标签中,包含 ref、value、type、index等属性。value 属性用于注入基本数据类型以及字符串类型的值;ref属性用于注入已经定义好的 Bean; type属性用来指定对应的构造函数中的属性,当构造函数有多个参数时, 可以使用 index 属性指定参数的位置,index 属性值从 0 开始。--> <bean id="person1" class="com.pres.entity.Person"> <constructor-arg index="0" value="2"/> <constructor-arg index="1" value="狂风"/> <constructor-arg index="2" value="23"/> <constructor-arg value="666"/> </bean> </beans>
结果:
DI实现步骤
DI,依赖注入,即spring创建对象A时,会将对象A所依赖的对象B也创建出来,并自动注入到对象A中。
//UserDaolmpl类public class UserDaolmpl implements UserDao { //编写set方法,spring才能将创建的User对象注入 private User user; public void setUser(User user){ this.user=user; } @Override public void userdao(User user) { user.run(); } } //User类 public class User { public void run(){ System.out.println("User类的run方法"); } }
UserDaolmpl类中的userdao方法使用User对象,通过DI注入降低耦合
<!--用来创建User对象--> <bean id="userid" class="com.pres.entity.User"></bean> <!-- 创建UserDaolmpl对象, property对其对象进行依赖注入,底层执行setter方法 name:在UserDaolmpl对象中的属性名 ref:ref属性用于注入已经定义好的 Bean--> <bean id="UserDaolmpl" class="com.pres.dao.impl.UserDaolmpl"> <property name="user" ref="userid"></property> </bean>
测试:
ApplicationContext ac=new ClassPathXmlApplicationContext("beans.xml"); //获得UserDaolmpl对象,这样就不用强转了 UserDaolmpl userDaolmpl=ac.getBean("UserDaolmpl",UserDaolmpl.class); userDaolmpl.userdao();结果:
本文内容总结:Spring,一、Spring概念名词,二、第一个IOC/DI实现,IOC实现步骤:,DI实现步骤,
原文链接:https://www.cnblogs.com/eternity-star/p/15505403.html
以上是 SpringDay01 的全部内容, 来源链接: utcz.com/z/295950.html


