基于 seq2seq 的时间序列预测实验
本文使用 seq2seq 模型来做若干组时间序列的预测任务,目的是验证RNN这种网络结构对时间序列数据的pattern的发现能力,并在小范围内探究哪些pattern是可以被识别的,哪些pattern是无法识别的。
下面将进行若干组的实验。方法是每组实验生成一系列的随机时间序列数据作为训练数据,时间序列数据的长度是seq_length * 2,我们用seq2seq模型的encoder学习出前半段(长度为seq_length)序列的pattern,然后用decoder的输出作为对后半段数据的预测,我们希望decoder的输出越接近后半段的真实数据越好。
实验一:平稳时间序列
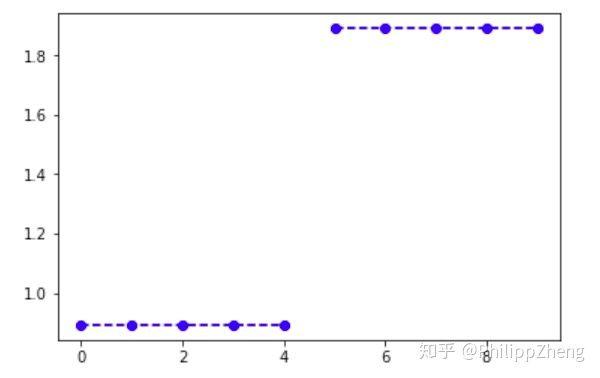
如下图,前半段数据与后半段数据的长度相等,而且后半段的高度比前半段总是高出1。看过大量的这种类型的数据后,你能识别出“后半段的高度比前半段总是高出1”这种模式进而准确预测出后半段的数据吗?看起来这是很简单的模式识别问题,之所以简单,是因为前半段和后半段的数据都是常量,只是后半段比前半段大一个常量罢了。
为了做实验,我们需要生成大量的这种数据,并搭建seq2seq模型(使用tensorflow),下面贴出主要的代码。
生成总长度为30,即前半段、后半段长度均为15,后半段高度总比前半段高度大1的随机时间序列数据,
def generate_x_y_data_two_freqs(batch_size, seq_length): batch_x = []
batch_y = []
for _ in range(batch_size):
amp_rand = random.random()
a = np.asarray([amp_rand] * seq_length)
b = np.asarray([amp_rand + 1] * seq_length)
sig = np.r_[a,b]
x1 = sig[:seq_length]
y1 = sig[seq_length:]
x_ = np.array([x1])
y_ = np.array([y1])
x_, y_ = x_.T, y_.T
batch_x.append(x_)
batch_y.append(y_)
batch_x = np.array(batch_x)
batch_y = np.array(batch_y)
batch_x = np.array(batch_x).transpose((1, 0, 2))
batch_y = np.array(batch_y).transpose((1, 0, 2))
return batch_x, batch_y
def generate_x_y_data_v2(batch_size):
return generate_x_y_data_two_freqs(batch_size, seq_length=15)
用tensorflow搭建seq2seq,其中encoder和decoder使用相同结构(但不share weights)的双层GRU。这块的代码是直接使用上文提到的github项目代码,
tf.reset_default_graph()# sess.close()
sess = tf.InteractiveSession()
layers_stacked_count = 2
with tf.variable_scope('Seq2seq'):
# Encoder: inputs
enc_inp = [
tf.placeholder(tf.float32, shape=(None, input_dim), name="inp_{}".format(t))
for t in range(seq_length)
]
# Decoder: expected outputs
expected_sparse_output = [
tf.placeholder(tf.float32, shape=(None, output_dim), name="expected_sparse_output_".format(t))
for t in range(seq_length)
]
# Give a "GO" token to the decoder.
# Note: we might want to fill the encoder with zeros or its own feedback rather than with "+ enc_inp[:-1]"
dec_inp = [ tf.zeros_like(enc_inp[0], dtype=np.float32, name="GO") ] + enc_inp[:-1]
# Create a `layers_stacked_count` of stacked RNNs (GRU cells here).
cells = []
for i in range(layers_stacked_count):
with tf.variable_scope('RNN_{}'.format(i)):
cells.append(tf.nn.rnn_cell.GRUCell(hidden_dim))
# cells.append(tf.nn.rnn_cell.BasicLSTMCell(...))
cell = tf.nn.rnn_cell.MultiRNNCell(cells)
# Here, the encoder and the decoder uses the same cell, HOWEVER,
# the weights aren't shared among the encoder and decoder, we have two
# sets of weights created under the hood according to that function's def.
dec_outputs, dec_memory = tf.nn.seq2seq.basic_rnn_seq2seq(
enc_inp,
dec_inp,
cell
)
# For reshaping the output dimensions of the seq2seq RNN:
w_out = tf.Variable(tf.random_normal([hidden_dim, output_dim]))
b_out = tf.Variable(tf.random_normal([output_dim]))
# Final outputs: with linear rescaling for enabling possibly large and unrestricted output values.
output_scale_factor = tf.Variable(1.0, name="Output_ScaleFactor")
reshaped_outputs = [output_scale_factor*(tf.matmul(i, w_out) + b_out) for i in dec_outputs]
# Training loss and optimizer
with tf.variable_scope('Loss'):
# L2 loss
output_loss = 0
for _y, _Y in zip(reshaped_outputs, expected_sparse_output):
output_loss += tf.reduce_mean(tf.nn.l2_loss(_y - _Y))
# L2 regularization (to avoid overfitting and to have a better generalization capacity)
reg_loss = 0
for tf_var in tf.trainable_variables():
if not ("Bias" in tf_var.name or "Output_" in tf_var.name):
reg_loss += tf.reduce_mean(tf.nn.l2_loss(tf_var))
loss = output_loss + lambda_l2_reg * reg_loss
with tf.variable_scope('Optimizer'):
optimizer = tf.train.RMSPropOptimizer(learning_rate, decay=lr_decay, momentum=momentum)
train_op = optimizer.minimize(loss)
def train_batch(batch_size):
"""
Training step that optimizes the weights
provided some batch_size X and Y examples from the dataset.
"""
X, Y = generate_x_y_data(isTrain=True, batch_size=batch_size)
feed_dict = {enc_inp[t]: X[t] for t in range(len(enc_inp))}
feed_dict.update({expected_sparse_output[t]: Y[t] for t in range(len(expected_sparse_output))})
_, loss_t = sess.run([train_op, loss], feed_dict)
return loss_t
def test_batch(batch_size):
"""
Test step, does NOT optimizes. Weights are frozen by not
doing sess.run on the train_op.
"""
X, Y = generate_x_y_data(isTrain=False, batch_size=batch_size)
feed_dict = {enc_inp[t]: X[t] for t in range(len(enc_inp))}
feed_dict.update({expected_sparse_output[t]: Y[t] for t in range(len(expected_sparse_output))})
loss_t = sess.run([loss], feed_dict)
return loss_t[0]
# Training
train_losses = []
test_losses = []
sess.run(tf.global_variables_initializer())
for t in range(nb_iters+1):
train_loss = train_batch(batch_size)
train_losses.append(train_loss)
if t % 10 == 0:
# Tester
test_loss = test_batch(batch_size)
test_losses.append(test_loss)
print("Step {}/{}, train loss: {}, \tTEST loss: {}".format(t, nb_iters, train_loss, test_loss))
print("Fin. train loss: {}, \tTEST loss: {}".format(train_loss, test_loss))
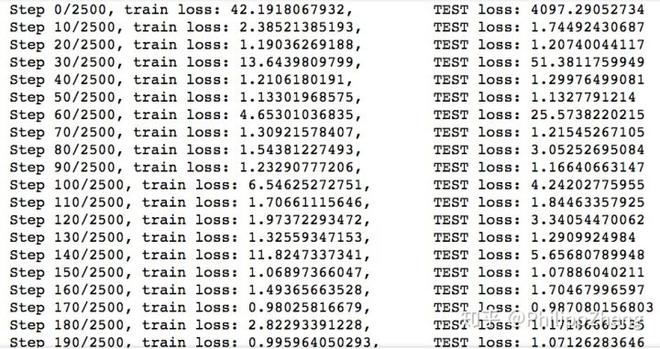
训练中 training loss 下降的很快,
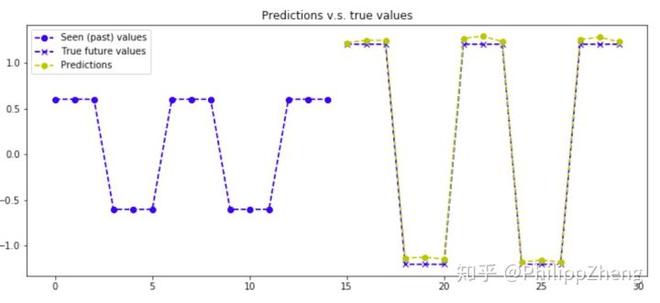
预测效果如何呢?下面给出两张预测效果图,
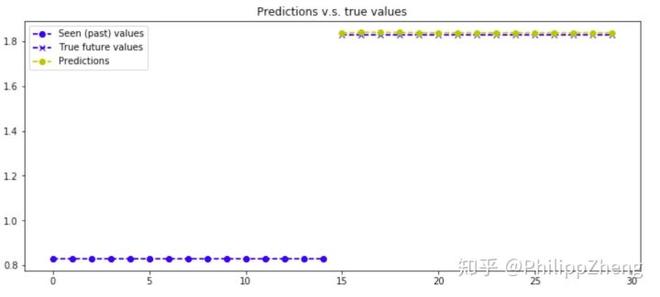
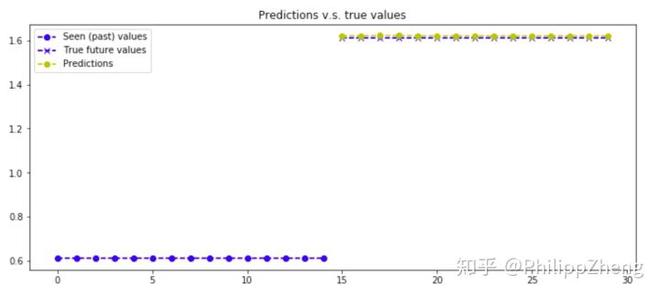
可以发现模型的预测效果很好,能够准确预测后半段的数据。
实验二:锯齿波时间序列
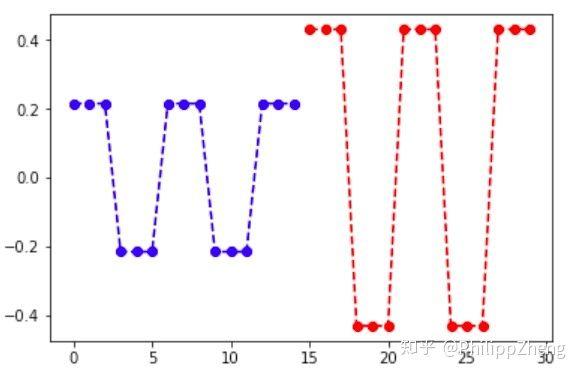
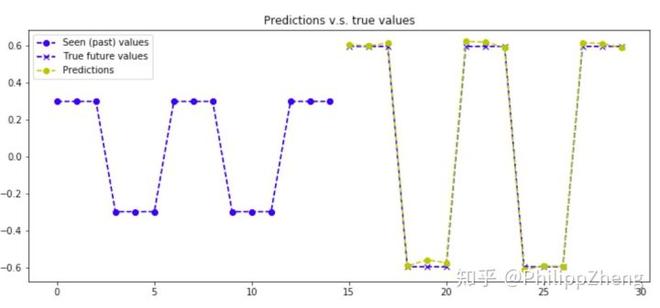
生成总长度30,前、后半段各长15的锯齿波,锯齿波每三个点为一小段,下一段为上一段的反转。后半段的高度是前半段的2倍,效果图如下,
生成数据代码如下,
def generate_x_y_data_two_freqs(batch_size, seq_length): batch_x = []
batch_y = []
for _ in range(batch_size):
amp_rand = random.random()
sig = []
flag = 1
for _ in range(seq_length / 3):
sig += [amp_rand * flag] * 3
flag = -flag
flag = 1
for _ in range(seq_length / 3):
sig += [amp_rand * flag * 2] * 3
flag = -flag
sig = np.asarray(sig)
x1 = sig[:seq_length]
y1 = sig[seq_length:]
x_ = np.array([x1])
y_ = np.array([y1])
x_, y_ = x_.T, y_.T
batch_x.append(x_)
batch_y.append(y_)
batch_x = np.array(batch_x)
batch_y = np.array(batch_y)
batch_x = np.array(batch_x).transpose((1, 0, 2))
batch_y = np.array(batch_y).transpose((1, 0, 2))
return batch_x, batch_y
def generate_x_y_data_v2(batch_size):
return generate_x_y_data_two_freqs(batch_size, seq_length=15)
模型训练的loss如下,
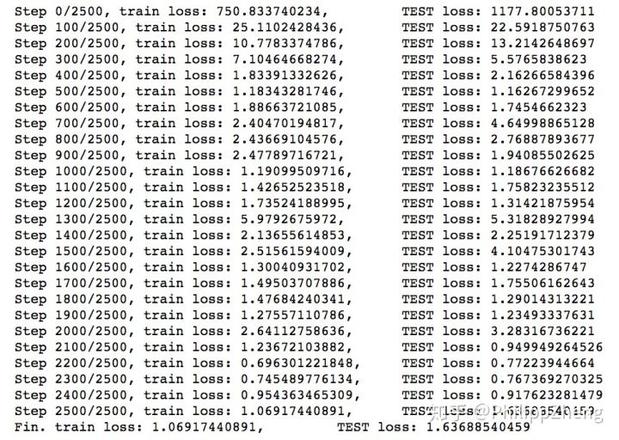
可见,loss很快下降到一个很小的值。
下面给出几张预测效果图,
实验三:正弦波时间序列
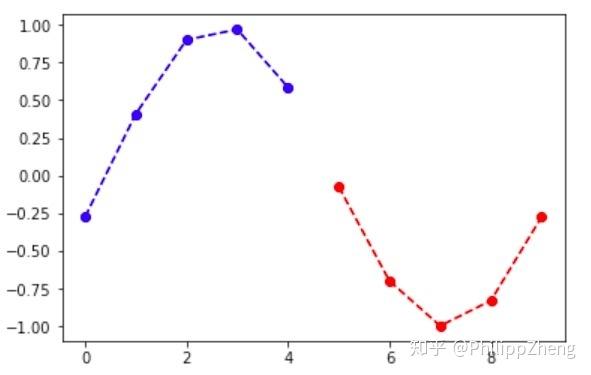
下图是一个正弦波图像。
正弦波的数学表达式为 ,其中
为振幅,
为相位,
为偏距,
为角速度。那么深度学习模型能学习出这些参数吗?让我们以结果说话。
同样的,先生成大量的随机正弦波
def generate_x_y_data_two_freqs(batch_size, seq_length): batch_x = []
batch_y = []
for _ in range(batch_size):
offset_rand = random.random() * 2 * math.pi
freq_rand = (random.random() - 0.5) / 1.5 * 15 + 0.5
amp_rand = random.random() + 0.1
sig = amp_rand * np.sin(np.linspace(
seq_length / 15.0 * freq_rand * 0.0 * math.pi + offset_rand,
seq_length / 15.0 * freq_rand * 3.0 * math.pi + offset_rand,
seq_length * 2
)
)
x1 = sig[:seq_length]
y1 = sig[seq_length:]
x_ = np.array([x1])
y_ = np.array([y1])
x_, y_ = x_.T, y_.T
batch_x.append(x_)
batch_y.append(y_)
batch_x = np.array(batch_x)
batch_y = np.array(batch_y)
batch_x = np.array(batch_x).transpose((1, 0, 2))
batch_y = np.array(batch_y).transpose((1, 0, 2))
return batch_x, batch_y
def generate_x_y_data_v2(batch_size):
return generate_x_y_data_two_freqs(batch_size, seq_length=15)
训练过程loss如下
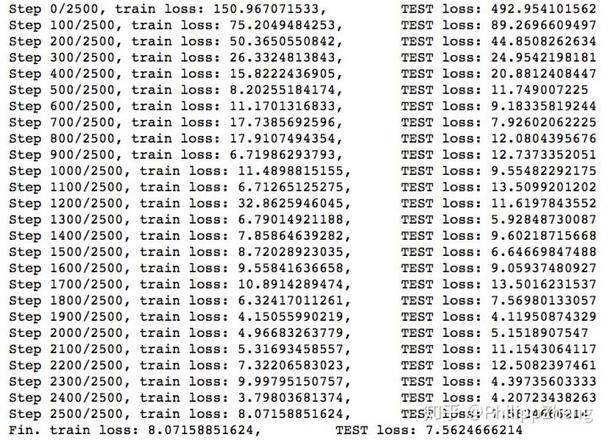
可以看到loss也是下降的比较快。
下面给出几张预测效果,
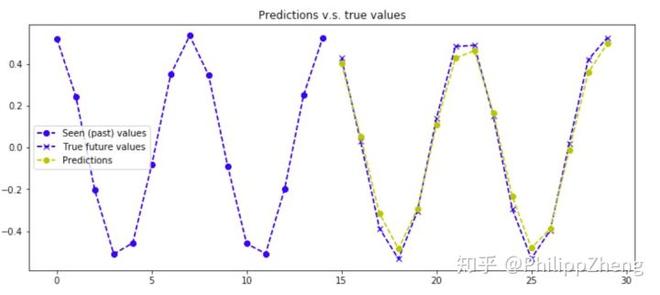
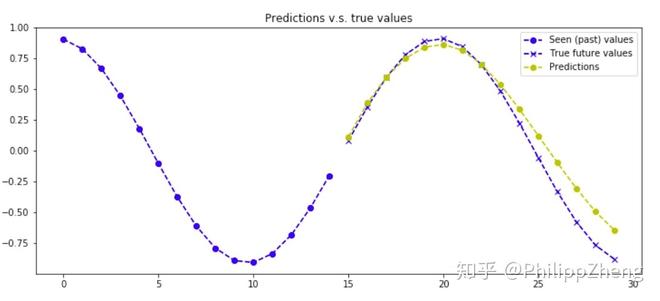
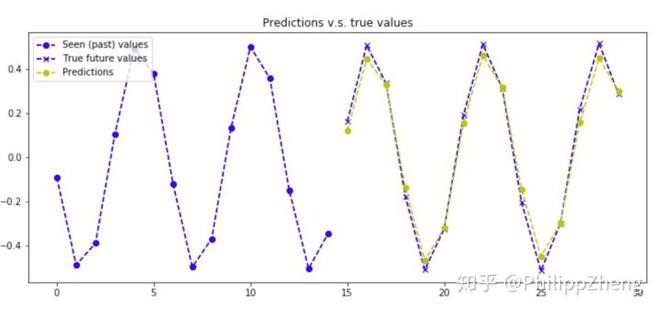
同样预测的效果很好!
实验四:正弦波与余弦波的叠加
振幅、周期等参数均不同的正弦波与余弦波相叠加,下图是一个叠加效果图,
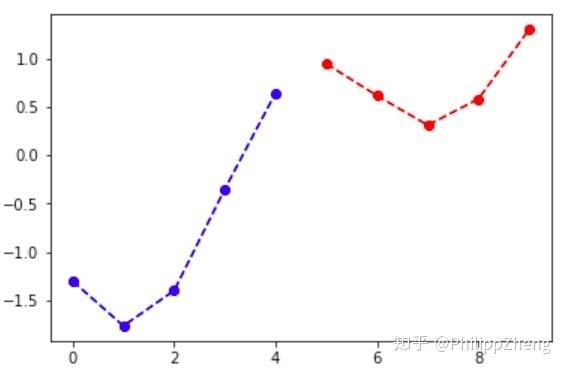
可以看到正弦和余弦波叠加后产生的图可能跟正弦、余弦差的比较远,所以这可能对深度学习提出了挑战。
先生成训练数据,
def generate_x_y_data_two_freqs(batch_size, seq_length): batch_x = []
batch_y = []
for _ in range(batch_size):
offset_rand = random.random() * 2 * math.pi
freq_rand = (random.random() - 0.5) / 1.5 * 15 + 0.5
amp_rand = random.random() + 0.1
sig = amp_rand * np.sin(np.linspace(
seq_length / 15.0 * freq_rand * 0.0 * math.pi + offset_rand,
seq_length / 15.0 * freq_rand * 3.0 * math.pi + offset_rand,
seq_length * 2
)
)
offset_rand = random.random() * 2 * math.pi
freq_rand = (random.random() - 0.5) / 1.5 * 15 + 0.5
amp_rand = 1.2
sig = amp_rand * np.cos(np.linspace(
seq_length / 15.0 * freq_rand * 0.0 * math.pi + offset_rand,
seq_length / 15.0 * freq_rand * 3.0 * math.pi + offset_rand,
seq_length * 2
)
) + sig
x1 = sig1[:seq_length]
y1 = sig1[seq_length:]
x_ = np.array([x1])
y_ = np.array([y1])
x_, y_ = x_.T, y_.T
batch_x.append(x_)
batch_y.append(y_)
batch_x = np.array(batch_x)
batch_y = np.array(batch_y)
batch_x = np.array(batch_x).transpose((1, 0, 2))
batch_y = np.array(batch_y).transpose((1, 0, 2))
return batch_x, batch_y
def generate_x_y_data_v2(batch_size):
return generate_x_y_data_two_freqs(batch_size, seq_length=15)
训练的loss如下,
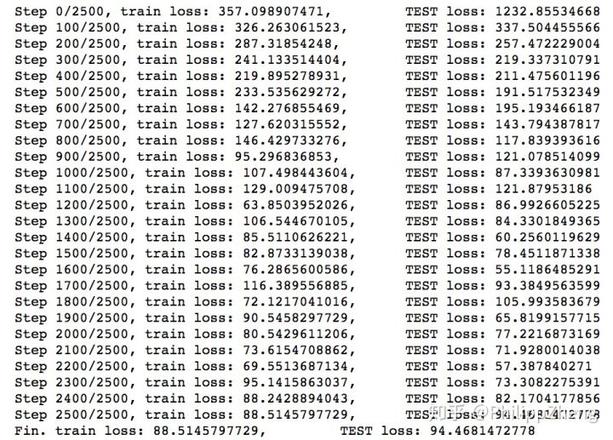
可见相对于实验三,实验四的loss明显变大了,下降速度也没那么快了~
下面是几张预测效果图,
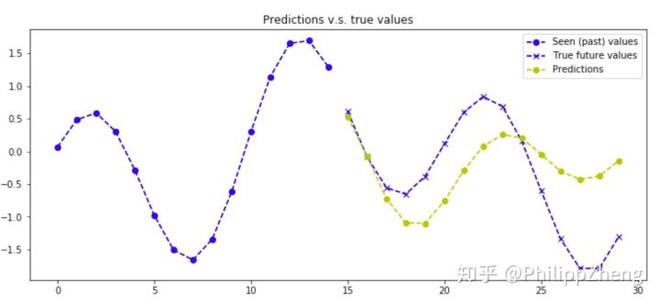
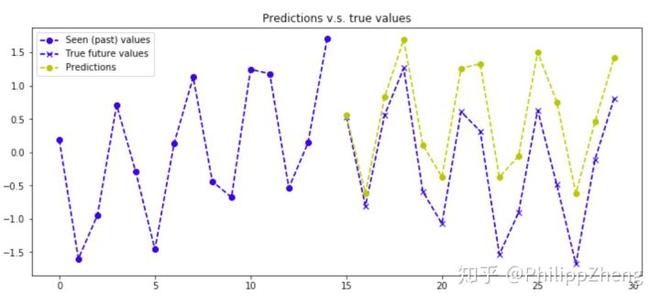
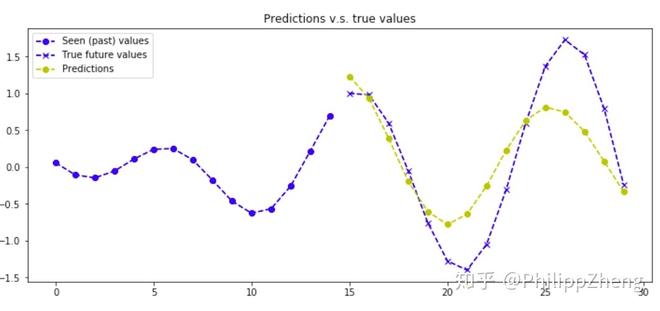
可以看到,预测效果较之于实验三有些下降,但也不算太糟糕,还是大致可以预测对曲线的形状。可以想象出深度学习可以通过训练数据从叠加曲线中剥离出正弦波和余弦波,并估算二者的参数。
实验五:正弦与余弦的随机叠加
在实验四中,我们是把正弦波与余弦波直接相加,在本实验中,我们采取不同的方式进行叠加,即在每一点,我们把余弦波加到正弦波上,或不把余弦波加到正弦波上(只有正弦),我们在每一个点上生成一个随机数来控制相应的叠加操作,取 0~1 间的随机数,如果随机数大于 0.5,则进行叠加操作,否则不进行叠加。
下面是一个随机叠加效果图,
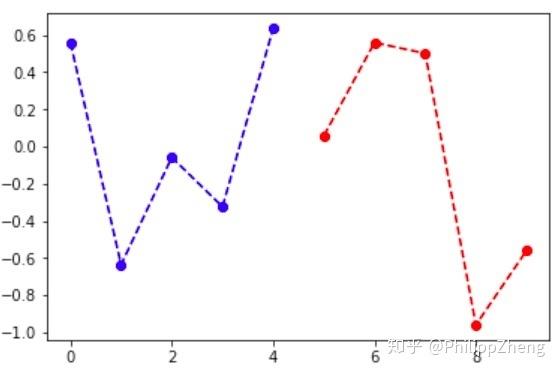
可以想象,这种在每一个点上正弦和余弦波随机叠加的数据,应该很难学习的,甚至无法找到数据的pattern。
生成数据代码如下
def generate_x_y_data_two_freqs(batch_size, seq_length): batch_x = []
batch_y = []
for _ in range(batch_size):
offset_rand = random.random() * 2 * math.pi
freq_rand = (random.random() - 0.5) / 1.5 * 15 + 0.5
amp_rand = random.random() + 0.1
sig = amp_rand * np.sin(np.linspace(
seq_length / 15.0 * freq_rand * 0.0 * math.pi + offset_rand,
seq_length / 15.0 * freq_rand * 3.0 * math.pi + offset_rand,
seq_length * 2
)
)
offset_rand = random.random() * 2 * math.pi
freq_rand = (random.random() - 0.5) / 1.5 * 15 + 0.5
amp_rand = 1.2
sig = np.asarray([np.sign(max(random.random()-0.5,0)) for _ in range(seq_length * 2)]) * amp_rand * np.cos(np.linspace(
seq_length / 15.0 * freq_rand * 0.0 * math.pi + offset_rand,
seq_length / 15.0 * freq_rand * 3.0 * math.pi + offset_rand,
seq_length * 2
)
) + sig
x1 = sig[:seq_length]
y1 = sig[seq_length:]
x_ = np.array([x1])
y_ = np.array([y1])
x_, y_ = x_.T, y_.T
batch_x.append(x_)
batch_y.append(y_)
batch_x = np.array(batch_x)
batch_y = np.array(batch_y)
batch_x = np.array(batch_x).transpose((1, 0, 2))
batch_y = np.array(batch_y).transpose((1, 0, 2))
return batch_x, batch_y
def generate_x_y_data_v2(batch_size):
return generate_x_y_data_two_freqs(batch_size, seq_length=15)
训练的loss如下,
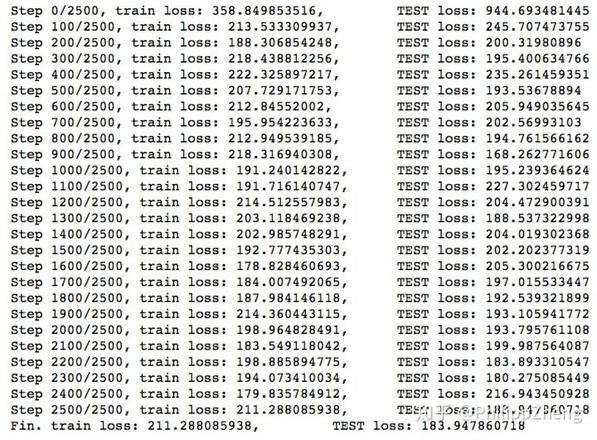
不出所料,loss下不去,学习几乎寸步难行~
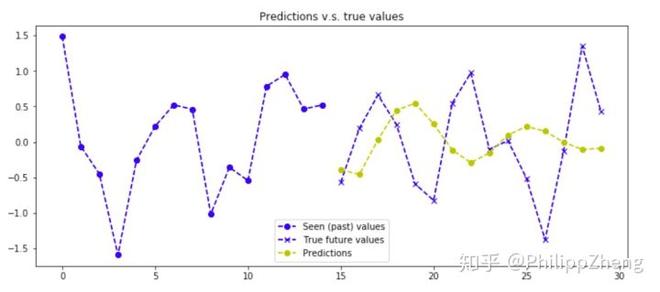
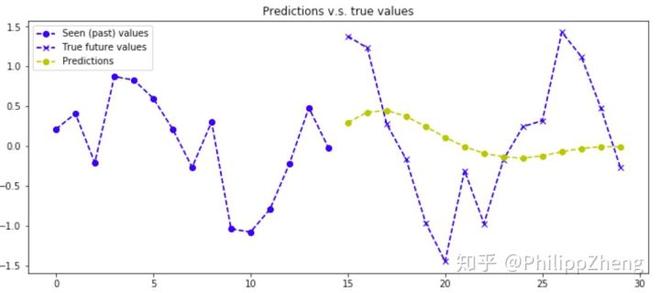
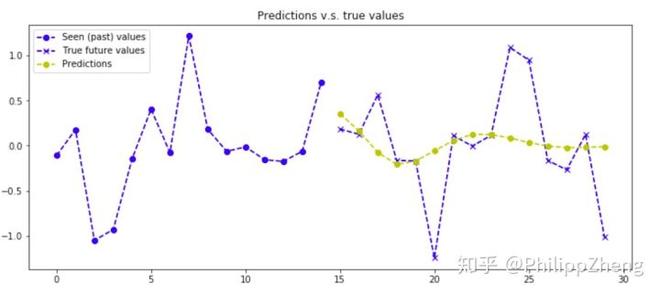
贴几张预测效果图,预测已经很糟糕了。。。
总结
本文做了五组实验,随机生成了大量的数据,用基于seq2seq的深度学习模型去学习时间序列数据的pattern。从实验中我们发现,如果数据的生成是有规律的,那么深度学习可以发现数据内部隐藏的pattern,而像第五组实验,由于数据在每一个点上包含了太多的随机性,所以时间序列数据没有包含显而易见的pattern,深度学习也无能无力。
以上是 基于 seq2seq 的时间序列预测实验 的全部内容, 来源链接: utcz.com/z/264772.html

