springboot Junit 执行顺序详解
springboot Junit 执行顺序
我们在写JUnit测试用例时,有时候需要按照定义顺序执行我们的单元测试方法,比如如在测试数据库相关的用例时候要按照测试插入、查询、删除的顺序测试。
如果不按照这个顺序测试可能会出现问题,比如删除方法在前面执行,后面的方法就都不能通过测试,因为数据已经被清空了。而JUnit测试时默认的顺序是随机的。
所以这时就需要有办法要求JUnit在执行测试方法时按照我们指定的顺序来执行。
JUnit是通过@FixMethodOrder注解(annotation)来控制测试方法的执行顺序的。
@FixMethodOrder注解的参数是org.junit.runners.MethodSorters对象,在枚举类org.junit.runners.MethodSorters中定义了如下三种顺序类型:
- MethodSorters.JVM
Leaves the test methods in the order returned by the JVM. Note that the order from the JVM may vary from run to run (按照JVM得到的方法顺序,也就是代码中定义的方法顺序)
- MethodSorters.DEFAULT(默认的顺序)
Sorts the test methods in a deterministic, but not predictable, order() (以确定但不可预期的顺序执行)
- MethodSorters.NAME_ASCENDING
Sorts the test methods by the method name, in lexicographic order, with Method.toString() used as a tiebreaker (按方法名字母顺序执行)
举例说明
以下的代码,定义了三个方法testAddAndGet,testSearch,testRemove,我设计的时候,是希望三个方法按定义的顺序来执行。
package test;
import org.junit.Assert;
import org.junit.FixMethodOrder;
import org.junit.runners.MethodSorters;
import org.junit.Test;
import org.slf4j.Logger;
import org.slf4j.LoggerFactory;
@FixMethodOrder(MethodSorters.JVM)//指定测试方法按定义的顺序执行
public class TestJNI {
private static final Logger logger = LoggerFactory.getLogger(TestJNI.class);
@Test
public void testAddAndGet(){
logger.info("test 'addBean' and 'getBean' ");
}
@Test
public final void testSearch() {
logger.info("test search CODE from JNI memory...");
}
@Test
public final void testRemove() {
logger.info("test remove CODE from JNI memory...");
}
}
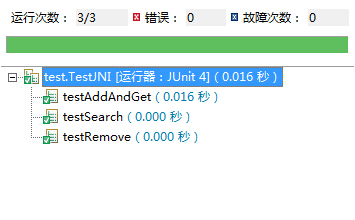
如果@FixMethodOrder定义为MethodSorters.DEFAULT或去掉代码中的@FixMethodOrder注解,那么测试用便执行的顺序是

这并不是我要的结果,testRemove如果先执行了,testSearch肯定什么也找不到。
如果改成@FixMethodOrder(MethodSorters.JVM),则这个执行顺序才是我想要的顺序。
SpringBoot JUnit 测试 Controller
Controller层代码如下:
@RestController
public class HelloController {
Logger logger = LoggerFactory.getLogger(this.getClass());
@Autowired
private UserService userService;
@RequestMapping("/hello")
public String index() {
logger.info("{}",userService == null);
logger.info("{}",userService.getCount());
return "Hello World";
}
}
JUnit 测试HelloController代码如下:
@RunWith(SpringRunner.class)
@SpringBootTest
public class HelloControllerTest {
private MockMvc mvc;
@Before
public void setUp() throws Exception {
mvc = MockMvcBuilders.standaloneSetup(new HelloController()).build();
}
@Test
public void getHello() throws Exception {
mvc.perform(MockMvcRequestBuilders.get("/hello").accept(MediaType.APPLICATION_JSON))
.andExpect(MockMvcResultMatchers.status().isOk())
.andDo(MockMvcResultHandlers.print())
.andReturn();
}
}
但是这种方法在运行过程中,Controller 里面Autowired 的bean 无法注入,报空指针,因为这种方法没有给通过Spring加载上下文实现注入参考这里的解决方法
采取下面这种测试写法
@RunWith(SpringRunner.class)
@SpringBootTest
@AutoConfigureMockMvc
public class HelloControllerTest {
@Autowired
private MockMvc mockMvc;
@Test
public void getHello() throws Exception {
mockMvc.perform(MockMvcRequestBuilders.get("/hello").accept(MediaType.APPLICATION_JSON))
.andExpect(MockMvcResultMatchers.status().isOk())
.andDo(MockMvcResultHandlers.print())
.andReturn();
}
}
以上为个人经验,希望能给大家一个参考,也希望大家多多支持。
以上是 springboot Junit 执行顺序详解 的全部内容, 来源链接: utcz.com/p/249764.html