Java中ShardingSphere 数据分片的实现
前言
其实很多人对分库分表多少都有点恐惧,其实我也是,总觉得这玩意是运维干的、数据量上来了或者sql过于复杂、一些数据分片的中间件支持的也不是很友好、配置繁琐等多种问题。
我们今天用ShardingSphere 给大家演示数据分片,包括分库分表、只分表不分库进行说明。
下一节有时间的话在讲讲读写分离吧。
github地址:https://github.com/362460453/boot-sharding-JDBC
ShardingSphere介绍
ShardingSphere是一套开源的分布式数据库中间件解决方案组成的生态圈,它由Sharding-JDBC、Sharding-Proxy和Sharding-Sidecar(计划中)这3款相互独立的产品组成。 他们均提供标准化的数据分片、分布式事务和数据库治理功能,可适用于如Java同构、异构语言、容器、云原生等各种多样化的应用场景。
ShardingSphere的功能能帮助我们做什么
- 数据分片
- 读写分离
- 编排治理
- 分布式事务
2016年初Sharding-JDBC被开源,这个产品是当当的,加入了Apache 后改名为 ShardingSphere 。他是我们应用和数据库之间的中间层,虽代码入侵性很强,但不会对现有业务逻辑进行改变。
更多文档请点击官网:https://shardingsphere.apache.org/document/current/en/overview/
为什么不用mycat
大家如果去查相关资料会知道,mycat和ShardingSphere是同类型的中间件,主要的功能,数据分片和读写分离两个都能去做,但是姿势却有很大的差别, 从字面意义上看Sharding 含义是分片、碎片的意思,所以不难理解ShardingSphere 对数据分片有很强对能力,对于99%对sql都是支持的,官网也有sql支持的相关内容,大家详细阅读,只有 类似sum 这种函数不支持,而且对 ORM框架和常用数据库基本都兼容,所以个人建议如果你们做数据分片,也就是是分库分表对话,强烈建议选择ShardingSphere,因为我私下也和一些朋友交流过,mycat 的数据分片对多表查询不是很友好,而且用 mycat 要有很强的运维来做,还有一点就是mycat 都是靠xml配置的,没有代码入侵,所以这也算是他的优点吧。如果你们只做读写分离对话,那么我建议用mycat,是没问题的。
实践前的准备工作
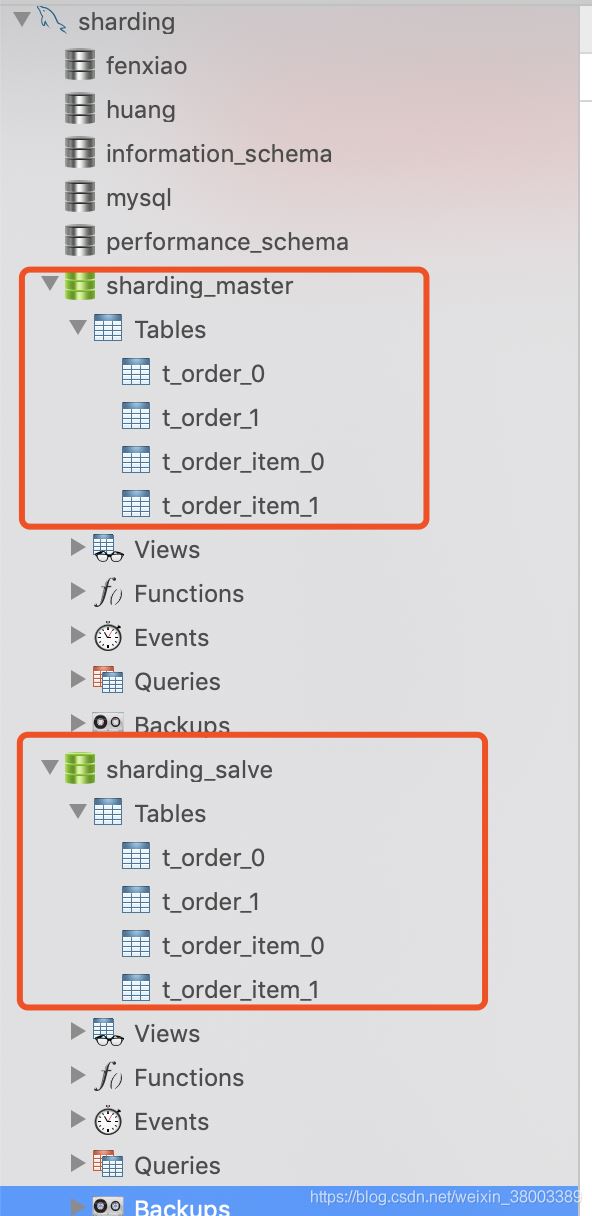
启动你的mysql,创建两个数据库,分别叫 sharding_master 和 sharding_salve分别在这两个数据库执行如下sql
CREATE TABLE IF NOT EXISTS `t_order_0` (
`order_id` INT NOT NULL,
`user_id` INT NOT NULL,
PRIMARY KEY (`order_id`)
);
CREATE TABLE IF NOT EXISTS `t_order_1` (
`order_id` INT NOT NULL,
`user_id` INT NOT NULL,
PRIMARY KEY (`order_id`)
);
做完以上两步结果如下
代码案例
环境
| 工具 | 版本 |
| jdk | 1.8.0_144 |
| springboot | 2.0.4.RELEASE |
| sharding | 1.3.1 |
| mysql | 5.7 |
创建一个springboot工程,我们使用 JdbcTemplate 框架,如果用mybatis也是无影响的。
pom引用依赖如下
<parent>
<groupId>org.springframework.boot</groupId>
<artifactId>spring-boot-starter-parent</artifactId>
<version>2.0.4.RELEASE</version>
</parent>
<properties>
<java.version>1.8</java.version>
<druid.version>1.0.26</druid.version>
<sharding.jdbc.core.version>1.3.3</sharding.jdbc.core.version>
</properties>
<dependencies>
<groupId>org.springframework.boot</groupId>
<artifactId>spring-boot-starter-web</artifactId>
</dependency>
<dependency>
<groupId>org.springframework.boot</groupId>
<artifactId>spring-boot-starter-jdbc</artifactId>
</dependency>
<dependency>
<groupId>mysql</groupId>
<artifactId>mysql-connector-java</artifactId>
</dependency>
<dependency>
<groupId>com.dangdang</groupId>
<artifactId>sharding-jdbc-core</artifactId>
<version>${sharding.jdbc.core.version}</version>
</dependency>
<dependency>
<groupId>com.alibaba</groupId>
<artifactId>druid</artifactId>
<version>${druid.version}</version>
</dependency>
</dependencies>
application.yml 配置如下
server:
port: 8050
sharding:
jdbc:
driverClassName: com.mysql.jdbc.Driver
url: jdbc:mysql://localhost:3306/sharding_master?useUnicode=true&characterEncoding=UTF-8&autoReconnect=true&failOverReadOnly=false
username: root
password: 123456
filters: stat
maxActive: 100
initialSize: 1
maxWait: 15000
minIdle: 1
timeBetweenEvictionRunsMillis: 30000
minEvictableIdleTimeMillis: 180000
validationQuery: SELECT 'x'
testWhileIdle: true
testOnBorrow: false
testOnReturn: false
poolPreparedStatements: false
maxPoolPreparedStatementPerConnectionSize: 20
removeAbandoned: true
removeAbandonedTimeout: 600
logAbandoned: false
connectionInitSqls:
url0: jdbc:mysql://localhost:3306/sharding_master?useUnicode=true&characterEncoding=UTF-8&autoReconnect=true&failOverReadOnly=false
username0: root
password0: 123456
url1: jdbc:mysql://localhost:3306/sharding_salve?useUnicode=true&characterEncoding=UTF-8&autoReconnect=true&failOverReadOnly=false
username1: root
password1: 123456
yml映射成Bean
@Data
@ConfigurationProperties(prefix="sharding.jdbc")
public class ShardDataSourceProperties {
private String driverClassName;
private String url;
private String username;
private String password;
private String url0;
private String username0;
private String password0;
private String url1;
private String username1;
private String password1;
private String filters;
private int maxActive;
private int initialSize;
private int maxWait;
private int minIdle;
private int timeBetweenEvictionRunsMillis;
private int minEvictableIdleTimeMillis;
private String validationQuery;
private boolean testWhileIdle;
private boolean testOnBorrow;
private boolean testOnReturn;
private boolean poolPreparedStatements;
private int maxPoolPreparedStatementPerConnectionSize;
private boolean removeAbandoned;
private int removeAbandonedTimeout;
private boolean logAbandoned;
private List<String> connectionInitSqls;
//省略geter setter
分库策略
//通过实现SingleKeyDatabaseShardingAlgorithm接口实现分库
public class ModuloDatabaseShardingAlgorithm implements SingleKeyDatabaseShardingAlgorithm<Integer> {
@Override
public String doEqualSharding(Collection<String> availableTargetNames, ShardingValue<Integer> shardingValue) {
for (String each : availableTargetNames) {
if (each.endsWith(shardingValue.getValue() % 2 + "")) {
return each;
}
}
throw new IllegalArgumentException();
}
@Override
public Collection<String> doInSharding(Collection<String> availableTargetNames,
ShardingValue<Integer> shardingValue) {
Collection<String> result = new LinkedHashSet<>(availableTargetNames.size());
for (Integer value : shardingValue.getValues()) {
for (String targetName : availableTargetNames) {
if (targetName.endsWith(value % 2 + "")) {
result.add(targetName);
}
}
}
return result;
}
@Override
public Collection<String> doBetweenSharding(Collection<String> availableTargetNames,
ShardingValue<Integer> shardingValue) {
Collection<String> result = new LinkedHashSet<>(availableTargetNames.size());
Range<Integer> range = (Range<Integer>) shardingValue.getValueRange();
for (Integer i = range.lowerEndpoint(); i <= range.upperEndpoint(); i++) {
for (String each : availableTargetNames) {
if (each.endsWith(i % 2 + "")) {
result.add(each);
}
}
}
return result;
}
}
分表策略
public class ModuloTableShardingAlgorithm implements SingleKeyTableShardingAlgorithm<Integer> {
/**
* 对于分片字段的等值操作 都走这个方法。(包括 插入 更新)
* 如:
* <p>
* select * from t_order from t_order where order_id = 11
* └── SELECT * FROM t_order_1 WHERE order_id = 11
* select * from t_order from t_order where order_id = 44
* └── SELECT * FROM t_order_0 WHERE order_id = 44
* </P>
*/
@Override
public String doEqualSharding(final Collection<String> tableNames, final ShardingValue<Integer> shardingValue) {
for (String each : tableNames) {
if (each.endsWith(shardingValue.getValue() % 2 + "")) {
return each;
}
}
throw new IllegalArgumentException();
}
/**
* 对于分片字段的in操作,都走这个方法。
* select * from t_order from t_order where order_id in (11,44)
* ├── SELECT * FROM t_order_0 WHERE order_id IN (11,44)
* └── SELECT * FROM t_order_1 WHERE order_id IN (11,44)
* select * from t_order from t_order where order_id in (11,13,15)
* └── SELECT * FROM t_order_1 WHERE order_id IN (11,13,15)
* select * from t_order from t_order where order_id in (22,24,26)
* └──SELECT * FROM t_order_0 WHERE order_id IN (22,24,26)
*/
@Override
public Collection<String> doInSharding(final Collection<String> tableNames, final ShardingValue<Integer> shardingValue) {
Collection<String> result = new LinkedHashSet<>(tableNames.size());
for (Integer value : shardingValue.getValues()) {
for (String tableName : tableNames) {
if (tableName.endsWith(value % 2 + "")) {
result.add(tableName);
}
}
}
return result;
}
/**
* 对于分片字段的between操作都走这个方法。
* select * from t_order from t_order where order_id between 10 and 20
* ├── SELECT * FROM t_order_0 WHERE order_id BETWEEN 10 AND 20
* └── SELECT * FROM t_order_1 WHERE order_id BETWEEN 10 AND 20
*/
@Override
public Collection<String> doBetweenSharding(final Collection<String> tableNames, final ShardingValue<Integer> shardingValue) {
Collection<String> result = new LinkedHashSet<>(tableNames.size());
Range<Integer> range = (Range<Integer>) shardingValue.getValueRange();
for (Integer i = range.lowerEndpoint(); i <= range.upperEndpoint(); i++) {
for (String each : tableNames) {
if (each.endsWith(i % 2 + "")) {
result.add(each);
}
}
}
return result;
}
}
对特定表和库,进行特定的分库分表规则
简单说,就是分库按照了user_id的奇偶区分,分表按照order_id 的奇偶区分,
如果你有多个表进行分片,就写多个TableRule,
配置两个数据源,分别是我在yml里的配置,根据你的需求个性化配置就可以。
@Configuration
@EnableConfigurationProperties(ShardDataSourceProperties.class)
public class ShardDataSourceConfig {
@Autowired
private ShardDataSourceProperties shardDataSourceProperties;
private DruidDataSource parentDs() throws SQLException {
DruidDataSource ds = new DruidDataSource();
ds.setDriverClassName(shardDataSourceProperties.getDriverClassName());
ds.setUsername(shardDataSourceProperties.getUsername());
ds.setUrl(shardDataSourceProperties.getUrl());
ds.setPassword(shardDataSourceProperties.getPassword());
ds.setFilters(shardDataSourceProperties.getFilters());
ds.setMaxActive(shardDataSourceProperties.getMaxActive());
ds.setInitialSize(shardDataSourceProperties.getInitialSize());
ds.setMaxWait(shardDataSourceProperties.getMaxWait());
ds.setMinIdle(shardDataSourceProperties.getMinIdle());
ds.setTimeBetweenEvictionRunsMillis(shardDataSourceProperties.getTimeBetweenEvictionRunsMillis());
ds.setMinEvictableIdleTimeMillis(shardDataSourceProperties.getMinEvictableIdleTimeMillis());
ds.setValidationQuery(shardDataSourceProperties.getValidationQuery());
ds.setTestWhileIdle(shardDataSourceProperties.isTestWhileIdle());
ds.setTestOnBorrow(shardDataSourceProperties.isTestOnBorrow());
ds.setTestOnReturn(shardDataSourceProperties.isTestOnReturn());
ds.setPoolPreparedStatements(shardDataSourceProperties.isPoolPreparedStatements());
ds.setMaxPoolPreparedStatementPerConnectionSize(
shardDataSourceProperties.getMaxPoolPreparedStatementPerConnectionSize());
ds.setRemoveAbandoned(shardDataSourceProperties.isRemoveAbandoned());
ds.setRemoveAbandonedTimeout(shardDataSourceProperties.getRemoveAbandonedTimeout());
ds.setLogAbandoned(shardDataSourceProperties.isLogAbandoned());
ds.setConnectionInitSqls(shardDataSourceProperties.getConnectionInitSqls());
return ds;
}
private DataSource ds0() throws SQLException {
DruidDataSource ds = parentDs();
ds.setUsername(shardDataSourceProperties.getUsername0());
ds.setUrl(shardDataSourceProperties.getUrl0());
ds.setPassword(shardDataSourceProperties.getPassword0());
return ds;
}
private DataSource ds1() throws SQLException {
DruidDataSource ds = parentDs();
ds.setUsername(shardDataSourceProperties.getUsername1());
ds.setUrl(shardDataSourceProperties.getUrl1());
ds.setPassword(shardDataSourceProperties.getPassword1());
return ds;
}
private DataSourceRule dataSourceRule() throws SQLException {
Map<String, DataSource> dataSourceMap = new HashMap<>(2);
dataSourceMap.put("ds_0", ds0());
dataSourceMap.put("ds_1", ds1());
DataSourceRule dataSourceRule = new DataSourceRule(dataSourceMap);
return dataSourceRule;
}
//对order对策略
private TableRule orderTableRule() throws SQLException {
TableRule orderTableRule = TableRule.builder("t_order").actualTables(Arrays.asList("t_order_0", "t_order_1"))
.dataSourceRule(dataSourceRule()).build();
return orderTableRule;
}
//分库分表策略
private ShardingRule shardingRule() throws SQLException {
ShardingRule shardingRule = ShardingRule.builder().dataSourceRule(dataSourceRule())
.tableRules(Arrays.asList(orderTableRule(), orderItemTableRule()))
.databaseShardingStrategy(
new DatabaseShardingStrategy("user_id", new ModuloDatabaseShardingAlgorithm()))
.tableShardingStrategy(new TableShardingStrategy("order_id", new ModuloTableShardingAlgorithm()))
.build();
return shardingRule;
}
@Bean
public DataSource dataSource() throws SQLException {
return ShardingDataSourceFactory.createDataSource(shardingRule());
}
@Bean
public PlatformTransactionManager transactionManager() throws SQLException {
return new DataSourceTransactionManager(dataSource());
}
}
我们需要从controller调用接口进行对数据的增加和查询
下面所有的类都是用来模拟请求进行测试
@RestController
@RequestMapping("/order")
public class OrderController {
@Autowired
private OrderDao orderDao;
@RequestMapping(path = "/createOrder/{userId}/{orderId}", method = {RequestMethod.GET})
public String createOrder(@PathVariable("userId") Integer userId, @PathVariable("orderId") Integer orderId) {
Order order = new Order();
order.setOrderId(orderId);
order.setUserId(userId);
orderDao.createOrder(order);
return "success";
}
@RequestMapping(path = "/{userId}", method = {RequestMethod.GET})
public List<Order> getOrderListByUserId(@PathVariable("userId") Integer userId) {
return orderDao.getOrderListByUserId(userId);
}
}
---------------------------------------------------
public interface OrderDao {
List<Order> getOrderListByUserId(Integer userId);
void createOrder(Order order);
}
---------------------------------------------------
@Service
public class OrderDaoImpl implements OrderDao {
@Autowired
JdbcTemplate jdbcTemplate;
@Override
public List<Order> getOrderListByUserId(Integer userId) {
StringBuilder sqlBuilder = new StringBuilder();
sqlBuilder
.append("select order_id, user_id from t_order where user_id=? ");
return jdbcTemplate.query(sqlBuilder.toString(), new Object[]{userId},
new int[]{Types.INTEGER}, new BeanPropertyRowMapper<Order>(
Order.class));
}
@Override
public void createOrder(Order order) {
StringBuffer sb = new StringBuffer();
sb.append("insert into t_order(user_id, order_id)");
sb.append("values(");
sb.append(order.getUserId()).append(",");
sb.append(order.getOrderId());
sb.append(")");
jdbcTemplate.update(sb.toString());
}
}
---------------------------------------------------
public class Order implements Serializable {
private int userId;
private int orderId;
---------------------------------------------------
@SpringBootApplication
public class Application {
public static void main(String[] args) {
SpringApplication.run(Application.class, args);
}
}
测试
启动项目,访问:http://localhost:8050/order/createOrder/1/1
更换参数多次访问,可以插入多条记录,观察你的数据库入库情况,已经按照我们制定的分库分表策略进行划分了。
需要注意的是
shareding是不支持jdbctemplate的批量修改操作的。
表名前不要加上库名,原生的情况加库名,不加库名其实是一样的,但使用shareding的表就会报错。

如果想进行只分表不分库的话
- 注释掉 ModuloDatabaseShardingAlgorithm 类
- 还有ShardDataSourceConfig.shardingRule() 中的分库策略那行代码
- 还有相关数据源配置改成 1 个
到此这篇关于Java中ShardingSphere 数据分片的实现的文章就介绍到这了,更多相关ShardingSphere 数据分片内容请搜索以前的文章或继续浏览下面的相关文章希望大家以后多多支持!
以上是 Java中ShardingSphere 数据分片的实现 的全部内容, 来源链接: utcz.com/p/249301.html