Java注解方式之防止重复请求
自定义注解方式防止前端同一时间多次重复提交
一、 前情提要
有这样一个业务,上课的时候老师给表现好的学生送小花花,
每节课都能统计出某个学生收到的花的总数。
按照产品需求,前端点击送花按钮后30秒内是不能再次送花的(信任的基础)
(上课老师送花行为都进行统计了,可见互联网是多么可怕)
二、技术设计
2.1 库表设计
CREATE TABLE `t_student_flower` (
`id` bigint(20) NOT NULL AUTO_INCREMENT COMMENT '主键(自增)',
`classroom_id` bigint(20) NOT NULL COMMENT '每堂课的唯一标识',
`student_id` bigint(20) NOT NULL COMMENT '学生唯一标识',
`flower_num` bigint(20) NOT NULL DEFAULT '0' COMMENT '学生收到的花数量',
PRIMARY KEY (`id`)
) ENGINE=InnoDB DEFAULT CHARSET=utf8
2.2 业务逻辑
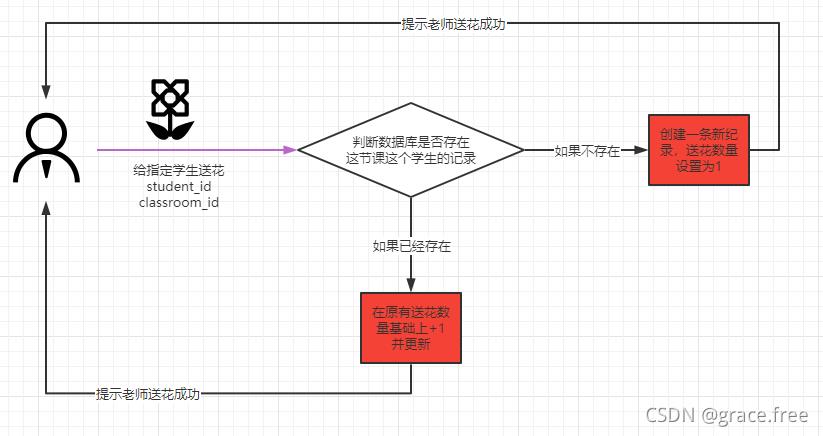
业务逻辑很简单,针对某一堂课的某一个学生,老师第一次送花就新增一条记录,之后老师给这个学生送花就在原有的记录基础上增加送花数量即可。
如果前端能保证一堂课,一个学生,30秒内只能送一次花,这样设计能99.9999%的保证业务没问题
2.3 代码编写
至于创建SpringBoot项目,连接Mybatis 准备在Mybatis篇章写,这里主要点不是这些。
重要是业务逻辑
pom.xml
<?xml version="1.0" encoding="UTF-8"?>
<project xmlns="http://maven.apache.org/POM/4.0.0" xmlns:xsi="http://www.w3.org/2001/XMLSchema-instance"
xsi:schemaLocation="http://maven.apache.org/POM/4.0.0 https://maven.apache.org/xsd/maven-4.0.0.xsd">
<modelVersion>4.0.0</modelVersion>
<parent>
<groupId>org.springframework.boot</groupId>
<artifactId>spring-boot-starter-parent</artifactId>
<version>2.5.4</version>
<relativePath/> <!-- lookup parent from repository -->
</parent>
<groupId>com.example</groupId>
<artifactId>student_flower</artifactId>
<version>0.0.1-SNAPSHOT</version>
<name>student_flower</name>
<description>Demo project for Spring Boot</description>
<properties>
<java.version>1.8</java.version>
</properties>
<dependencies>
<!--web-->
<dependency>
<groupId>org.springframework.boot</groupId>
<artifactId>spring-boot-starter-web</artifactId>
</dependency>
<!--mybatis-->
<dependency>
<groupId>org.mybatis.spring.boot</groupId>
<artifactId>mybatis-spring-boot-starter</artifactId>
<version>1.3.2</version>
</dependency>
<!--mysql驱动-->
<dependency>
<groupId>mysql</groupId>
<artifactId>mysql-connector-java</artifactId>
<scope>runtime</scope>
</dependency>
<!--lombok 一款还不错的副主编程工具-->
<dependency>
<groupId>org.projectlombok</groupId>
<artifactId>lombok</artifactId>
<version>1.16.18</version>
<scope>provided</scope>
</dependency>
<!--测试使用-->
<dependency>
<groupId>org.springframework.boot</groupId>
<artifactId>spring-boot-starter-test</artifactId>
<scope>test</scope>
</dependency>
</dependencies>
<build>
<plugins>
<plugin>
<groupId>org.springframework.boot</groupId>
<artifactId>spring-boot-maven-plugin</artifactId>
</plugin>
</plugins>
</build>
</project>
application.yml
server:
# 服务端口配置
port: 8888
spring:
# 数据源配置
datasource:
driver-class-name: com.mysql.cj.jdbc.Driver
url: jdbc:mysql://127.0.0.1:3306/test?characterEncoding=utf-8&useSSL=false
username: root
password: 123456
mybatis:
# mapper扫描路径
mapper-locations: classpath:mapper/*.xml
# 实体类别名映射包路径
type-aliases-package: com.example.student_flower.entity
configuration:
# 开启驼峰命名
map-underscore-to-camel-case: true
StudentFlowerController
package com.example.student_flower.controller;
import com.example.student_flower.service.StudentFlowerService;
import com.sun.istack.internal.NotNull;
import org.springframework.beans.factory.annotation.Autowired;
import org.springframework.web.bind.annotation.GetMapping;
import org.springframework.web.bind.annotation.PathVariable;
import org.springframework.web.bind.annotation.RestController;
/**
* @author 发现更多精彩 关注公众号:木子的昼夜编程
* 一个生活在互联网底层,做着增删改查的码农,不谙世事的造作
* @create 2021-09-11 10:35
*/
@RestController
public class StudentFlowerController {
@Autowired
StudentFlowerService studentFlowerService;
/**
*
* @param classroomId 教师ID
* @param studentId 学生ID
*/
@GetMapping(value = "/test/sendflower/{classroomId}/{studentId}")
public void sendFlower(@NotNull @PathVariable("classroomId") Long classroomId , @NotNull @PathVariable("studentId") Long studentId){
studentFlowerService.SendFlower(classroomId,studentId);
}
}
StudentFlowerService
package com.example.student_flower.service;
import com.example.student_flower.dao.TStudentFlowerMapper;
import com.example.student_flower.entity.TStudentFlower;
import org.springframework.beans.factory.annotation.Autowired;
import org.springframework.stereotype.Service;
/**
* @author 发现更多精彩 关注公众号:木子的昼夜编程
* 一个生活在互联网底层,做着增删改查的码农,不谙世事的造作
* @create 2021-09-11 10:38
*/
@Service
public class StudentFlowerService {
@Autowired
TStudentFlowerMapper mapper;
public void SendFlower(Long classroomId, Long studentId){
TStudentFlower tStudentFlower = mapper.selectByClassroomIdAndStudentId(classroomId, studentId);
// 第一次送花 没有记录 新增
if (tStudentFlower == null) {
TStudentFlower tsf = new TStudentFlower();
tsf.setClassroomId(classroomId);
tsf.setStudentId(studentId);
tsf.setFlowerNum(1);
mapper.insert(tsf);
} else {
// 已经送过花了 原来数量上+1
tStudentFlower.setFlowerNum(tStudentFlower.getFlowerNum() + 1);
mapper.update(tStudentFlower);
}
}
}
TStudentFlowerMapper
package com.example.student_flower.dao;
import com.example.student_flower.entity.TStudentFlower;
import org.apache.ibatis.annotations.Mapper;
import org.apache.ibatis.annotations.Param;
/**
* @author 发现更多精彩 关注公众号:木子的昼夜编程
* 一个生活在互联网底层,做着增删改查的码农,不谙世事的造作
* @create 2021-09-11 10:14
*/
@Mapper
public interface TStudentFlowerMapper {
// 插入
void insert(TStudentFlower tStudentFlower);
// 更新
void update(TStudentFlower tStudentFlower);
// 查询
TStudentFlower selectByClassroomIdAndStudentId(
@Param("classroomId") Long classroomId,
@Param("studentId") Long studentId);
}
TStudentFlowerMapper.xml
<?xml version="1.0" encoding="UTF-8" ?>
<!DOCTYPE mapper PUBLIC "-//mybatis.org//DTD Mapper 3.0//EN" "http://mybatis.org/dtd/mybatis-3-mapper.dtd" >
<mapper namespace="com.example.student_flower.dao.TStudentFlowerMapper">
<!--新增-->
<insert id="insert" parameterType="TStudentFlower">
INSERT INTO t_student_flower (classroom_id,student_id,flower_num)
VALUES (#{classroomId},#{studentId},#{flowerNum})
</insert>
<!--更新-->
<update id="update" parameterType="TStudentFlower">
UPDATE t_student_flower
SET flower_num = #{flowerNum}
WHERE id=#{id};
</update>
<select id="selectByClassroomIdAndStudentId"
resultType="TStudentFlower">
select * from t_student_flower
where classroom_id = #{classroomId} and student_id = #{studentId}
</select>
</mapper>
2.4 测试
浏览器直接访问:
http://127.0.0.1:8888/test/sendflower/1/1
就会给classroomId = 1 ,studentId = 1 的学生送一朵花
2.5 问题所在
一切看似没有问题,因为请求频率还没有达到可以出错的速度。
我们写一个测试用了来模拟前端不可信任的时候(由于某种原因他们送花事件绑定了多次没有解绑,也就是同一时间发送多次送花请求)
package com.example.student_flower;
import com.example.student_flower.service.StudentFlowerService;
import org.junit.jupiter.api.Test;
import org.springframework.beans.factory.annotation.Autowired;
import org.springframework.boot.test.context.SpringBootTest;
import java.util.concurrent.TimeUnit;
@SpringBootTest
class StudentFlowerApplicationTests {
@Autowired
StudentFlowerService service;
@Test
void sendFlower() throws InterruptedException {
final Long classroomId = 2L;
final Long studengId = 102L;
Thread thread1 = new Thread(() -> {
service.SendFlower(classroomId, studengId);
System.out.println("thread1执行完了");
});
Thread thread2 = new Thread(() -> {
service.SendFlower(classroomId, studengId);
System.out.println("thread2执行完了");
});
Thread thread3 = new Thread(() -> {
service.SendFlower(classroomId, studengId);
System.out.println("thread3执行完了");
});
thread1.start();
thread2.start();
thread3.start();
// 睡会儿 等三个线程跑完 很low? 做测试凑活用吧
Thread.sleep(TimeUnit.SECONDS.toMillis(20));
}
}
执行完看一下数据库结果:

这肯定是有问题的 多三条要出问题的,要扣钱绩效的
三、解决方案
解决方案有很多,我今天介绍一种自定义注解的方式(其实就是用了分布redis锁)
方案看似很简单:
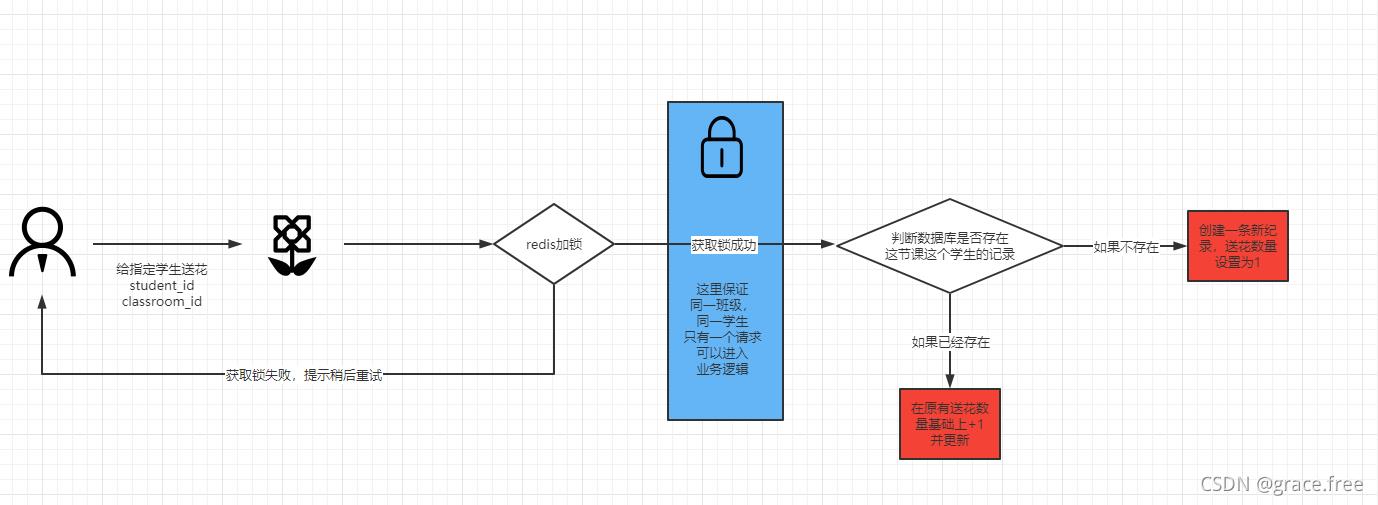
自定义注解MyAnotation
package com.example.student_flower.common.anotation;
import java.lang.annotation.ElementType;
import java.lang.annotation.Retention;
import java.lang.annotation.RetentionPolicy;
import java.lang.annotation.Target;
/**
* @author 发现更多精彩 关注公众号:木子的昼夜编程 分享一个生活在互联网底层做着增删改查的码农的感悟与学习
*
* 关于自定义注解 后边有机会专门写一写 先会用
* @create 2021-09-11 15:26
*/
@Target({ElementType.METHOD}) // 方法上使用的注解
@Retention(RetentionPolicy.RUNTIME) // 运行时通过反射访问
public @interface MyAnotation {
/**
* 获取锁时默认等待多久
*/
int waitTime() default 3;
/**
* 锁过期时间
*/
int expireTime() default 20;
/**
* 锁key值
*/
String redisKey() default "";
/**
* 锁key后拼接的动态参数的值
*/
String[] params() default {};
}
自定义切面处理逻辑,进行放重复提交校验MyAspect
package com.example.student_flower.common.aspect;
import com.example.student_flower.common.anotation.MyAnotation;
import com.example.student_flower.util.HttpContextUtils;
import com.example.student_flower.util.SpelUtil;
import io.micrometer.core.instrument.util.StringUtils;
import lombok.extern.slf4j.Slf4j;
import org.aspectj.lang.ProceedingJoinPoint;
import org.aspectj.lang.annotation.Around;
import org.aspectj.lang.annotation.Aspect;
import org.aspectj.lang.annotation.Pointcut;
import org.aspectj.lang.reflect.MethodSignature;
import org.redisson.api.RLock;
import org.redisson.api.RedissonClient;
import org.springframework.beans.factory.annotation.Autowired;
import org.springframework.stereotype.Component;
import javax.servlet.http.HttpServletRequest;
import java.lang.reflect.Method;
import java.util.concurrent.TimeUnit;
/**
* @author 发现更多精彩 关注公众号:木子的昼夜编程
* 一个生活在互联网底层,做着增删改查的码农,不谙世事的造作
*
* 关于spring面向切面的知识 等以后文章有机会我写一写(自己也不太熟 暂时会用)
*
* @create 2021-09-11 15:29
*/
@Slf4j
@Aspect
@Component
public class MyAspect {
@Autowired
RedissonClient redissonClient;
// 这个是那些方法需要被切 -- 被标记注解MyAnotation的方法要被切
@Pointcut("@annotation(com.example.student_flower.common.anotation.MyAnotation)")
public void whichMethodAspect() {
}
/**
* 切面 执行业务逻辑 在实际业务方法执行前 后 都可以进行一些额外的操作
* 切面的好处就是对你不知不觉
*/
@Around("whichMethodAspect()")
public Object around(ProceedingJoinPoint joinPoint) throws Throwable {
// 1. 获取注解
MethodSignature signature = (MethodSignature) joinPoint.getSignature();
Method method = signature.getMethod();
MyAnotation myAnotation = method.getAnnotation(MyAnotation.class);
// 2. 锁等待时间
int waitTime = myAnotation.waitTime();
// 2. 锁超时时间 怕万一finally没有被执行到的时候 多长时间自动释放锁(基本不会不执行finnaly 除非那个点机器down了)
final int lockSeconds = myAnotation.expireTime();
// 3. 特殊业务自定义key
String key = myAnotation.redisKey();
// 自定义redisKey是否使用参数
String[] params = myAnotation.params();
// 4.获取HttpServletRequest
HttpServletRequest request = HttpContextUtils.getRequest();
if (request == null) {
throw new Exception("错误的请求 request为null");
}
assert request != null;
// 5. 组合redis锁key
// 5.1 如果没有自定义 用默认的 url+token
if (StringUtils.isBlank(key) && (params == null || params.length == 0)) {
// 这里怎么获取token 主要看自己项目用的什么框架 token在哪个位置存储着
String token = request.getHeader("Authorization");
String requestURI = request.getRequestURI();
key = requestURI+token;
} else {
// 5.2 自定义key
key = SpelUtil.generateKeyBySpEL(key, params, joinPoint);
}
// 6. 获取key
// 获取锁 获取不到最多等waitTime秒 lockSeconds秒后自动释放锁
// 每个项目组应该会有自己的redisUtil的封装 我这里就用最简单的方式
// 怎么使用锁不是重点 重点是这个思想
RLock lock = redissonClient.getLock(key);
log.info("tryLock key = {}", key);
boolean b = lock.tryLock(waitTime, lockSeconds, TimeUnit.SECONDS);
// 获取锁成功
if (b) {
try {
log.info("tryLock success, key = {}", key);
// 7. 执行业务代码 返回结果
return joinPoint.proceed();
} finally {
lock.unlock();
}
} else {
// 获取锁失败
log.info("tryLock fail, key = {}", key);
throw new Exception("请求频繁,请稍后重试");
}
}
}
Redisson配置RedissonConfig
package com.example.student_flower;
import org.redisson.Redisson;
import org.redisson.api.RedissonClient;
import org.redisson.config.Config;
import org.springframework.context.annotation.Bean;
/**
* @author 发现更多精彩 关注公众号:木子的昼夜编程
* 一个生活在互联网底层,做着增删改查的码农,不谙世事的造作
* @create 2021-09-11 16:31
*/
public class RedissonConfig {
// 这里就简单设置 真实项目中会做到配置文件或配置中心
@Bean
public RedissonClient getRedisson() {
Config config = new Config();
config.useSingleServer().setAddress("redis://127.0.0.1:6379");
return Redisson.create(config);
}
}
获取request对象HttpContextUtils
package com.example.student_flower.util;
import org.springframework.web.context.request.RequestContextHolder;
import org.springframework.web.context.request.ServletRequestAttributes;
import javax.servlet.http.HttpServletRequest;
import javax.servlet.http.HttpServletResponse;
/**
* @author 发现更多精彩 关注公众号:木子的昼夜编程
* 一个生活在互联网底层,做着增删改查的码农,不谙世事的造作
* @create 2021-09-11 16:17
*
* 获取springboot环境中的request/response对象
*/
public class HttpContextUtils {
// 获取request
public static HttpServletRequest getRequest(){
ServletRequestAttributes servletRequestAttributes = (ServletRequestAttributes) RequestContextHolder.getRequestAttributes();
HttpServletRequest request = servletRequestAttributes.getRequest();
return request;
}
// 获取response
public static HttpServletResponse getResponse(){
ServletRequestAttributes servletRequestAttributes = (ServletRequestAttributes) RequestContextHolder.getRequestAttributes();
HttpServletResponse response = servletRequestAttributes.getResponse();
return response;
}
}
El表达式解析 SpelUtil
package com.example.student_flower.util;
import java.lang.reflect.Method;
import org.aspectj.lang.ProceedingJoinPoint;
import org.aspectj.lang.reflect.MethodSignature;
import org.springframework.core.DefaultParameterNameDiscoverer;
import org.springframework.expression.EvaluationContext;
import org.springframework.expression.Expression;
import org.springframework.expression.spel.standard.SpelExpressionParser;
import org.springframework.expression.spel.support.StandardEvaluationContext;
/**
* @author 发现更多精彩 关注公众号:木子的昼夜编程
* 一个生活在互联网底层,做着增删改查的码农,不谙世事的造作
* @create 2021-09-11 15:35
*/
/**
* EL表达式解析
*/
public class SpelUtil {
/**
* 用于SpEL表达式解析.
*/
private static SpelExpressionParser parser = new SpelExpressionParser();
/**
* 用于获取方法参数定义名字.
*/
private static DefaultParameterNameDiscoverer nameDiscoverer = new DefaultParameterNameDiscoverer();
/**
* 解析表达式
*/
public static String generateKeyBySpEL(String key, String[] params, ProceedingJoinPoint joinPoint) {
StringBuilder spELString = new StringBuilder();
if (params != null && params.length > 0) {
spELString.append("'" + key + "'");
for (int i = 0; i < params.length; i++) {
spELString.append("+#" + params[i]);
}
} else {
return key;
}
// 通过joinPoint获取被注解方法
MethodSignature methodSignature = (MethodSignature) joinPoint.getSignature();
Method method = methodSignature.getMethod();
// 使用spring的DefaultParameterNameDiscoverer获取方法形参名数组
String[] paramNames = nameDiscoverer.getParameterNames(method);
// 解析过后的Spring表达式对象
Expression expression = parser.parseExpression(spELString.toString());
// spring的表达式上下文对象
EvaluationContext context = new StandardEvaluationContext();
// 通过joinPoint获取被注解方法的形参
Object[] args = joinPoint.getArgs();
// 给上下文赋值
for (int i = 0; i < args.length; i++) {
context.setVariable(paramNames[i], args[i]);
}
return expression.getValue(context).toString();
}
}
controller使用注解:
package com.example.student_flower.controller;
import com.example.student_flower.common.anotation.MyAnotation;
import com.example.student_flower.service.StudentFlowerService;
import com.sun.istack.internal.NotNull;
import org.springframework.beans.factory.annotation.Autowired;
import org.springframework.web.bind.annotation.GetMapping;
import org.springframework.web.bind.annotation.PathVariable;
import org.springframework.web.bind.annotation.RestController;
/**
* @author 发现更多精彩 关注公众号:木子的昼夜编程
* 一个生活在互联网底层,做着增删改查的码农,不谙世事的造作
* @create 2021-09-11 10:35
*/
@RestController
public class StudentFlowerController {
@Autowired
StudentFlowerService studentFlowerService;
/**
*
* @param classroomId 教师ID
* @param studentId 学生ID
*/
@MyAnotation(redisKey = "/test/sendflower", params = {"classroomId", "studentId"})
@GetMapping(value = "/test/sendflower/{classroomId}/{studentId}")
public void sendFlower(@NotNull @PathVariable("classroomId") Long classroomId , @NotNull @PathVariable("studentId") Long studentId){
studentFlowerService.SendFlower(classroomId,studentId);
}
}
测试类(这里用了MockMvc直接测试controller)
package com.example.student_flower;
import org.junit.jupiter.api.Test;
import org.springframework.beans.factory.annotation.Autowired;
import org.springframework.boot.test.autoconfigure.web.servlet.AutoConfigureMockMvc;
import org.springframework.boot.test.context.SpringBootTest;
import org.springframework.http.MediaType;
import org.springframework.test.web.servlet.MockMvc;
import org.springframework.test.web.servlet.request.MockMvcRequestBuilders;
import org.springframework.test.web.servlet.result.MockMvcResultHandlers;
import org.springframework.test.web.servlet.result.MockMvcResultMatchers;
import java.util.concurrent.TimeUnit;
@SpringBootTest
@AutoConfigureMockMvc
class StudentFlowerTests {
@Autowired
protected MockMvc mockMvc;
@Test
void sendFlower() throws Exception {
final Long classroomId = 7L;
final Long studengId = 102L;
Thread thread1 = new Thread(() -> {
try {
mockMvc.perform(MockMvcRequestBuilders
.get("/test/sendflower/" + classroomId + "/"
+ studengId).accept(MediaType.APPLICATION_JSON))
.andExpect(MockMvcResultMatchers.status().isOk())
.andDo(MockMvcResultHandlers.print())
.andReturn();
} catch (Exception e) {
e.printStackTrace();
}
});
Thread thread2 = new Thread(() -> {
try {
mockMvc.perform(MockMvcRequestBuilders
.get("/test/sendflower/" + classroomId + "/"
+ studengId).accept(MediaType.APPLICATION_JSON))
.andExpect(MockMvcResultMatchers.status().isOk())
.andDo(MockMvcResultHandlers.print())
.andReturn();
} catch (Exception e) {
e.printStackTrace();
}
});
Thread thread3 = new Thread(() -> {
try {
mockMvc.perform(MockMvcRequestBuilders
.get("/test/sendflower/" + classroomId + "/"
+ studengId).accept(MediaType.APPLICATION_JSON))
.andExpect(MockMvcResultMatchers.status().isOk())
.andDo(MockMvcResultHandlers.print())
.andReturn();
} catch (Exception e) {
e.printStackTrace();
}
});
thread1.start();
thread2.start();
thread3.start();
// 睡会儿 等三个线程跑完 很low? 做测试凑活用吧
Thread.sleep(TimeUnit.SECONDS.toMillis(20));
}
}
去掉controller注解测试 会插入多条,加上MyAnotation注解只会生成一条
四 、唠唠
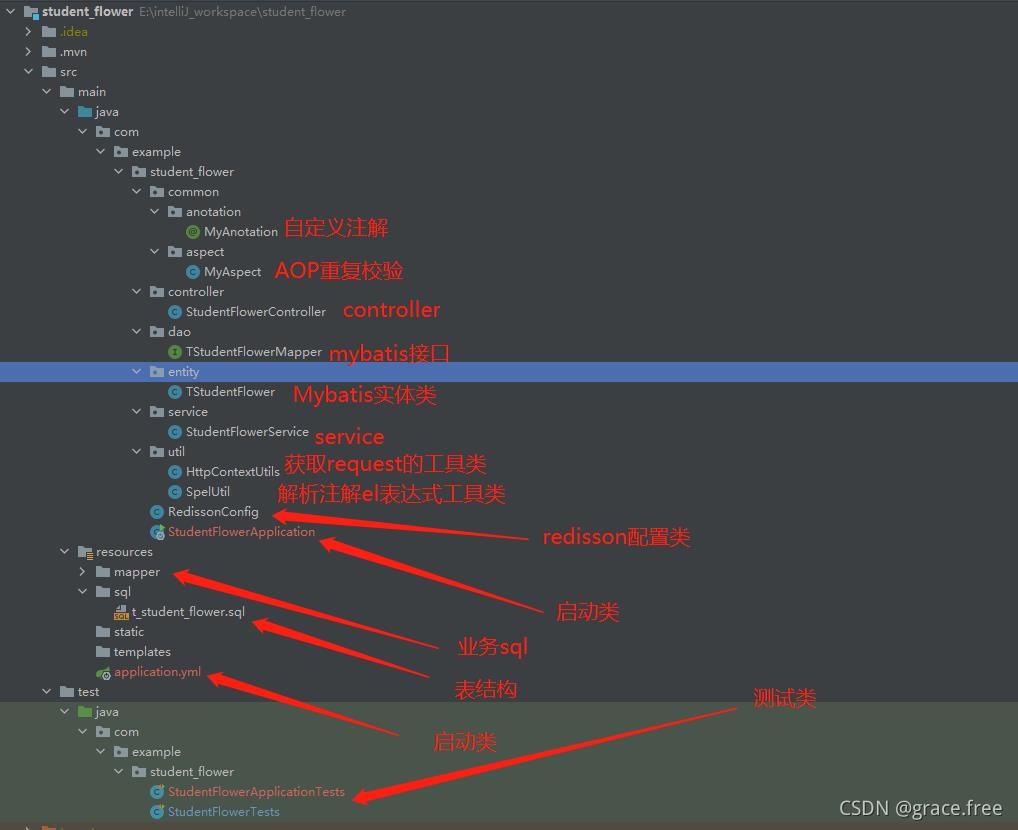
4.1 项目
主要用到了自定义注解、RedissonClient的redis锁、AOP等知识
可能么有写过这种场景代码的人会觉得比较乱:木有关系全部代码已经提交到github上了,
地址:https://github.com/githubforliming/student_flower
4.2 redis服务
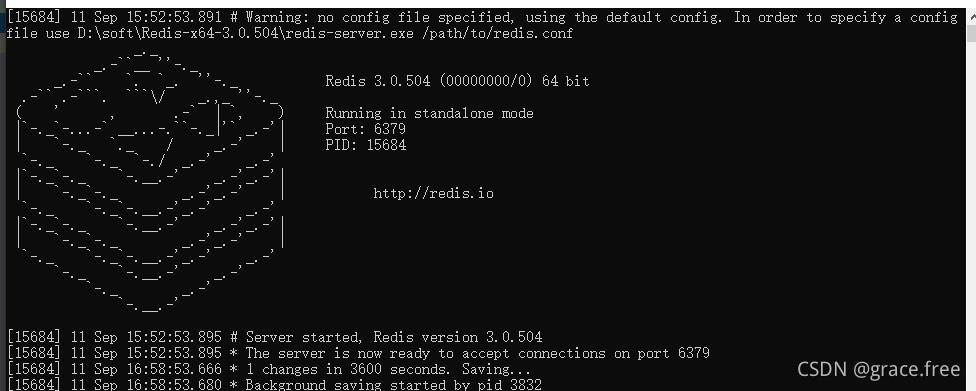
贴心的我把redis的windows免安装包都放到项目里了
test/java/soft 解压 双击redis-server.exe 即可运行
默认没密码
4.3 其他问题
支持参数是对象的自定义key
@MyAnotation(redisKey = "/test/sendflower", params = {"p.id"})
@PostMapping(value = "/test/sendflower02")
public void sendFlower(@RequestBody Person p){
// xxx
}
到此这篇关于Java注解方式之防止重复请求的文章就介绍到这了,更多相关Java 注解方式内容请搜索以前的文章或继续浏览下面的相关文章希望大家以后多多支持!
以上是 Java注解方式之防止重复请求 的全部内容, 来源链接: utcz.com/p/248948.html


