spring webflux自定义netty 参数解析
自定义 webflux 容器配置
配置代码
@Component
public class ContainerConfig extends ReactiveWebServerFactoryCustomizer {
public ContainerConfig(ServerProperties serverProperties) {
super(serverProperties);
}
@Override
public void customize(ConfigurableReactiveWebServerFactory factory) {
super.customize(factory);
NettyReactiveWebServerFactory nettyFactory = (NettyReactiveWebServerFactory) factory;
nettyFactory.setResourceFactory(null);
nettyFactory.addServerCustomizers(server ->
server.tcpConfiguration(tcpServer ->
tcpServer.runOn(LoopResources.create("mfilesvc", Runtime.getRuntime().availableProcessors() * 4, Runtime.getRuntime().availableProcessors() * 8, true))
.selectorOption(CONNECT_TIMEOUT_MILLIS, 200)
).channelGroup(new ChannelGroup())
);
}
@Override
public int getOrder() {
return -10;
}
}
服务重启时 报错
SpringContextShutdownHook Socket couldn't be stopped within 3000ms
解决方案

初识Spring WebFlux
在我的认识中,大部分人都在用SpringMVC(包括我自己)。在最近的学习中,发现spring5中有一个和SpringMVC平级的东西Spring WebFlux,接下来初步认识一下这是个什么东东?
Spring Web新的改变
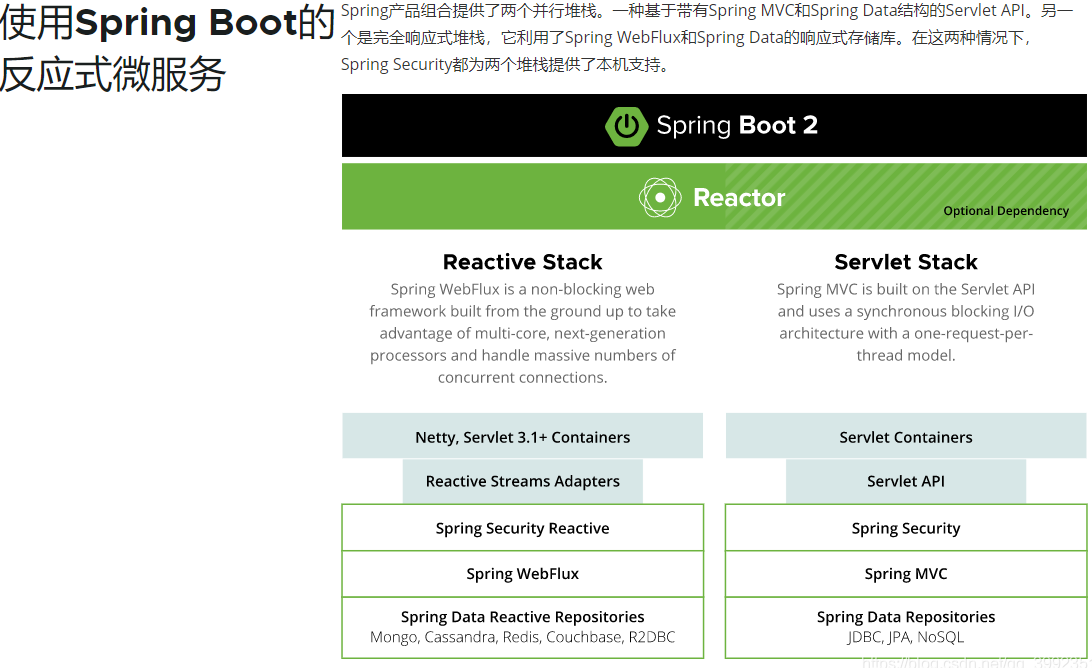
众所周知Spring MVC是同步阻塞的IO模型,当我们在处理一个耗时的任务时,如上传文件,服务器的处理线程会一直处于等待状态,等待文件的上传,这期间什么也做不了,等到文件上传完毕后可能需要写入,写入的过程线程又只能在那等待,非常浪费资源。为了避免这类资源的浪费,Spring WebFlux应运而生,在Spring WebFlux中若文件还没上传完毕,线程可以先去做其他事情,当文件上传完毕后会通知线程,线程再来处理,后续写入也是类似的,通过异步非阻塞机制节省了系统资源,极大的提高了系统的并发量。这两种形式,是不是像极了BIO和NIO这两种形式,实际上,SpringMVC和Spring WebFlux也就是这两种IO特点的体现。
以下为官网的介绍:
Spring WebFlux的特性
1.异步非阻塞
如上文所说,线程不需要一直处于等待状态,Spring WebFlux很好的体现了NIO的异步非阻塞思想。
2.响应式(reactive)编程
响应式编程是一种新的编程风格,其特点是异步和并发、事件驱动、推送PUSH机制一级观察者模式的衍生。reactive引用允许开发者构建事件驱动,可扩展性,弹性的反应系统:提供高度敏感的实时用户体验感觉,可伸缩性和弹性的引用程序栈的支持,随时可以部署在多核和云计算架构。
Reactive的主要接口:
- Publisher:发布者,数据的生产端
- Subscriber:消费者,此处可以定义获取到数据后响应的操作
- Processor:消费者与发布者之间的数据处理
- back pressure:背压,消费者告诉发布者自己能处理多少数据
消费者的回调方法:
- onSubscribe:订阅关系处理,用它来响应发布者
- onNext:接收到数据后会响应的方法
- onError:出现错误时处理的方法
- onComplete:任务完成后响应的方法
3.适配多种web容器
既然Spring WebFlux很好的体现了NIO的异步非阻塞思想。作为首屈一指的NIO框架netty,便是Spring WebFlux默认的运行容器。此外,大家熟悉的Tomcat、Jetty等Servlet容器,也能运行Spring WebFlux,前提是容器需要支持Servlet3.1,因为非阻塞IO是使用了Servlet3.1的特性。
Spring WebFlux简单实践
本文默认开发环境是JDK8,开发工具是IDEA。实践分两部分内容,第一部分与SpringMVC对比开发中的不一样的地方;第二部分为Spring WebFlux独有的响应式编程的简单实践。
在webflux中,Mono代表返回0或1个元素(相当于一个对象)。Flux代表返回0-n个元素(相当于集合)
1.工程创建
新建springboot工程。
选择Web -> Spring Reactive Web 创建

或者在springboot工程中pom文件添加依赖
<dependency>
<groupId>org.springframework.boot</groupId>
<artifactId>spring-boot-starter-webflux</artifactId>
</dependency>
2.Controller中与SpringMVC的对比
在controller中,webflux的写法可以和springMVC的写法类似
@RestController
@Slf4j
public class UserController {
@RequestMapping("/index")
public String index(){
log.info("springmvc index begin");
String result="cc666";
log.info("springmvc index end");
return result;
}
@RequestMapping("/index2")
public Mono<String> index2(){
log.info("webflux index begin");
Mono<String> result=Mono.just("666cc");
log.info("webflux index end");
return result;
}
}
3.异步非阻塞的体现
上面已经实现了初步的数据返回,不过webflux和springmvc目前来看没有什么区别,已知springmvc线程执行时会阻塞的,webflux线程是异步非阻塞的。下面修改一下代码,在获取数据的时候加一些额外的耗时操作,看看webflux是否是真的异步非阻塞
@RestController
@Slf4j
@AllArgsConstructor
public class UserController {
/**
* 模拟耗时查询操作
*/
public String createStr(){
try {
Thread.sleep(3000L);
} catch (InterruptedException e) {
e.printStackTrace();
}
return "cc666cc";
}
@RequestMapping("/index")
public String index(){
log.info("springmvc index begin");
String result=this.createStr();
log.info("springmvc index end");
return result;
}
@RequestMapping("/index2")
public Mono<String> index2(){
log.info("webflux index begin");
Mono<String> result=Mono.fromSupplier(()->this.createStr());
log.info("webflux index end");
return result;
}
}
通过日志结果,可以很明显的发现,虽然前端页面展示的效果是一样的,但springmvc是等待后返回结果;而webflux是先执行,等有结果后,再返回结果。由此体现了webflux异步非阻塞的特性
springmvc
2020-08-04 21:28:57.430 INFO 14156 --- [ctor-http-nio-2] c.w.webflux.controller.UserController : springmvc index begin
2020-08-04 21:29:00.430 INFO 14156 --- [ctor-http-nio-2] c.w.webflux.controller.UserController : springmvc index end
webflux
2020-08-04 21:29:09.640 INFO 14156 --- [ctor-http-nio-2] c.w.webflux.controller.UserController : webflux index begin
2020-08-04 21:29:09.641 INFO 14156 --- [ctor-http-nio-2] c.w.webflux.controller.UserController : webflux index end
4.添加数据库支持
对于数据库的支持,webflux用到的是r2dbc这样一个东西。
R2DBC(Reactive Relational Database Connectivity)是一个使用反应式驱动集成关系数据库的孵化器。Spring Data R2DBC运用熟悉的Spring抽象和repository 支持R2DBC。基于此,在响应式程序栈上使用关系数据访问技术,构建由Spring驱动的程序将变得非常简单。
在pom中引入依赖:
<dependency>
<groupId>org.springframework.boot</groupId>
<artifactId>spring-boot-starter-data-r2dbc</artifactId>
</dependency>
<dependency>
<groupId>com.github.jasync-sql</groupId>
<artifactId>jasync-r2dbc-mysql</artifactId>
<version>1.1.3</version>
</dependency>
在application.yml中加入数据源:
spring:
r2dbc:
url: r2dbc:mysql://127.0.0.1:3306/study
username: xxx
password: xxx
5.Dao的编写
Dao的编写和springmvc中类似,本文中继承了ReactiveCrudRepository类,是Repository的一个实现类,其中实现了简单的crud操作,model和dao的实现:
@Table("user")
@Data
@AllArgsConstructor
@NoArgsConstructor
public class User {
@Id
private Long id;
private String username;
private String password;
}
public interface UserDao extends ReactiveCrudRepository<User,Long> {
}
6.Controller的编写
controller的编写还是和springmvc类似,这里采用RESTful的方式
@RestController
@AllArgsConstructor
public class UserController {
private final UserDao userDao;
@GetMapping("/findAll")
public Flux<User> findAll(){
return userDao.findAll();
}
@PostMapping("/save")
public Mono save(@RequestBody User user){
return this.userDao.save(user);
}
@DeleteMapping("/delete/{id}")
public Mono delete(@PathVariable Long id){
return this.userDao.deleteById(id);
}
@GetMapping("/get/{id}")
public Mono get(@PathVariable Long id){
return this.userDao.findById(id);
}
}
7.响应式编程Handler的编写
在使用上,webflux可以和springmvc类似,不过webflux也有自己的一套响应式编程的写法,先定义handler,类似于controller,不过只有业务处理的代码,其中就用到了reactive模拟的request(ServerRequest )和response(ServerResponse),同样的实现简单的crud功能:
@Component
@AllArgsConstructor
public class UserHandler {
private final UserDao userDao;
public Mono<ServerResponse> saveUser(ServerRequest request){
Mono<User> mono=request.bodyToMono(User.class);
User user = mono.block();
return ServerResponse.ok().build(this.userDao.save(user).then());
}
public Mono<ServerResponse> deleteById(ServerRequest request){
Long id=Long.parseLong(request.pathVariable("id"));
return ServerResponse.ok().build(this.userDao.deleteById(id).then());
}
public Mono<ServerResponse> getByid(ServerRequest request){
Long id=Long.parseLong(request.pathVariable("id"));
Mono<User> mono = this.userDao.findById(id);
return ServerResponse.ok().contentType(MediaType.APPLICATION_JSON).body(mono,User.class);
}
public Mono<ServerResponse> findAll(ServerRequest request){
Flux<User> all = this.userDao.findAll();
return ServerResponse.ok().contentType(MediaType.APPLICATION_JSON).body(all,User.class);
}
}
8.响应式编程Route的编写
在handler中我们编写了处理代码,但是怎么通过请求地址访问呢?
学习过vue的老铁们应该知道,vue是通过路由定义地址和页面的对应关系的,vue也是响应式编程的一种体现。webflux中也是通过类似的方式来实现的,在Route中定义规则:
@Configuration
public class UserRoute {
@Bean
public RouterFunction<ServerResponse> routeUser(UserHandler userHandler){
return RouterFunctions
.route(RequestPredicates.GET("findAll2")
.and(RequestPredicates.accept(MediaType.APPLICATION_JSON)),userHandler::findAll)
.andRoute(RequestPredicates.GET("/get2/{id}")
.and(RequestPredicates.accept(MediaType.APPLICATION_JSON)),userHandler::getByid)
.andRoute(RequestPredicates.DELETE("/delete2/{id}")
.and(RequestPredicates.accept(MediaType.APPLICATION_JSON)),userHandler::deleteById)
.andRoute(RequestPredicates.POST("/save2")
.and(RequestPredicates.accept(MediaType.APPLICATION_JSON)),userHandler::saveUser);
}
}
以上为个人经验,希望能给大家一个参考,也希望大家多多支持。
以上是 spring webflux自定义netty 参数解析 的全部内容, 来源链接: utcz.com/p/248944.html

