SpringMVC配置多个properties文件之通配符解析
SpringMVC配置多个properties文件之通配符
在springmvc中配置加载properties文件一般会在
xml文件中配置如下
<context:property-placeholder location="classpath:resources/properties/zza.properties"
ignore-unresolvable="true" />
如果希望在项目中添加了一个新的模块,并且希望新的模块和之前项目相对独立,需要新添加一个properties文件的话,那么需要在xml配置文件中,再配置一份。比如:
<context:property-placeholder location="classpath:resources/properties/zza.properties"
ignore-unresolvable="true" />
<context:property-placeholder location="classpath:resources/properties/weixin.properties"
ignore-unresolvable="true" />
这样做就太麻烦了,每次添加完properties文件还得在xml文件中添加。并且还必须把ignore-unresolvable属性设置为true。
解决方案是:利用通配符
具体如下:
<context:property-placeholder location="classpath*:resources/properties/*.properties" />
多个SpringMVC项目配置统一管理
来自于springCloud的统一配置思路
因公司项目分多个系统进行开发,而系统架构几乎完全一样,所以同样的配置文件会存在不同的系统中
当其中的某些配置需要修改时,就需要依次把所有系统中相关的配置都修改掉
纯耗时且没技术含量的体力活
所以借鉴SpringCloud的统一配置文件管理思想来对公司多个系统的配置文件也进行统一管理
1.首先是properties文件
针对诸如数据库连接等类似的共通信息,如果数据库信息发生变更则都需要修改,为了方便者直接在服务器上放置一个默认的连接配置
并发布到IIS等server上,通过http请求能够获取到
然后修改加载资源文件的配置文件如下:
<?xml version="1.0" encoding="UTF-8"?>
<beans xmlns="http://www.springframework.org/schema/beans"
xmlns:xsi="http://www.w3.org/2001/XMLSchema-instance"
xsi:schemaLocation="http://www.springframework.org/schema/beans
http://www.springframework.org/schema/beans/spring-beans.xsd">
<bean class="org.springframework.beans.factory.config.PropertyPlaceholderConfigurer">
<property name="locations">
<list>
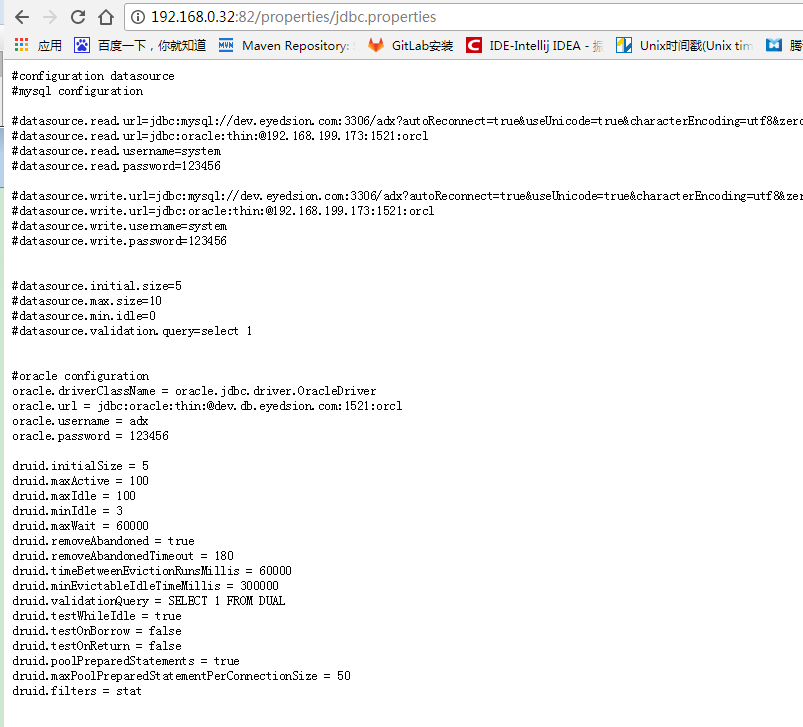
<value>http://192.168.0.32:82/properties/jdbc.properties</value>
</list>
</property>
</bean>
</beans>
PropertyPlaceholderConfigurer默认是支持http和file方式加载资源的
2.针对各类xml配置文件
项目中除了web.xml外,还有众多的xml
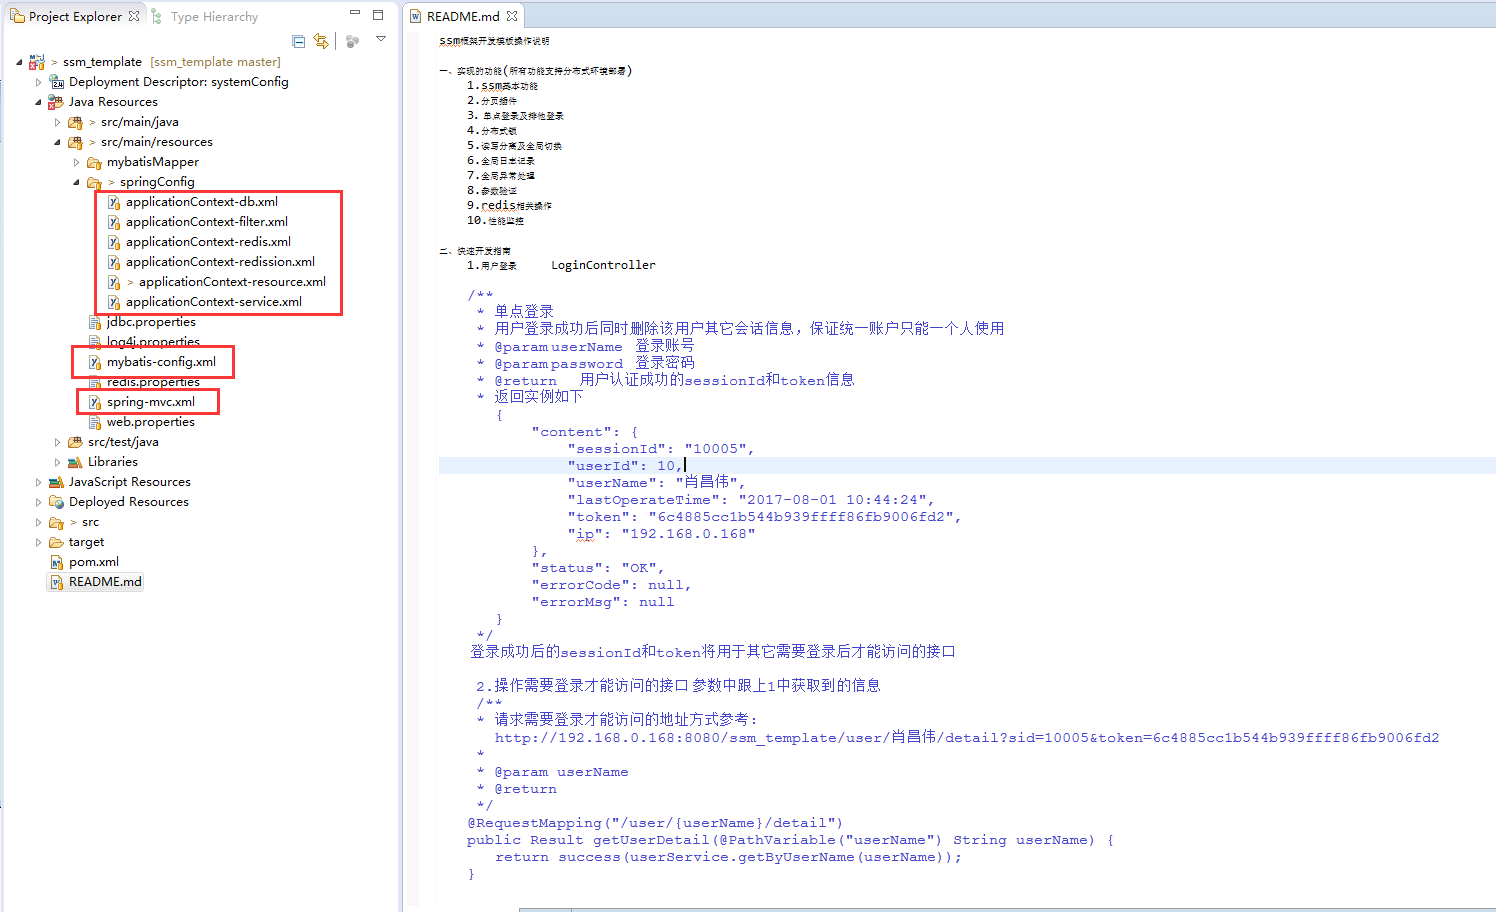
和propertie文件一样,也是相同的配置文件存在于不同的项目中,一改就要挨个改,烦
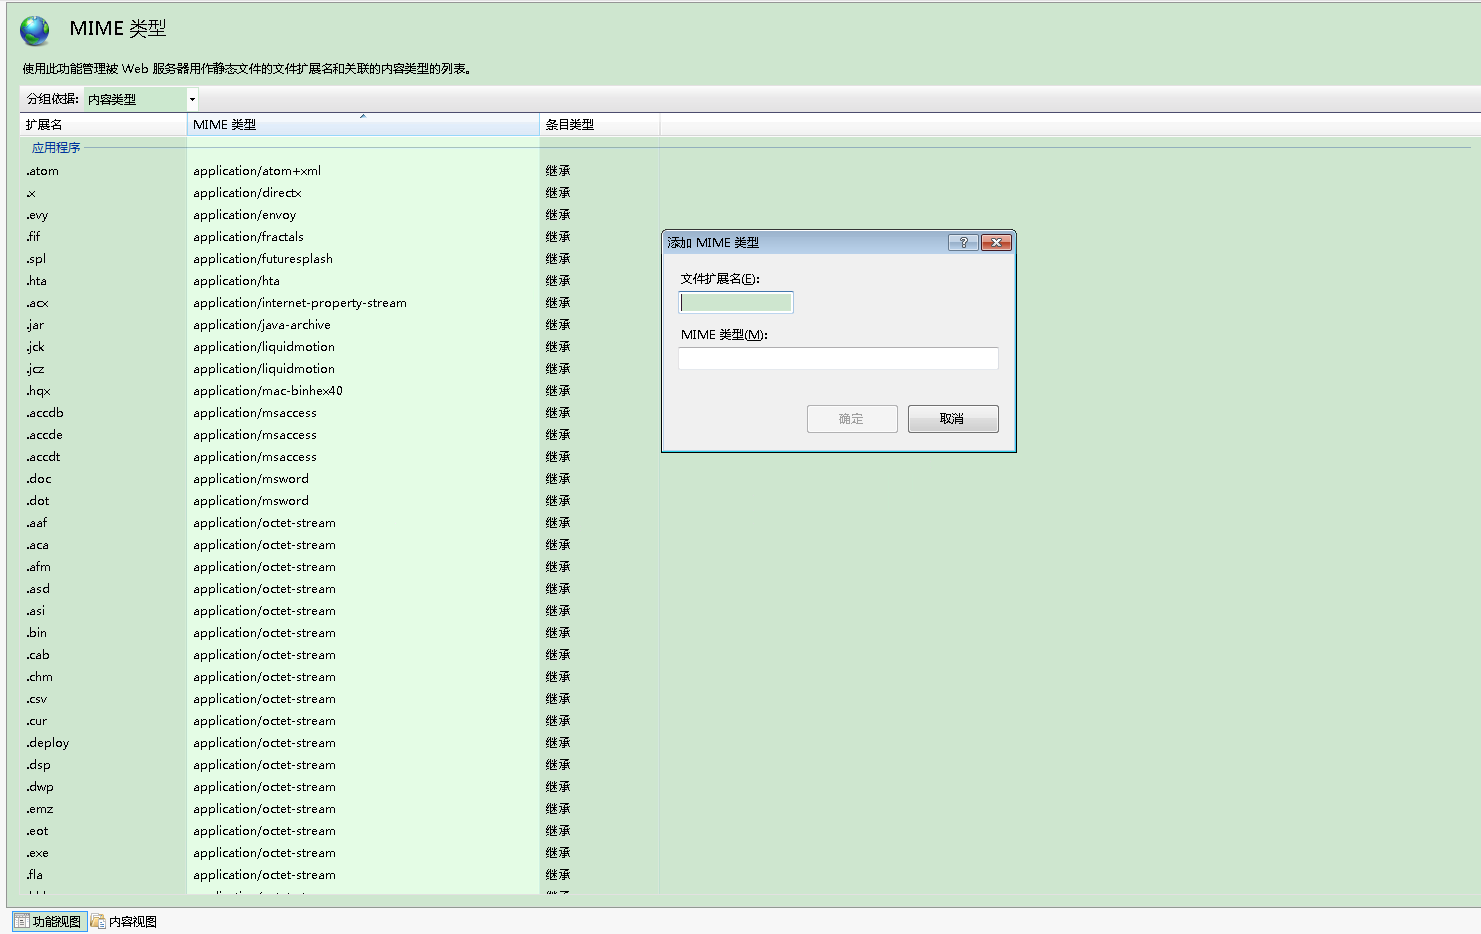
同理,将xml发布,并修改IIS设置,使其通过浏览器能访问
iis需要增加MIME类型 properties和xml为text/plain才能在浏览器访问
然后就可以在浏览器访问了
<context-param>
<param-name>contextConfigLocation</param-name>
<param-value>
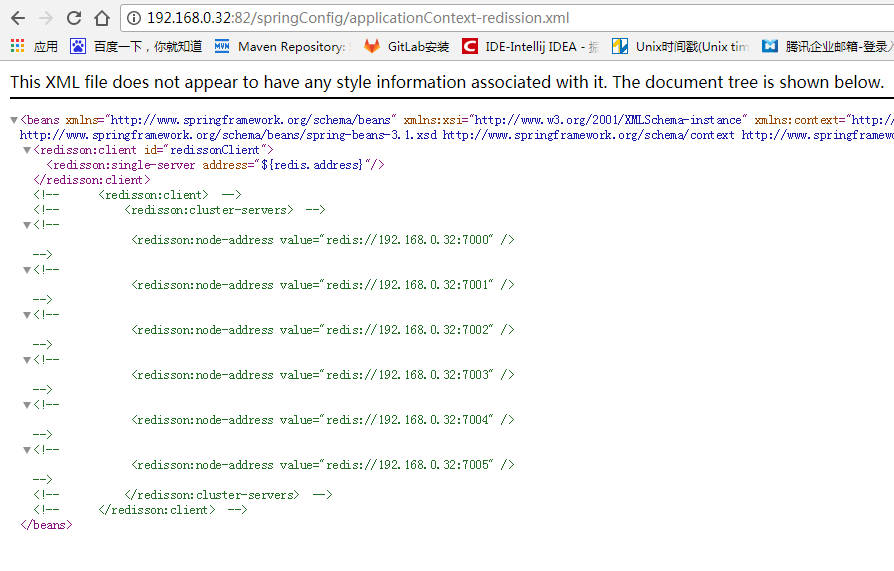
http://192.168.0.32:82/springConfig/applicationContext-resource.xml,
http://192.168.0.32:82/springConfig/applicationContext-db.xml,
http://192.168.0.32:82/springConfig/applicationContext-redis.xml,
http://192.168.0.32:82/springConfig/applicationContext-redission.xml,
http://192.168.0.32:82/springConfig/applicationContext-service.xml,
http://192.168.0.32:82/springConfig/applicationContext-filter.xml
</param-value>
</context-param>
<servlet>
<description>spring-mvc</description>
<servlet-name>mvc</servlet-name>
<servlet-class>org.springframework.web.servlet.DispatcherServlet</servlet-class>
<init-param>
<param-name>contextConfigLocation</param-name>
<param-value>
http://192.168.0.32:82/spring-mvc.xml
<!-- classpath:spring-mvc.xml -->
</param-value>
</init-param>
<load-on-startup>1</load-on-startup>
</servlet>
这样就可以直接启动了,启动时可以查看下面日志信息确定加载内容是正确的

最开始是修改为这样的
<context-param>
<param-name>contextConfigLocation</param-name>
<param-value>
http://192.168.0.32:82/springConfig/applicationContext-*.xml
</param-value>
</context-param>
和classpath一样,但是很遗憾,解析不了统配费,找不到文件
java.io.FileNotFoundException: URL [http://192.168.0.32:82/springConfig/] cannot be resolved to absolute file path because it does not reside in the file system: http://192.168.0.32:82/springConfig/
at org.springframework.util.ResourceUtils.getFile(ResourceUtils.java:215)
at org.springframework.core.io.AbstractFileResolvingResource.getFile(AbstractFileResolvingResource.java:53)
at org.springframework.core.io.UrlResource.getFile(UrlResource.java:213)
at org.springframework.core.io.support.PathMatchingResourcePatternResolver.doFindPathMatchingFileResources(PathMatchingResourcePatternResolver.java:689)
at org.springframework.web.context.support.ServletContextResourcePatternResolver.doFindPathMatchingFileResources(ServletContextResourcePatternResolver.java:92)
at org.springframework.core.io.support.PathMatchingResourcePatternResolver.findPathMatchingResources(PathMatchingResourcePatternResolver.java:478)
at org.springframework.core.io.support.PathMatchingResourcePatternResolver.getResources(PathMatchingResourcePatternResolver.java:293)
仔细看源码 加载配置文件的源码 PathMatchingResourcePatternResolver中这段
@Override
public Resource[] getResources(String locationPattern) throws IOException {
Assert.notNull(locationPattern, "Location pattern must not be null");
if (locationPattern.startsWith(CLASSPATH_ALL_URL_PREFIX)) {
// a class path resource (multiple resources for same name possible)
if (getPathMatcher().isPattern(locationPattern.substring(CLASSPATH_ALL_URL_PREFIX.length()))) {
// a class path resource pattern
return findPathMatchingResources(locationPattern);
}
else {
// all class path resources with the given name
return findAllClassPathResources(locationPattern.substring(CLASSPATH_ALL_URL_PREFIX.length()));
}
}
else {
// Generally only look for a pattern after a prefix here,
// and on Tomcat only after the "*/" separator for its "war:" protocol.
int prefixEnd = (locationPattern.startsWith("war:") ? locationPattern.indexOf("*/") + 1 :
locationPattern.indexOf(":") + 1);
if (getPathMatcher().isPattern(locationPattern.substring(prefixEnd))) {
// a file pattern
return findPathMatchingResources(locationPattern);
}
else {
// a single resource with the given name
return new Resource[] {getResourceLoader().getResource(locationPattern)};
}
}
}
思路都很简单,配置的头尾解析出目录和含有通配符的文件,然后依次去找哪些文件满足
不过很遗憾的是,如果是http开头的通配符路径,暂时是不支持的,支持classpth,jar等方式
不过让人欣慰的是,是可以重写文件加载方式的,原因很简单,http目录知道了,要知道目录下面有哪些文件还是很简单的(需要开启iis的目录浏览),然后取到所有文件后,如果和通配符匹配,则加载
虽然有远端服务了,但是远端服务只是一个默认的全局配置,
为了方便本地修改部分参数进行调试,所以在需要的时候,修改部分xml地址为classpath中的,只是在提交代码的时候不要提交
若的确需要修改,则可以通知有服务器操作权限的人(我们公司比如我 ^_^)进行全局修改
以上仅为个人项目经验,其实就是把默认的classpath修改为了http,多思考,多总结,多实践,小改动,大用处。希望能给大家一个参考,也希望大家多多支持。
以上是 SpringMVC配置多个properties文件之通配符解析 的全部内容, 来源链接: utcz.com/p/248715.html