基于OpenCV实现图像分割
本文实例为大家分享了基于OpenCV实现图像分割的具体代码,供大家参考,具体内容如下
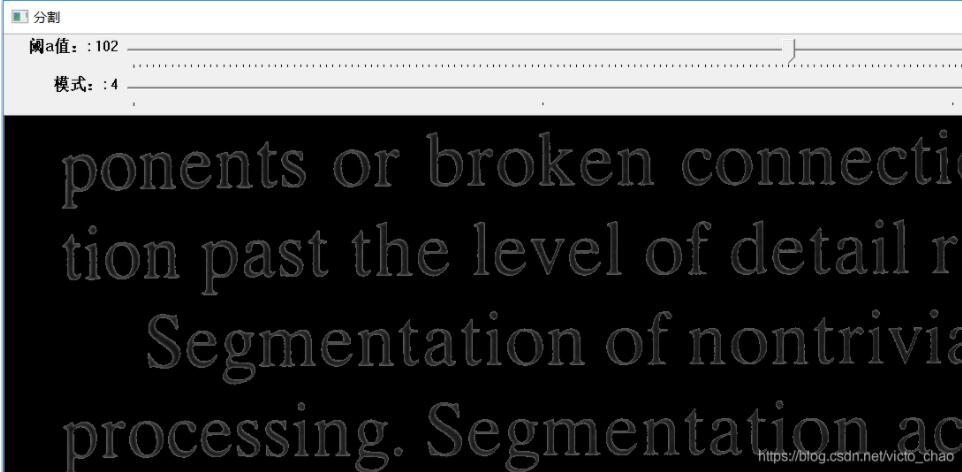
1、图像阈值化
源代码:
#include "opencv2/highgui/highgui.hpp"
#include "opencv2/imgproc/imgproc.hpp"
#include <iostream>
using namespace std;
using namespace cv;
int thresholds=50;
int model=2;
Mat image,srcimage;
void track(int ,void *)
{
Mat result;
threshold(srcimage,result,thresholds,255,CV_THRESH_BINARY);
//imshow("原图",result);
if(model==0)
{
threshold(srcimage,result,thresholds,255,CV_THRESH_BINARY);
imshow("分割",result);
}
if(model==1)
{
threshold(srcimage,result,thresholds,255,THRESH_BINARY_INV);
imshow("分割",result);
}
if(model==2)
{
threshold(srcimage,result,thresholds,255,THRESH_TRUNC);
imshow("分割",result);
}
if(model==3)
{
threshold(srcimage,result,thresholds,255,THRESH_TOZERO);
imshow("分割",result);
}
if(model==4)
{
threshold(srcimage,result,thresholds,255,THRESH_TOZERO_INV);
imshow("分割",result);
}
}
int main()
{
image=imread("2.2.tif");
if(!image.data)
{
return 0;
}
cvtColor(image,srcimage,CV_BGR2GRAY);
namedWindow("分割",WINDOW_AUTOSIZE);
cv::createTrackbar("阈a值:","分割",&thresholds,255,track);
cv::createTrackbar("模式:","分割",&model,4,track);
track(thresholds,0);
track(model,0);
waitKey(0);
return 0;
}
实现结果:
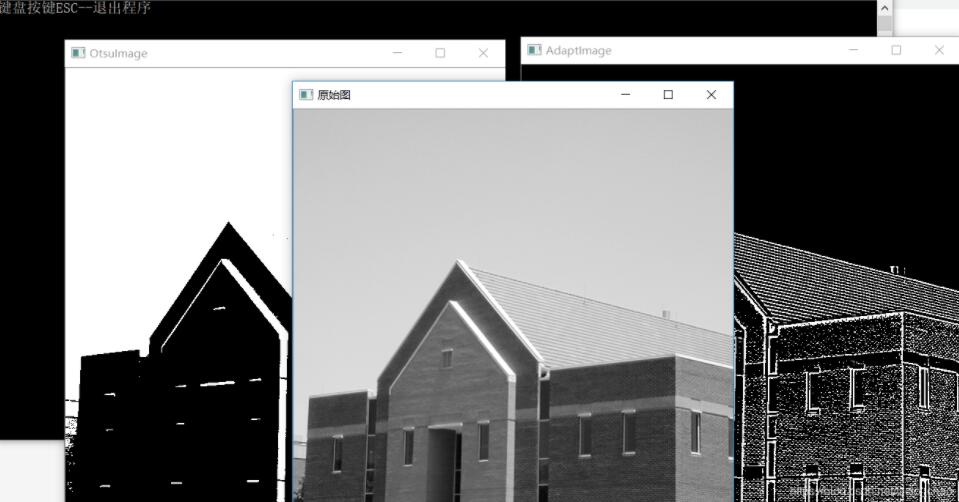
2、阈值处理
//阈值处理
#include "opencv2/core/core.hpp"
#include "opencv2/highgui/highgui.hpp"
#include "opencv2/imgproc/imgproc.hpp"
using namespace cv;
using namespace std;
int main()
{
printf("键盘按键ESC--退出程序");
Mat g_srcImage = imread("1.tif",0);
if(!g_srcImage.data)
{
printf("读取图片失败");
}
imshow("原始图",g_srcImage);
//大津法阈值分割显示
/*大津法,简称OTSU.它是按图像的灰度特性,将图像分成背景
和目标2部分。背景和目标之间的类间方差越大,说明构成图像
的2部分的差别越大,当部分目标错分为背景或部分背景错分为
目标都会导致2部分差别变小。*/
Mat OtsuImage;
threshold(g_srcImage,OtsuImage,0,255,THRESH_OTSU);//0不起作用,可为任意阈值
imshow("OtsuImage",OtsuImage);
//自适应分割并显示
Mat AdaptImage;
//THRESH_BINARY_INV:参数二值化取反
adaptiveThreshold(g_srcImage,AdaptImage,255,0,THRESH_BINARY_INV,7,8);
imshow("AdaptImage",AdaptImage);
while(1)
{
int key;
key = waitKey(20);
if((char)key == 27)
{ break; }
}
}
效果图:
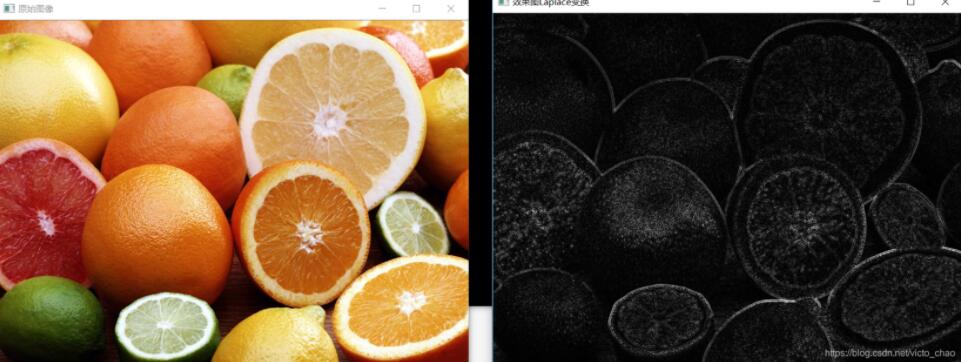
3、拉普拉斯检测
//Laplacian检测
#include "opencv2/core/core.hpp"
#include "opencv2/highgui/highgui.hpp"
#include "opencv2/imgproc/imgproc.hpp"
using namespace cv;
using namespace std;
/*,在只关心边缘的位置而不考虑其周围的象素灰度差值时比较合适。
Laplace 算子对孤立象素的响应要比对边缘或线的响应要更强烈,因此
只适用于无噪声图象。存在噪声情况下,使用 Laplacian 算子检测边
缘之前需要先进行低通滤波。*/
int main()
{
Mat src,src_gray,dst,abs_dst;
src = imread("1.jpg");
imshow("原始图像",src);
//高斯滤波
GaussianBlur(src,src,Size(3,3),0,0,BORDER_DEFAULT);
//转化为灰度图,输入只能为单通道
cvtColor(src,src_gray,CV_BGR2GRAY);
Laplacian(src_gray,dst,CV_16S,3,1,0,BORDER_DEFAULT);
convertScaleAbs(dst,abs_dst);
imshow("效果图Laplace变换",abs_dst);
waitKey();
return 0;
}
效果图:
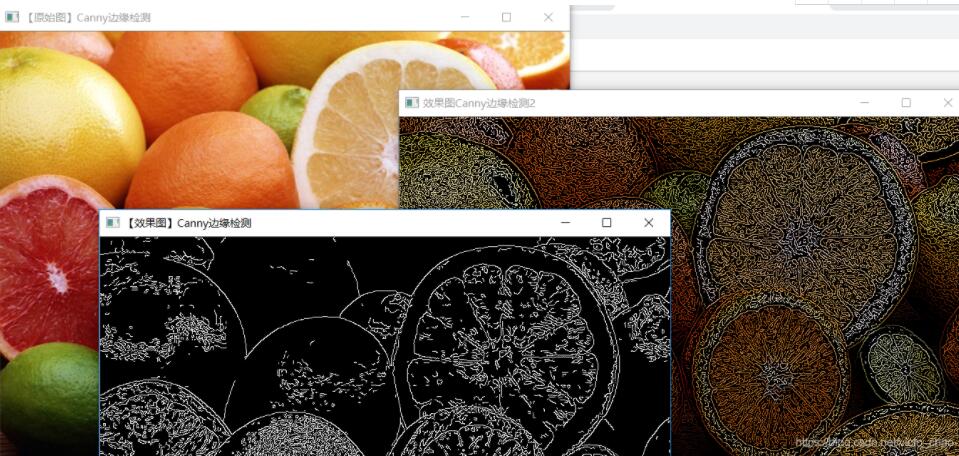
4、canny算法的边缘检测
源代码
#include "opencv2/core/core.hpp"
#include "opencv2/highgui/highgui.hpp"
#include "opencv2/imgproc/imgproc.hpp"
using namespace cv;
using namespace std;
/*如果某一像素位置的幅值超过高阈值,该像素被保留为边缘像素。如果某
一像素位置的幅值小于低阈值,该像素被排除。如果某一像素位置的幅值在
两个阈值之间,该像素仅仅在连接到一个高于高阈值的像素时被保留。 */
int main()
{
Mat picture2=imread("1.jpg");
Mat new_picture2;
Mat picture2_1=picture2.clone();
Mat gray_picture2 , edge , new_edge;
imshow("【原始图】Canny边缘检测" , picture2);
Canny(picture2_1 , new_picture2 ,150 , 100 ,3 );
imshow("【效果图】Canny边缘检测", new_picture2 );
Mat dstImage,grayImage;
//dstImage与srcImage同大小类型
dstImage.create(picture2_1.size() , picture2_1.type());
cvtColor(picture2_1,gray_picture2,CV_BGR2GRAY);//转化为灰度图
blur(gray_picture2 , edge , Size(3,3));//用3x3的内核降噪
Canny(edge,edge,3,9,3);
dstImage = Scalar::all(0);//将dst内所有元素设置为0
//使用canny算子的边缘图edge作为掩码,将原图拷贝到dst中
picture2_1.copyTo(dstImage,edge);
imshow("效果图Canny边缘检测2",dstImage);
waitKey();
}
效果图:
5、图像的分水岭算法
源代码:
#include "opencv2/core/core.hpp"
#include "opencv2/highgui/highgui.hpp"
#include "opencv2/imgproc/imgproc.hpp"
#include <iostream>
using namespace cv;
using namespace std;
#define WINDOW_NAME1 "显示/操作窗口"
#define WINDOW_NAME2 "分水岭算法效果图"
Mat g_maskImage,g_srcImage;
Point prevPt(-1,-1);
static void ShowHelpText();
static void on_Mouse(int event,int x,int y,int flags,void*);
//输出一些帮助信息
static void ShowHelpText()
{
printf("当前使用的版本为:"CV_VERSION);
printf("\n");
printf("分水岭算法---点中图片进行鼠标或按键操作\n");
printf("请先用鼠标在图片窗口中标记出大致的区域,\n然后再按键【1】或者【space】启动算法");
printf("\n按键操作说明:\n"
"键盘按键【1】或者【space】--运行的分水岭分割算法\n"
"键盘按键【2】--回复原始图片\n"
"键盘按键【ESC】--退出程序\n");
}
static void on_Mouse(int event,int x,int y,int flags,void*)
{
if(x<0||x>=g_srcImage.cols||y<0||y>=g_srcImage.rows)
return;
if(event == CV_EVENT_LBUTTONUP||!(flags & CV_EVENT_FLAG_LBUTTON))
prevPt = Point(-1,-1);
else if(event == CV_EVENT_LBUTTONDOWN)
prevPt= Point(x,y);
else if(event == CV_EVENT_MOUSEMOVE && (flags & CV_EVENT_FLAG_LBUTTON))
{
Point pt(x,y);
if(prevPt.x<0)
prevPt = pt;
line(g_maskImage,prevPt,pt,Scalar::all(255),5,8,0);
line(g_srcImage,prevPt,pt,Scalar::all(255),5,8,0);
prevPt = pt;
imshow(WINDOW_NAME1,g_srcImage);
}
}
int main(int argc,char** argv)
{
system("color A5");
ShowHelpText();
g_srcImage = imread("1.jpg",1);
imshow(WINDOW_NAME1,g_srcImage);
Mat srcImage,grayImage;
g_srcImage.copyTo(srcImage);
cvtColor(g_srcImage,g_maskImage,CV_BGR2GRAY);
cvtColor(g_maskImage,grayImage,CV_GRAY2BGR);//灰度图转BGR3通道,但每通道的值都是原先单通道的值,所以也是显示灰色的
g_maskImage = Scalar::all(0);//黑
setMouseCallback(WINDOW_NAME1,on_Mouse,0);
while(1)
{
int c = waitKey(0);
if((char)c == 27)
break;
if((char)c == '2')
{
g_maskImage = Scalar::all(0);//黑
srcImage.copyTo(g_srcImage);
imshow("image",g_srcImage);
}
if((char)c == '1'||(char)c == ' ')
{
int i,j,compCount = 0;
vector<vector<Point>> contours;//定义轮廓
vector<Vec4i> hierarchy;//定义轮廓的层次
findContours(g_maskImage,contours,hierarchy,RETR_CCOMP,CHAIN_APPROX_SIMPLE);
if(contours.empty())
continue;
Mat maskImage(g_maskImage.size(),CV_32S);
maskImage = Scalar::all(0);
for(int index = 0;index >= 0;index = hierarchy[index][0],compCount++)
drawContours(maskImage,contours,index,Scalar::all(compCount+1),-1,8,hierarchy,INT_MAX);
if(compCount == 0)
continue;
vector<Vec3b> colorTab;
for(i=0;i<compCount;i++)
{
int b = theRNG().uniform(0,255);
int g = theRNG().uniform(0,255);
int r = theRNG().uniform(0,255);
colorTab.push_back(Vec3b((uchar)b,(uchar)g,(uchar)r));
}
//计算处理时间并输出到窗口中
double dTime = (double)getTickCount();
watershed(srcImage,maskImage);
dTime = (double)getTickCount()-dTime;
printf("\t处理时间=%gms\n",dTime*1000./getTickFrequency());
//双层循环,将分水岭图像遍历存入watershedImage中
Mat watershedImage(maskImage.size(),CV_8UC3);
for(i=0;i<maskImage.rows;i++)
for(j=0;j<maskImage.cols;j++)
{
int index = maskImage.at<int>(i,j);
if(index == -1)
watershedImage.at<Vec3b>(i,j) = Vec3b(255,255,255);
else if(index<=0||index>compCount)
watershedImage.at<Vec3b>(i,j) = Vec3b(0,0,0);
else
watershedImage.at<Vec3b>(i,j) = colorTab[index-1];
}
//混合灰度图和分水岭效果图并显示最终的窗口
watershedImage = watershedImage*0.5+grayImage*0.5;
imshow(WINDOW_NAME2,watershedImage);
}
}
waitKey();
return 0;
}
效果图:

以上就是本文的全部内容,希望对大家的学习有所帮助,也希望大家多多支持。
以上是 基于OpenCV实现图像分割 的全部内容, 来源链接: utcz.com/p/247042.html