C++实现PatchMatch图像修复算法
PatchMatch算法出自Barnes的论文
PatchMatch: A Randomized Correspondence Algorithm for Structural Image Editing
PatchMatch 算法就是一个找近似最近邻(Approximate Nearest neigbhor)的方法,要比其他ANN算法快上10倍+。
将下面的图理解了,就基本理解了整个算法。
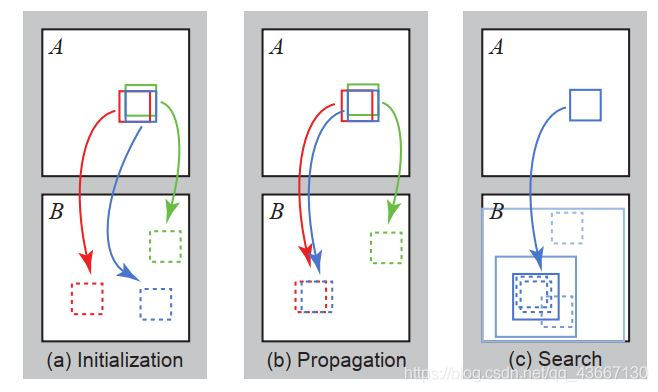
看上图时,我们以蓝色为主颜色。A代表原图像,矩形框代表待修复的patch块,要修复patch_A块就需要在B(也是原图)中搜索一个最合适的块patch_B,而从patch_A到patch_B的偏移量,就是上图箭头,也就是offset。
蓝色为主patch块,红色是蓝色向左移一个像素,绿色是蓝色向上移一个像素。
上图 (a):随机初始化 (b):传播 ©:随机扰动搜索
PatchMatch 的核心思想是利用图像的连续性(consistence), 一个图像A的patch_A(蓝色)附近的Patch块(红色绿色)的最近邻(B中的红色绿色框)最有可能出现在Patch_A的最近邻(B中的蓝色框)附近,利用这种图像的连续性大量减少搜索的范围,通过迭代的方式保证大多数点能尽快收敛。
PatchMatch算法是对所有待修复像素迭代修复的,而不是像Criminisi或FMM算法对待修复区域像素优先级排序后进行渐进修复的。
来看算法步骤:
![[外链图片转存失败,源站可能有防盗链机制,建议将图片保存下来直接上传(img-nffFeKnG-1618805820395)(D:\微信公众号图文\视觉\手撕算法\4月图像修复\PatchMatch算法\截图00.jpg)]](/wp-content/uploads/aaacj/20220116javaicn/22976rsqjagxwbl2.jpg)
首先是建立图像的下采样金字塔模型,代码中设定为五层,建立模型后
对A的待修复区域每个patch块随机在B已知区域中匹配一个patch块,即初始化偏置地图(上图a步骤)。
/*********************************
函数声明:初始化偏置图像
参数:NONE
注释:NONE
测试:NONE
**********************************/
void PatchMatch::InitOff(Mat Mask, Mat &Off)
{
//为方便起见,将所有的都附上,要求不能赋值到非搜索区域
//初始化格式
Off = Mat(Mask.size(), CV_32FC2, Scalar::all(0));//2维无符号32位精度浮点数
for (int i = 0; i < Mask.rows; i++)
{
for (int j = 0; j < Mask.cols; j++)
{
//不考虑search区域,没有破损,他们的最佳偏移向量当然是0,自己
if (Mask.at<uchar>(i, j) == search)
{
Off.at<Vec2f>(i, j)[0] = 0; //<Vec2f> 向量,2维,浮点数
Off.at<Vec2f>(i, j)[1] = 0;
}
else//处理hole,采用随机偏置
{
//先初始化2个偏置数r_col,r_row
int r_col = rand() % Mask.cols; //rand()产生随机数,主要是产生一个偏置的初始值
int r_row = rand() % Mask.rows;
r_col = r_col + j < Mask.cols ? r_col : r_col - Mask.cols;//边界检测
r_row = r_row + i < Mask.rows ? r_row : r_row - Mask.rows;
//为什么要有这个循环?因为一次的随机赋值,很可能会出现偏置后的块跑到破损区域,或者是超出限定搜索框的边界
while (
!(Mask.at<uchar>(r_row + i, r_col + j) == search //这里加上I,j,是因为他是A投影到B中的搜索偏置
&& abs(r_row) < searchrowratio*Mask.rows)) //searchrowratio=0.5,搜索的时候,确保r_row偏置不会太远,一定是在原图像的大小里
{
r_col = rand() % Mask.cols;
r_row = rand() % Mask.rows;
//边界检测
r_col = r_col + j < Mask.cols ? r_col : r_col - Mask.cols;
r_row = r_row + i < Mask.rows ? r_row : r_row - Mask.rows;
}
//赋偏置值
Off.at<Vec2f>(i, j)[0] = r_row;
Off.at<Vec2f>(i, j)[1] = r_col;
}
}
}
}
之后从低分辨率开始,对于每一层金字塔模型进行迭代:
每一次迭代都会遍历原图A待修复区域所有像素。当遍历到当前像素时,执行下面的步骤来进行修复:
步骤一:传播(图中b步骤)
传播会计算原图A当前像素块patch_A(蓝色)对应的B中的patch_B_1,patch_A上方(绿色)(奇数次迭代为下方)对应的B中的patch_B_2,patch_A左侧(红色)(奇数次迭代为右侧)对应的B中的patch_B_3这三个patch块中与patch_A相似度最高的patch块。
计算相似度函数为
//以块为单位,用所有像素点的相同颜色通道的差平方来简单判断相似度
float PatchMatch::Distance(Mat Dst, Mat Src)
{
float distance = 0;
for (int i = 0; i < Dst.rows; i++)
{
for (int j = 0; j < Dst.cols; j++)
{
for (int k = 0; k < 3; k++)//K=3个颜色通道
{
int tem = Src.at < Vec3b >(i, j)[k] - Dst.at < Vec3b >(i, j)[k];
distance += tem * tem;//差平方
}
}
}
return distance;
}
传播函数:
//迭代第一步:传播
//(now_row, now_col):patch里的像素
//odd:当前迭代次
void PatchMatch::Propagation(Mat Dst, Mat Src, Mat Mask, Mat &Off, int row, int col,int odd)
{
Mat DstPatch = GetPatch(Dst, row, col);//获取长度为 patchsize = 3 的边界框, (row, col)代表的是中心像素点坐标
if (odd % 2 == 0)//偶次迭代
{
//提取(row, col)的match块
Mat SrcPatch = GetPatch(Src, row + Off.at < Vec2f >(row, col)[0],
col + Off.at < Vec2f >(row, col)[1]);
//提取(row, col-1)的match块
Mat LSrcPatch = GetPatch(Src, row + Off.at < Vec2f >(row, col - 1)[0],
col - 1 + Off.at < Vec2f >(row, col - 1)[1]);
//提取(row-1, col)的match块
Mat USrcPatch = GetPatch(Src,
row - 1 + Off.at < Vec2f >(row - 1, col)[0],
col + Off.at < Vec2f >(row - 1, col)[1]);
//返回上面4个块最相似的块的代表数字,用于switch判断
int location = GetMinPatch1(DstPatch, SrcPatch, LSrcPatch, USrcPatch);
//利用上面的信息更新像素点的偏置地图
switch (location)
{
//若是1则不更新
case 2:
Off.at < Vec2f >(row, col)[0] = Off.at < Vec2f >(row, col - 1)[0];
Off.at < Vec2f >(row, col)[1] = Off.at < Vec2f >(row, col - 1)[1] - 1;
break;
case 3:
Off.at < Vec2f >(row, col)[0] = Off.at < Vec2f >(row - 1, col)[0] - 1;
Off.at < Vec2f >(row, col)[1] = Off.at < Vec2f >(row - 1, col)[1];
break;
}
}
else//奇数次迭代
{
Mat SrcPatch = GetPatch(Src, row + Off.at < Vec2f >(row, col)[0],
col + Off.at < Vec2f >(row, col)[1]);
Mat RSrcPatch = GetPatch(Src, row + Off.at < Vec2f >(row, col + 1)[0],
col + 1 + Off.at < Vec2f >(row, col + 1)[1]);
Mat DSrcPatch = GetPatch(Src,
row + 1 + Off.at < Vec2f >(row + 1, col)[0],
col + Off.at < Vec2f >(row + 1, col)[1]);
int location = GetMinPatch1(DstPatch, SrcPatch, RSrcPatch, DSrcPatch);
switch (location)
{
case 2:
Off.at < Vec2f >(row, col)[0] = Off.at < Vec2f >(row, col + 1)[0];
Off.at < Vec2f >(row, col)[1] = Off.at < Vec2f
>(row, col + 1)[1] + 1;
break;
case 3:
Off.at < Vec2f >(row, col)[0] = Off.at < Vec2f
>(row + 1, col)[0] + 1;
Off.at < Vec2f >(row, col)[1] = Off.at < Vec2f >(row + 1, col)[1];
break;
}
}
}
步骤二:随机扰动搜索(图中c步骤)
为了避免陷入局部极值,再额外再随机生成几个patch位置作为候选patch块,若小于当前patch,则更新。
随机扰动会在原图A中,以当前像素为中心点,初始半径区域为全图,在此区域内随机找寻patch块并与patch_A原本对应的B中的patch块对比,若更相似则更新对应关系offset,然后以新的patch_B为中心,半径缩小一倍,继续搜索,直到半径缩小为1,更新完毕。
//迭代第二步:随机搜索
//(row,col)=(now_row, now_col):修复patch里的像素
void PatchMatch::RandomSearch(Mat Dst, Mat Src, Mat Mask, Mat &Off, int row, int col)
{
Mat DstPatch = GetPatch(Dst, row, col);//获取修复基准框,在框内操作
//迭代指数
int attenuate = 0;
while (true)
{
//获取随机参数,在 [-1;1] 间
float divcol = rand() % 2000 / 1000.0f - 1.0f;
float divrow = rand() % 2000 / 1000.0f - 1.0f;
//减小框大小的公式,𝑢_𝑖=𝑣_0+𝑤*𝛼^𝑖*𝑅_𝑖
//行列分别处理,MaxWindow:原始框宽度;divcol:随机系数;pow(A,B):A的B次方。随迭代次数而变小的缩小系数;RandomAttenuation=0.5;
float veccol = MaxWindow * pow(RandomAttenuation, attenuate)* divcol;
float vecrow = MaxWindow * pow(RandomAttenuation, attenuate)* divrow;
float length = sqrt(veccol * veccol + vecrow * vecrow);
//如果低于1个像素,没有意义,直接结束整个循环,对下一个像素处理
if (length < 1)
break;
//x方向,前2项指向(row, col)的match块,后面是公式的后一项
int nowrow = row + Off.at < Vec2f >(row, col)[0] + vecrow;
//y方向
int nowcol = col + Off.at < Vec2f >(row, col)[1] + veccol;
//判断随机搜索的patch不越界,在search内
if (nowcol >= 0 && nowcol <= Off.cols - 1 && nowrow >= 0
&& nowrow <= Off.rows - 1
&& Mask.at < uchar >(nowrow, nowcol) == search
&& abs(nowrow - row) < searchrowratio * Mask.rows)//abs:绝对值
{
//取出原来的match块
Mat SrcPatch1 = GetPatch(Src, Off.at < Vec2f >(row, col)[0] + row,
Off.at < Vec2f >(row, col)[1] + col);
//取出现在的随机match块
Mat SrcPatch2 = GetPatch(Src, nowrow, nowcol);
//对比相似性,找出最好的块
int location = GetMinPatch2(DstPatch, SrcPatch1, SrcPatch2);
//结合最好的相似块给像素新的偏置值
switch (location)
{
case 2:
Off.at < Vec2f >(row, col)[1] = nowcol - col;
Off.at < Vec2f >(row, col)[0] = nowrow - row;
break;
}
}
//迭代指数增加
attenuate++;
}
}
经过该两个步骤,本次迭代完毕。
当最终迭代完成后,就完成了整个修复过程。
算法效果

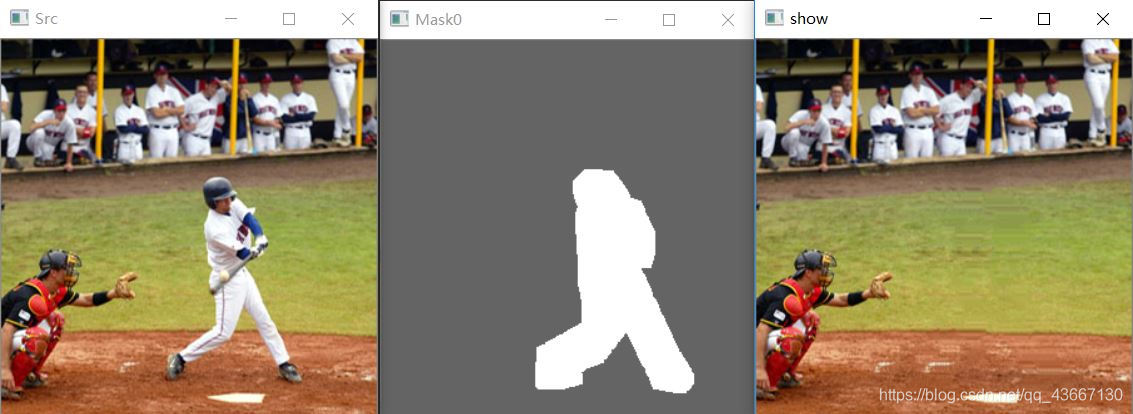
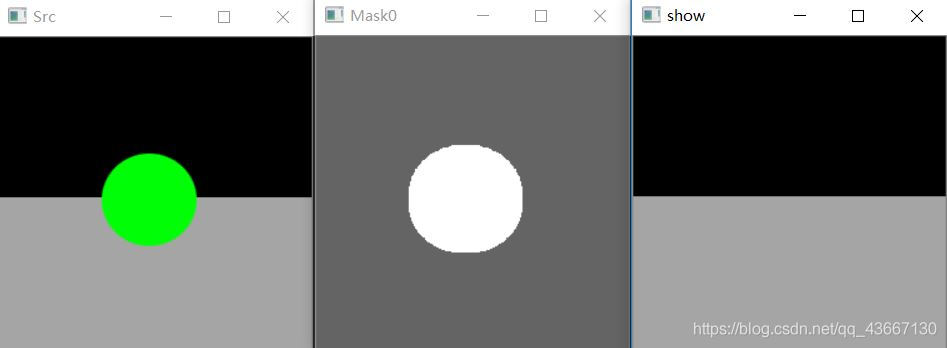
可以看到效果还是可以的,速度也比较快。
到此这篇关于C++实现PatchMatch图像修复算法的文章就介绍到这了,更多相关C++ PatchMatch图像修复算法内容请搜索以前的文章或继续浏览下面的相关文章希望大家以后多多支持!
以上是 C++实现PatchMatch图像修复算法 的全部内容, 来源链接: utcz.com/p/246056.html