Android Flutter自适应瀑布流案例详解
Flutter自适应瀑布流
前言:在电商app经常会看到首页商品推荐的瀑布流,或者类似短视频app首页也是瀑布流,这些都是需要自适应的,才能给用户带来好的体验
话不多说先上效果图:
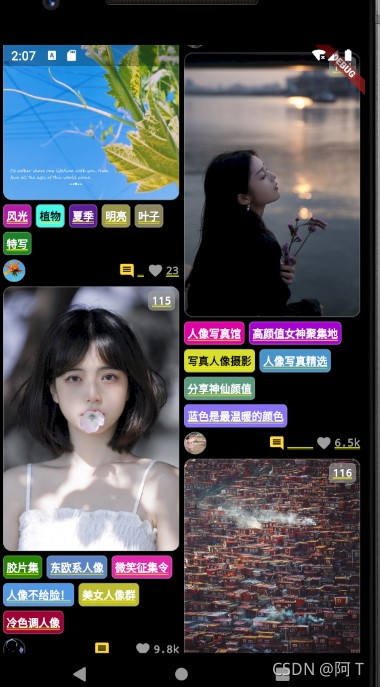
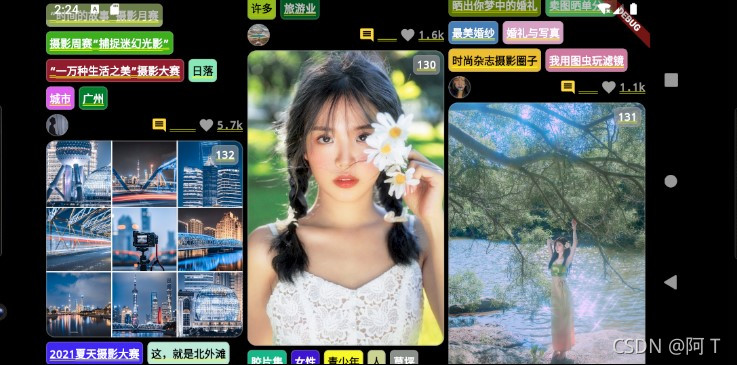
根据效果图可以分为四步:
- 图片自适应
- 自适应标签
- 上拉刷新和下拉加载
- 底部的点赞按钮可以去掉或者自己修改样式,我这里使用的like_button库
注:本文使用的库:为啥这么多呢,因为我把图片缓存这样东西都加上了,单纯的瀑布流就用waterfall_flow
waterfall_flow: ^3.0.1
extended_image: any
extended_sliver: any
ff_annotation_route_library: any
http_client_helper: any
intl: any
like_button: any
loading_more_list: any
pull_to_refresh_notification: any
url_launcher: any
1.图片自适应:
Widget image = Stack(
children: <Widget>[
ExtendedImage.network(
item.imageUrl,
shape: BoxShape.rectangle,
//clearMemoryCacheWhenDispose: true,
border: Border.all(color: Colors.grey.withOpacity(0.4), width: 1.0),
borderRadius: const BorderRadius.all(
Radius.circular(10.0),
),
loadStateChanged: (ExtendedImageState value) {
if (value.extendedImageLoadState == LoadState.loading) {
Widget loadingWidget = Container(
alignment: Alignment.center,
color: Colors.grey.withOpacity(0.8),
child: CircularProgressIndicator(
strokeWidth: 2.0,
valueColor:
AlwaysStoppedAnimation<Color>(Theme.of(c).primaryColor),
),
);
if (!konwSized) {
//todo: not work in web
loadingWidget = AspectRatio(
aspectRatio: 1.0,
child: loadingWidget,
);
}
return loadingWidget;
} else if (value.extendedImageLoadState == LoadState.completed) {
item.imageRawSize = Size(
value.extendedImageInfo.image.width.toDouble(),
value.extendedImageInfo.image.height.toDouble());
}
return null;
},
),
Positioned(
top: 5.0,
right: 5.0,
child: Container(
padding: const EdgeInsets.all(3.0),
decoration: BoxDecoration(
color: Colors.grey.withOpacity(0.6),
border: Border.all(color: Colors.grey.withOpacity(0.4), width: 1.0),
borderRadius: const BorderRadius.all(
Radius.circular(5.0),
),
),
child: Text(
'${index + 1}',
textAlign: TextAlign.center,
style: const TextStyle(fontSize: fontSize, color: Colors.white),
),
),
)
],
);
if (konwSized) {
image = AspectRatio(
aspectRatio: item.imageSize.width / item.imageSize.height,
child: image,
);
} else if (item.imageRawSize != null) {
image = AspectRatio(
aspectRatio: item.imageRawSize.width / item.imageRawSize.height,
child: image,
);
}
return Column(
crossAxisAlignment: CrossAxisAlignment.start,
children: <Widget>[
image,
const SizedBox(
height: 5.0,
),
buildTagsWidget(item),
const SizedBox(
height: 5.0,
),
buildBottomWidget(item),
],
);
}
2.自适应标签:
Widget buildTagsWidget(
TuChongItem item, {
int maxNum = 6,
}) {
const double fontSize = 12.0;
return Wrap(
runSpacing: 5.0,
spacing: 5.0,
children: item.tags.take(maxNum).map<Widget>((String tag) {
final Color color = item.tagColors[item.tags.indexOf(tag)];
return Container(
padding: const EdgeInsets.all(3.0),
decoration: BoxDecoration(
color: color,
border: Border.all(color: Colors.grey.withOpacity(0.4), width: 1.0),
borderRadius: const BorderRadius.all(
Radius.circular(5.0),
),
),
child: Text(
tag,
textAlign: TextAlign.start,
style: TextStyle(
fontSize: fontSize,
color: color.computeLuminance() < 0.5
? Colors.white
: Colors.black),
),
);
}).toList());
}
3.上拉刷新和下拉加载
class PullToRefreshHeader extends StatelessWidget {
const PullToRefreshHeader(this.info, this.lastRefreshTime, {this.color});
final PullToRefreshScrollNotificationInfo info;
final DateTime lastRefreshTime;
final Color color;
@override
Widget build(BuildContext context) {
if (info == null) {
return Container();
}
String text = '';
if (info.mode == RefreshIndicatorMode.armed) {
text = 'Release to refresh';
} else if (info.mode == RefreshIndicatorMode.refresh ||
info.mode == RefreshIndicatorMode.snap) {
text = 'Loading...';
} else if (info.mode == RefreshIndicatorMode.done) {
text = 'Refresh completed.';
} else if (info.mode == RefreshIndicatorMode.drag) {
text = 'Pull to refresh';
} else if (info.mode == RefreshIndicatorMode.canceled) {
text = 'Cancel refresh';
}
final TextStyle ts = const TextStyle(
color: Colors.grey,
).copyWith(fontSize: 13);
final double dragOffset = info?.dragOffset ?? 0.0;
final DateTime time = lastRefreshTime ?? DateTime.now();
final double top = -hideHeight + dragOffset;
return Container(
height: dragOffset,
color: color ?? Colors.transparent,
//padding: EdgeInsets.only(top: dragOffset / 3),
//padding: EdgeInsets.only(bottom: 5.0),
child: Stack(
children: <Widget>[
Positioned(
left: 0.0,
right: 0.0,
top: top,
child: Row(
mainAxisAlignment: MainAxisAlignment.center,
crossAxisAlignment: CrossAxisAlignment.center,
children: <Widget>[
Expanded(
child: Container(
alignment: Alignment.centerRight,
child: RefreshImage(top),
margin: const EdgeInsets.only(right: 12.0),
),
),
Column(
children: <Widget>[
Text(
text,
style: ts,
),
Text(
'Last updated:' +
DateFormat('yyyy-MM-dd hh:mm').format(time),
style: ts.copyWith(fontSize: 12),
)
],
),
Expanded(
child: Container(),
),
],
),
)
],
),
);
}
}
class RefreshImage extends StatelessWidget {
const RefreshImage(this.top);
final double top;
@override
Widget build(BuildContext context) {
const double imageSize = 40;
return ExtendedImage.asset(
Assets.assets_fluttercandies_grey_png,
width: imageSize,
height: imageSize,
afterPaintImage: (Canvas canvas, Rect rect, ui.Image image, Paint paint) {
final double imageHeight = image.height.toDouble();
final double imageWidth = image.width.toDouble();
final Size size = rect.size;
final double y = (1 - min(top / (refreshHeight - hideHeight), 1)) *
imageHeight;
canvas.drawImageRect(
image,
Rect.fromLTWH(0.0, y, imageWidth, imageHeight - y),
Rect.fromLTWH(rect.left, rect.top + y / imageHeight * size.height,
size.width, (imageHeight - y) / imageHeight * size.height),
Paint()
..colorFilter =
const ColorFilter.mode(Color(0xFFea5504), BlendMode.srcIn)
..isAntiAlias = false
..filterQuality = FilterQuality.low);
//canvas.restore();
},
);
}
}
4.底部的点赞按钮
LikeButton(
size: 18.0,
isLiked: item.isFavorite,
likeCount: item.favorites,
countBuilder: (int count, bool isLiked, String text) {
final ColorSwatch<int> color =
isLiked ? Colors.pinkAccent : Colors.grey;
Widget result;
if (count == 0) {
result = Text(
'love',
style: TextStyle(color: color, fontSize: fontSize),
);
} else {
result = Text(
count >= 1000 ? (count / 1000.0).toStringAsFixed(1) + 'k' : text,
style: TextStyle(color: color, fontSize: fontSize),
);
}
return result;
},
likeCountAnimationType: item.favorites < 1000
? LikeCountAnimationType.part
: LikeCountAnimationType.none,
onTap: (bool isLiked) {
return onLikeButtonTap(isLiked, item);
},
)
这样自适应的瀑布流就完成了。
到此这篇关于Android Flutter自适应瀑布流案例详解的文章就介绍到这了,更多相关Android Flutter自适应瀑布流内容请搜索以前的文章或继续浏览下面的相关文章希望大家以后多多支持!
以上是 Android Flutter自适应瀑布流案例详解 的全部内容, 来源链接: utcz.com/p/243929.html