详解Android中Service AIDL的使用
前言
有些朋友可能是从事开发工作的时间不是特别的长,所以觉得Service相对与另外两个组件activity、broadcast receiver来说,使用可能并不是特别的多,所以对Service来说,理解不是特别的深入,只是有一个大概的概念,今天就和一块来走一下Service,希望能够帮助到大家对Service有更深入的理解。
Service基本用法——本地服务
我们知道服务分为本地服务和远程服务,而本地服务由于它的启动方式不一样,所以生命周期也就不一样,对Service生命周期不熟悉的朋友,自行去百度一下啊。好了,那么我们分别看一下两种不同的启动方式。
我们先创建好Service:ServiceTest.java
package com.example.administrator.servicetestaidl;
import android.app.Service;
import android.content.Intent;
import android.os.IBinder;
import android.support.annotation.IntDef;
import android.util.Log;
public class ServiceTest extends Service {
@Override
public void onCreate() {
super.onCreate();
Log.d("ServiceTest"," -----> onCreate");
}
@Override
public int onStartCommand(Intent intent,int flags, int startId) {
Log.d("ServiceTest"," -----> onStartCommand");
return super.onStartCommand(intent, flags, startId);
}
@Override
public void onDestroy() {
super.onDestroy();
Log.d("ServiceTest"," -----> onDestroy");
}
@Override
public IBinder onBind(Intent intent) {
// TODO: Return the communication channel to the service.
throw new UnsupportedOperationException("Not yet implemented");
}
}
在看看MainActivity的代码:
package com.example.administrator.servicetestaidl;
import android.app.Activity;
import android.content.Intent;
import android.os.Bundle;
import android.view.View;
import android.widget.Button;
public class MainActivity extends Activity {
private Button startService, stopService;
@Override
protected void onCreate(Bundle savedInstanceState) {
super.onCreate(savedInstanceState);
setContentView(R.layout.activity_main);
startService = (Button) findViewById(R.id.start_service);
stopService = (Button) findViewById(R.id.stop_service);
/**
* 开启服务
*/
startService.setOnClickListener(new View.OnClickListener() {
@Override
public void onClick(View v) {
Intent startService = new Intent(MainActivity.this,ServiceTest.class);
startService(startService);
}
});
/**
* 停止服务
*/
stopService.setOnClickListener(new View.OnClickListener() {
@Override
public void onClick(View v) {
Intent stopService = new Intent(MainActivity.this,ServiceTest.class);
stopService(stopService);
}
});
}
}
布局activity_main
<?xml version="1.0" encoding="utf-8"?>
<LinearLayout xmlns:android="http://schemas.android.com/apk/res/android"
android:layout_width="match_parent"
android:layout_height="match_parent"
android:orientation="vertical">
<Button
android:id="@+id/start_service"
android:layout_width="wrap_content"
android:layout_height="wrap_content"
android:text="开启服务" />
<Button
android:id="@+id/stop_service"
android:layout_width="wrap_content"
android:layout_height="wrap_content"
android:text="停止服务" />
</LinearLayout>
配置文件AndroidManifest.xml
<?xml version="1.0" encoding="utf-8"?>
<manifest xmlns:android="http://schemas.android.com/apk/res/android"
package="com.example.administrator.servicetestaidl">
<application
android:allowBackup="true"
android:icon="@mipmap/ic_launcher"
android:label="@string/app_name"
android:roundIcon="@mipmap/ic_launcher_round"
android:supportsRtl="true"
android:theme="@style/AppTheme">
<activity android:name=".MainActivity">
<intent-filter>
<action android:name="android.intent.action.MAIN" />
<category android:name="android.intent.category.LAUNCHER" />
</intent-filter>
</activity>
<service
android:name=".ServiceTest"
android:enabled="true"
android:exported="true"></service>
</application>
</manifest>
上面的代码很简单,并不难理解,在页面上加两个按钮,一个是启动服务,一个是销毁服务的,并且我们在ServiceTest里面的几个方法都加上了log,那我们点击开启服务,看看Log,如图:

然后我们多次点击开启服务,如图:

我们看到,后面即使多点几下这个开启服务,但是也只会调onStartCommand方法,onCreate方法并不会重复调用,那是因为我们点击Service,由于该service已经存在,所以并不会重新创建,所以onCreate方法只会调用一次。
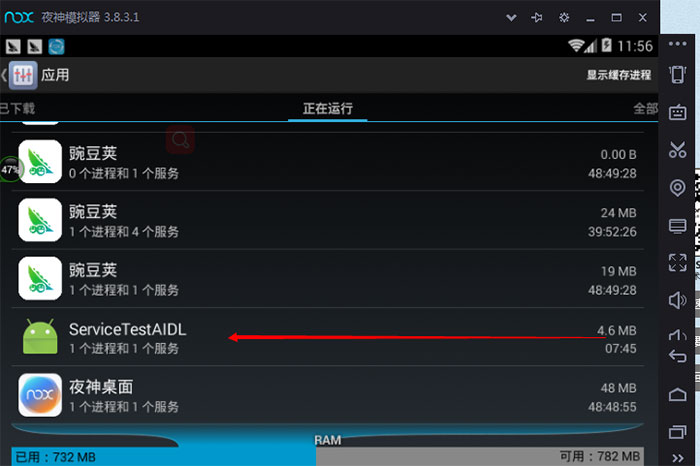
我们还可以到手机的应用程序管理界面来检查一下Service是不是正在运行,如下图所示:
那当我们点击停止服务按钮呢,看看log:如图

这时候说明了服务已经销毁了。
有些朋友可能注意到了,我们刚刚那种启动服务的方式,好像除了对Service进行开启和销毁以外,很难在activity里进行对Service进行控制,什么意思呢?举个例子,如果说我现在用Service进行下载某些东西,我现在在Service写有下载这两个东西的方法,方法a,方法b,那么我怎样在activity里面控制什么时候调用方法a,什么时候调用方法b呢,如果按照原本的启动方式,好像并不好实现,或者说灵活性很差,那么有没有办法办到呢,接着看Service另一种启动方式。在前面我们有一个方法一直都没有动onBind方法,我们就从这个方法入手,先看ServiceTest代码:
package com.example.administrator.servicetestaidl;
import android.app.Service;
import android.content.Intent;
import android.os.Binder;
import android.os.IBinder;
import android.support.annotation.IntDef;
import android.util.Log;
public class ServiceTest extends Service {
@Override
public void onCreate() {
super.onCreate();
Log.d("ServiceTest"," -----> onCreate");
}
@Override
public int onStartCommand(Intent intent,int flags, int startId) {
Log.d("ServiceTest"," -----> onStartCommand");
return super.onStartCommand(intent, flags, startId);
}
@Override
public void onDestroy() {
super.onDestroy();
Log.d("ServiceTest"," -----> onDestroy");
}
@Override
public IBinder onBind(Intent intent) {
return new Mybind();
}
class Mybind extends Binder{
public void getString(){
Log.d("ServiceTest"," -----> getString");
}
}
}
在ServiceTest中增加了一个内部类Mybind,并且在Mybind中增加一个getString方法,在方法中打印log,然后在onBind方法中返回Mybind对象。
再看看MainActivity的代码
package com.example.administrator.servicetestaidl;
import android.app.Activity;
import android.content.ComponentName;
import android.content.Intent;
import android.content.ServiceConnection;
import android.os.Bundle;
import android.os.IBinder;
import android.view.View;
import android.widget.Button;
public class MainActivity extends Activity {
private Button startService,stopService,bindService,unbindService;
private ServiceTest.Mybind mybind;
private ServiceConnection connection = new ServiceConnection() {
@Override
public void onServiceConnected(ComponentName name, IBinder service) {
mybind = (ServiceTest.Mybind) service;
mybind.getString(); //获取到getString方法
}
@Override
public void onServiceDisconnected(ComponentName name) {
}
};
@Override
protected void onCreate(Bundle savedInstanceState) {
super.onCreate(savedInstanceState);
setContentView(R.layout.activity_main);
startService = (Button) findViewById(R.id.start_service);
stopService = (Button) findViewById(R.id.stop_service);
bindService = (Button) findViewById(R.id.bind_service);
unbindService = (Button) findViewById(R.id.unbind_service);
/**
* 开启服务
*/
startService.setOnClickListener(new View.OnClickListener() {
@Override
public void onClick(View v) {
Intent startService = new Intent(MainActivity.this,ServiceTest.class);
startService(startService);
}
});
/**
* 停止服务
*/
stopService.setOnClickListener(new View.OnClickListener() {
@Override
public void onClick(View v) {
Intent stopService = new Intent(MainActivity.this,ServiceTest.class);
stopService(stopService);
}
});
/**
* 绑定服务
*/
bindService.setOnClickListener(new View.OnClickListener() {
@Override
public void onClick(View v) {
Intent bindService = new Intent(MainActivity.this,ServiceTest.class);
bindService(bindService,connection,BIND_AUTO_CREATE);
}
});
/**
* 解绑服务
*/
unbindService.setOnClickListener(new View.OnClickListener() {
@Override
public void onClick(View v) {
unbindService(connection);
}
});
}
}
主页面布局:activity_main
<?xml version="1.0" encoding="utf-8"?>
<LinearLayout xmlns:android="http://schemas.android.com/apk/res/android"
android:layout_width="match_parent"
android:layout_height="match_parent"
android:orientation="vertical">
<Button
android:id="@+id/start_service"
android:layout_width="wrap_content"
android:layout_height="wrap_content"
android:text="开启服务" />
<Button
android:id="@+id/stop_service"
android:layout_width="wrap_content"
android:layout_height="wrap_content"
android:text="停止服务" />
<Button
android:id="@+id/bind_service"
android:layout_width="wrap_content"
android:layout_height="wrap_content"
android:text="绑定服务" />
<Button
android:id="@+id/unbind_service"
android:layout_width="wrap_content"
android:layout_height="wrap_content"
android:text="解绑服务" />
</LinearLayout>
可以看到,这里我们首先创建了一个ServiceConnection的匿名类,在里面重写了onServiceConnected()方法和onServiceDisconnected()方法,这两个方法分别会在Activity与Service建立关联和解除关联的时候调用。在onServiceConnected()方法中,我们又通过向下转型得到了MyBind的实例,有了这个实例,Activity和Service之间的关系就变得非常紧密了。现在我们可以在Activity中根据具体的场景来调用MyBind中的任何public方法,即实现了Activity指挥Service干什么Service就去干什么的功能。
当我们点击绑定服务的时候,结果如下,如图

点击解绑服务的时候,结果如下,如图

注意:Service 是运行在后台,没有可视化的页面,我们很多时候会把耗时的操作放在Service中执行,但是注意,Service是运行在主线程的,不是在子线程中,Service和Thread没有半毛钱的关系,所以如果在Service中执行耗时操作,一样是需要开起线程,否则会引起ANR,这个需要区别开来。
远程服务 —— AIDL
AIDL(Android Interface Definition Language)是Android接口定义语言的意思,它可以用于让某个Service与多个应用程序组件之间进行跨进程通信,从而可以实现多个应用程序共享同一个Service的功能。实际上实现跨进程之间通信的有很多,
比如广播,Content Provider,但是AIDL的优势在于速度快(系统底层直接是共享内存),性能稳,效率高,一般进程间通信就用它。
既然是跨进程,那必须的有两个应用,一个是service端,一个是client端,然后实现客户端从服务端获取数据。那么我们创建一个服务端,项目结构如图所示:
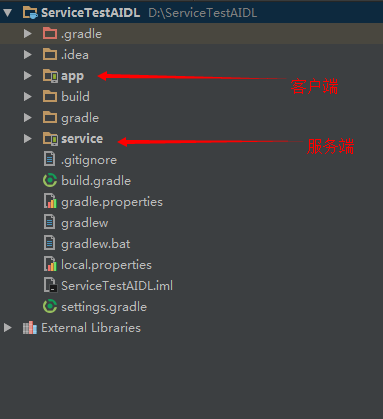
服务端
我们在服务端下建立一个MyAIDLService.aidl文件,目录结构为如图所示:

然后,我们在MyAIDLService下增加一个获取字符串的方法。代码如下:(注:刚刚建立的aidl文件中存在一个方法,那个方法可以忽略,可以删掉不要)
// MyAIDLService.aidl
package aidl;
// Declare any non-default types here with import statements
interface MyAIDLService {
//获取String数据
String getString();
}
创建完aidl文件以后,我们build一下项目,然后会在build - >generated ->source ->aidl->debug下会生成一个aidl文件,那说明AIDL文件已经编译成功。
接着建立一个MyService类,代码如下:
package com.example.service;
import android.app.Service;
import android.content.Intent;
import android.os.Binder;
import android.os.IBinder;
import android.os.RemoteException;
import android.util.Log;
import java.util.Map;
import aidl.MyAIDLService;
public class MyService extends Service {
@Override
public void onCreate() {
super.onCreate();
}
@Override
public int onStartCommand(Intent intent, int flags, int startId) {
return super.onStartCommand(intent, flags, startId);
}
@Override
public void onDestroy() {
super.onDestroy();
}
@Override
public IBinder onBind(Intent intent) {
return new Mybind();
}
class Mybind extends MyAIDLService.Stub {
@Override
public String getString() throws RemoteException {
String string = "我是从服务起返回的";
return string;
}
}
}
代码看起来是不是很熟悉,唯一不一样的就是原来在本地服务的时候内部类继承的是Binder,而现在继承的是MyAIDLService.Stub,继承的是我们刚刚建立的aidl文件,然后实现我们刚刚的定义的getString()方法,在这里,我们只是返回一句话,"我是从服务起返回的"~~~~~~~~~~~
客户端
首先将刚刚在服务端创建的MyAIDLService原封不动的复制到客户端来。(注意:路径要一模一样)。接着我们在客户端的MainActivity中加两个按钮,并且和服务端进行相连,代码如下:
MainActivity
package com.example.administrator.servicetestaidl;
import android.app.Activity;
import android.content.ComponentName;
import android.content.Intent;
import android.content.ServiceConnection;
import android.os.Bundle;
import android.os.IBinder;
import android.os.RemoteException;
import android.view.View;
import android.widget.Button;
import android.widget.TextView;
import aidl.MyAIDLService;
public class MainActivity extends Activity {
private Button bindService,unbindService;
private TextView tvData;
private MyAIDLService myAIDLService;
private ServiceConnection connection = new ServiceConnection() {
@Override
public void onServiceConnected(ComponentName name, IBinder service) {
myAIDLService = MyAIDLService.Stub.asInterface(service);
try {
String str = myAIDLService.getString();
tvData.setText(str);
} catch (RemoteException e) {
e.printStackTrace();
}
}
@Override
public void onServiceDisconnected(ComponentName name) {
myAIDLService = null;
}
};
@Override
protected void onCreate(Bundle savedInstanceState) {
super.onCreate(savedInstanceState);
setContentView(R.layout.activity_main);
bindService = (Button) findViewById(R.id.bind_service);
unbindService = (Button) findViewById(R.id.unbind_service);
tvData = (TextView) findViewById(R.id.tv_data);
/**
* 绑定服务
*/
bindService.setOnClickListener(new View.OnClickListener() {
@Override
public void onClick(View v) {
Intent intent = new Intent();
intent.setAction("com.example.service.MyService");
//从 Android 5.0开始 隐式Intent绑定服务的方式已不能使用,所以这里需要设置Service所在服务端的包名
intent.setPackage("com.example.service");
bindService(intent, connection, BIND_AUTO_CREATE);
}
});
/**
* 解绑服务
*/
unbindService.setOnClickListener(new View.OnClickListener() {
@Override
public void onClick(View v) {
unbindService(connection);
}
});
}
}
大家是不是感觉和连接本地服务的代码差不多,没错,这里只需要注意两个地方,一个是绑定服务的时候,因为从 Android 5.0开始 隐式Intent绑定服务的方式已不能使用,所以这里需要设置Service所在服务端的包名
那么这个action是怎么来的呢,我们回来服务端的AndroidManifest.xml,代码如下
<?xml version="1.0" encoding="utf-8"?>
<manifest xmlns:android="http://schemas.android.com/apk/res/android"
package="com.example.service">
<application
android:allowBackup="true"
android:icon="@mipmap/ic_launcher"
android:label="@string/app_name"
android:roundIcon="@mipmap/ic_launcher_round"
android:supportsRtl="true"
android:theme="@style/AppTheme">
<activity android:name=".MainActivity">
<intent-filter>
<action android:name="android.intent.action.MAIN" />
<category android:name="android.intent.category.LAUNCHER" />
</intent-filter>
</activity>
<service
android:name=".MyService"
>
<intent-filter>
<action android:name="com.example.service.MyService" />
</intent-filter>
</service>
</application>
</manifest>
另一个需要注意的就是获取MyAIDLService对象是通过MyAIDLService.Stub.asInterface(service);这里大家需要注意一下的。
不过还有一点需要说明的是,由于这是在不同的进程之间传递数据,Android对这类数据的格式支持是非常有限的,
基本上只能传递Java的基本数据类型、字符串、List或Map等。那么如果我想传递一个自定义的类该怎么办呢?这就必须要让这个类去实现Parcelable接口,并且要给这个类也定义一个同名的AIDL文件。这部分内容并不复杂,而且和Service关系不大,所以就不再详细进行讲解了,感兴趣的朋友可以自己去查阅一下相关的资料。
注意:从服务器复制过来的aidl文件不能直接放到Java文件夹下面,必须建立一个aidl文件夹存放,否则会编译不成功
好了,到这里,基本上就结束了,附上一张效果图:
最后附上源码链接
本地服务源码:https://github.com/343661629/nativeService
远程服务源码:https://github.com/343661629/remoteService
以上就是详解Android中Service AIDL的使用的详细内容,更多关于Android中Service AIDL的使用的资料请关注其它相关文章!
以上是 详解Android中Service AIDL的使用 的全部内容, 来源链接: utcz.com/p/243623.html