Android简单使用PopupWindow的方法
本文实例为大家分享了Android简单使用PopupWindow的的具体代码,供大家参考,具体内容如下
思路
1.在res下面创建一个menu文件夹,并新建一个xml文件作为PoupWindow的布局文件。
2.Activity中布局填充器加载菜单布局
3.创建PopupWindow对象并设置内容以及动画
4.设置菜单布局中控件需要做的操作
menu菜单布局:
<?xml version="1.0" encoding="utf-8"?>
<LinearLayout xmlns:android="http://schemas.android.com/apk/res/android"
android:layout_width="match_parent"
android:layout_height="match_parent"
android:background="#eaeaea"
android:orientation="vertical">
<Button
android:id="@+id/bt1"
android:layout_width="wrap_content"
android:layout_height="wrap_content"
android:layout_marginTop="10dp"
android:text="选项一" />
<Button
android:id="@+id/bt2"
android:layout_width="wrap_content"
android:layout_height="wrap_content"
android:layout_marginTop="10dp"
android:text="选项二" />
<Button
android:id="@+id/bt3"
android:layout_width="wrap_content"
android:layout_height="wrap_content"
android:layout_marginTop="10dp"
android:text="选项三" />
</LinearLayout>
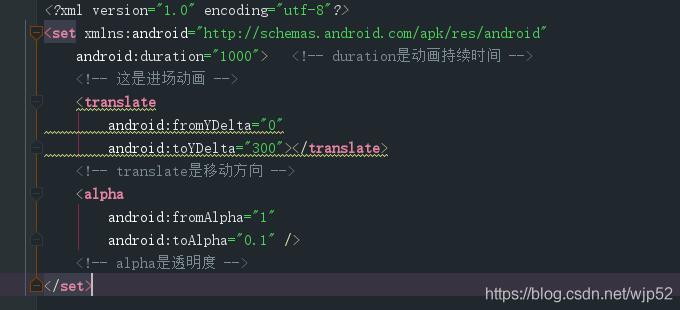
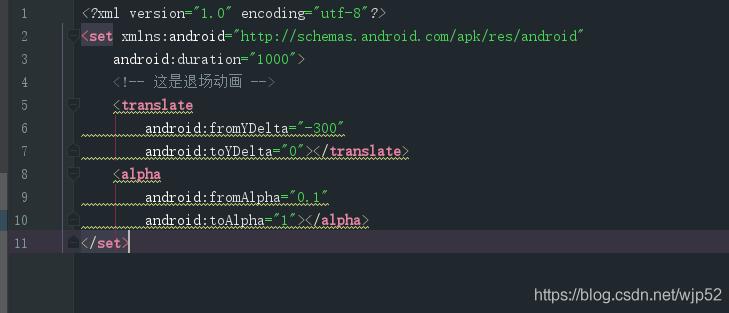
定义动画:
在styles资源文件里写一个style继承android:Animation,并设置进出场效果
内容引用res下面的anim资源文件夹里的资源文件
将动画绑定到popuwidow
styles资源文件

在res下面创建一个anim资源文件夹
anim资源文件
popupwindow绑定动画 popupWindow.setAnimationStyle(R.style.www);
Activity
public class MainActivity extends AppCompatActivity {
private Button bt;
@Override
protected void onCreate(Bundle savedInstanceState) {
super.onCreate(savedInstanceState);
setContentView(R.layout.activity_main);
bt = findViewById(R.id.bt);
}
public void click(View view) { //点击事件
View inflate = LayoutInflater.from(this).inflate(R.layout.menu, null); //布局加载器加载菜单布局
Button bt1 = inflate.findViewById(R.id.bt1);
Button bt2 = inflate.findViewById(R.id.bt2);
Button bt3 = inflate.findViewById(R.id.bt3);
/**
* 创建PopupWindow对象 视图对象, 宽, 高,缺一不可
* 第一种:创建对象的时候直接加参数 PopupWindow popupWindow = new PopupWindow(inflate, 200, ViewGroup.LayoutParams.WRAP_CONTENT,true);
* 第二种 通过setContentView,setHeight,setWidth 来设置
* 宽高可设置固定值或者ViewGroup.LayoutParams.WRAP_CONTENT
**/
final PopupWindow popupWindow = new PopupWindow(inflate, 200, ViewGroup.LayoutParams.WRAP_CONTENT);
popupWindow.setOutsideTouchable(true); //点击弹窗外部是否取消弹窗
popupWindow.setAnimationStyle(R.style.www); //设置自定义好的动画
//弹窗出现外部为阴影
WindowManager.LayoutParams attributes = getWindow().getAttributes();
attributes.alpha = 0.5f;
getWindow().setAttributes(attributes);
//弹窗取消监听 取消之后恢复阴影
popupWindow.setOnDismissListener(new PopupWindow.OnDismissListener() {
@Override
public void onDismiss() {
WindowManager.LayoutParams attributes = getWindow().getAttributes();
attributes.alpha = 1;
getWindow().setAttributes(attributes);
}
});
//选项的点击事件
bt1.setOnClickListener(new View.OnClickListener() {
@Override
public void onClick(View view) {
popupWindow.dismiss();
Toast.makeText(MainActivity.this, "选项一", Toast.LENGTH_SHORT).show();
}
});
bt2.setOnClickListener(new View.OnClickListener() {
@Override
public void onClick(View view) {
popupWindow.dismiss();
Toast.makeText(MainActivity.this, "选项二", Toast.LENGTH_SHORT).show();
}
});
bt3.setOnClickListener(new View.OnClickListener() {
@Override
public void onClick(View view) {
popupWindow.dismiss();
Toast.makeText(MainActivity.this, "选项三", Toast.LENGTH_SHORT).show();
}
});
/**
* 显示popupwidow两种方式
* 1.howAsDropDown出现在下方,三个参数:1绑定的控件2.x轴偏移量 3.y轴偏移量
* 2.showAtLocation自定义位置 四个参数 1绑定的控件 2.出现的位置 3.x轴偏移量 4.y轴偏移量
*
**/
// popupWindow.showAsDropDown(bt,0,0);
popupWindow.showAtLocation(bt, Gravity.CENTER, 0, 0);
}
}
以上就是本文的全部内容,希望对大家的学习有所帮助,也希望大家多多支持。
以上是 Android简单使用PopupWindow的方法 的全部内容, 来源链接: utcz.com/p/243293.html