Android仿微信多人音视频通话界面
工作中需要实现一个类似微信多人视频通话功能的界面,分别使用自定义viewgroup和自定义layoutManager的方式进行了实现。最终工作中采用了layoutManager,因为可以使用payload更新单个布局控件,效率更好。下面放出两种具体的实现效果代码。
1、使用自定义ViewGroup方式实现
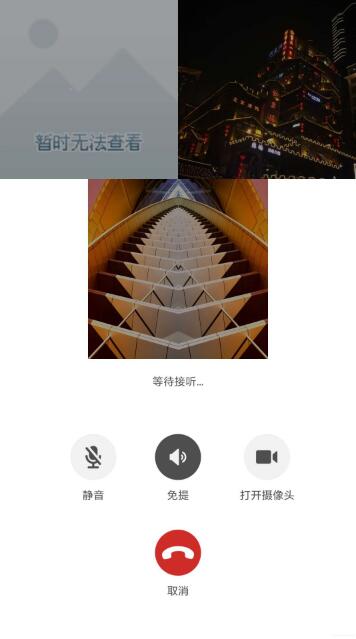
下面是三个人通话时候的效果,其他的可以参考微信多人音视频通话界面。
package com.dnaer.android.telephone.widgets;
import android.content.Context;
import android.os.Build;
import android.support.annotation.RequiresApi;
import android.util.AttributeSet;
import android.util.DisplayMetrics;
import android.view.View;
import android.view.ViewGroup;
import android.view.WindowManager;
import com.anbetter.log.MLog;
public class MultiVideoChatLayout extends ViewGroup implements CommLayoutAdapter.OnDataChangedListener {
private CommLayoutAdapter mCommLayoutAdapter;
private int mScreenWidth;
//人数为2,3,4状态下的宽高度
private int mSizeModel1;
//人数为5,6,7,8,9状态下的宽高度
private int mSizeModel2;
public MultiVideoChatLayout(Context context) {
this(context, null);
}
public MultiVideoChatLayout(Context context, AttributeSet attrs) {
this(context, attrs, 0);
}
public MultiVideoChatLayout(Context context, AttributeSet attrs, int defStyleAttr) {
super(context, attrs, defStyleAttr);
initialize(context);
}
@RequiresApi(api = Build.VERSION_CODES.LOLLIPOP)
public MultiVideoChatLayout(Context context, AttributeSet attrs, int defStyleAttr, int defStyleRes) {
super(context, attrs, defStyleAttr, defStyleRes);
initialize(context);
}
private void initialize(Context context) {
WindowManager wm = (WindowManager) context.getSystemService(Context.WINDOW_SERVICE);
DisplayMetrics metrics = new DisplayMetrics();
wm.getDefaultDisplay().getMetrics(metrics);
mScreenWidth = metrics.widthPixels;
mSizeModel1 = mScreenWidth / 2;
mSizeModel2 = mScreenWidth / 3;
}
@Override
protected void onMeasure(int widthMeasureSpec, int heightMeasureSpec) {
//宽度默认给屏幕的宽度,高度直接取宽度,形成一个正方形
final int width = MeasureSpec.makeMeasureSpec(mScreenWidth, MeasureSpec.EXACTLY);
final int height = MeasureSpec.makeMeasureSpec(mScreenWidth, MeasureSpec.EXACTLY);
setMeasuredDimension(width, height);
MLog.d("width: " + width + ", height:" + height);
final int childWidth = MeasureSpec.makeMeasureSpec(mScreenWidth / 3, MeasureSpec.EXACTLY);
final int childHeight = MeasureSpec.makeMeasureSpec(mScreenWidth / 3, MeasureSpec.EXACTLY);
final int childWidth2 = MeasureSpec.makeMeasureSpec(mScreenWidth / 2, MeasureSpec.EXACTLY);
final int childHeight2 = MeasureSpec.makeMeasureSpec(mScreenWidth / 2, MeasureSpec.EXACTLY);
if (getChildCount() > 4) {
for (int i = 0; i < getChildCount(); i++) {
View child = getChildAt(i);
child.measure(childWidth, childHeight);
}
} else {
for (int i = 0; i < getChildCount(); i++) {
View child = getChildAt(i);
child.measure(childWidth2, childHeight2);
}
}
}
@Override
protected void onLayout(boolean changed, int l, int t, int r, int b) {
if (getChildCount() <= 4) {
layoutModel1();
} else {
layoutModel2();
}
}
private void layoutModel2() {
int currentWidth = 0;
for (int i = 0; i < getChildCount(); i++) {
View item = getChildAt(i);
if (i % 3 == 0) {
currentWidth = 0;
item.layout(0, i / 3 * mSizeModel2, mSizeModel2, i / 3 * mSizeModel2 + mSizeModel2);
} else {
item.layout(currentWidth + mSizeModel2, i / 3 * mSizeModel2, currentWidth + 2 * mSizeModel2, i / 3 * mSizeModel2 + mSizeModel2);
currentWidth = currentWidth + mSizeModel2;
}
}
}
private void layoutModel1() {
if (getChildCount() == 3) {
for (int i = 0; i < getChildCount(); i++) {
View item = getChildAt(i);
MLog.d("width: " + item.getMeasuredWidth() + ", height: " + item.getMeasuredHeight() + ", mSizeModel1: " + mSizeModel1);
if (i == 0) {
item.layout(0, 0, mSizeModel1, mSizeModel1);
} else if (i == 1) {
item.layout(mSizeModel1, 0, mSizeModel1 * 2, mSizeModel1);
} else if (i == 2) {
item.layout(mSizeModel1 / 2, mSizeModel1, mSizeModel1 + mSizeModel1 / 2, mSizeModel1 * 2);
}
}
} else {
for (int i = 0; i < getChildCount(); i++) {
View item = getChildAt(i);
if (i % 2 == 0) {
item.layout(0, i / 2 * mSizeModel1, mSizeModel1, i / 2 * mSizeModel1 + mSizeModel1);
} else {
item.layout(mSizeModel1, i / 2 * mSizeModel1, 2 * mSizeModel1, i / 2 * mSizeModel1 + mSizeModel1);
}
}
}
}
public void setAdapter(CommLayoutAdapter adapter) {
mCommLayoutAdapter = adapter;
mCommLayoutAdapter.setOnDataChangedListener(this);
changedAdapter();
}
@Override
public void onChanged() {
changedAdapter();
}
private void changedAdapter() {
removeAllViews();
CommLayoutAdapter layoutAdapter = mCommLayoutAdapter;
for (int i = 0; i < layoutAdapter.getCount(); i++) {
View view = layoutAdapter.getView(this, i, layoutAdapter.getItem(i));
view.setDuplicateParentStateEnabled(true);
addView(view);
}
}
}
2、使用自定义LayoutManager方式实现
package org.fireking.customgridlayoutmanager
import android.content.res.Resources
import android.support.v7.widget.RecyclerView
import java.lang.IllegalArgumentException
class MultiChatLayoutManager : RecyclerView.LayoutManager() {
private var leftMargin = 0
private var rightMargin = 0
private var mScreenWidth = 0
override fun generateDefaultLayoutParams(): RecyclerView.LayoutParams {
return RecyclerView.LayoutParams(RecyclerView.LayoutParams.WRAP_CONTENT, RecyclerView.LayoutParams.WRAP_CONTENT)
}
override fun onLayoutChildren(recycler: RecyclerView.Recycler?, state: RecyclerView.State?) {
super.onLayoutChildren(recycler, state)
if (itemCount == 0) {
detachAndScrapAttachedViews(recycler!!)
return
}
if (childCount == 0 && state!!.isPreLayout) {
return
}
val params = recycler!!.getViewForPosition(0).layoutParams as RecyclerView.LayoutParams
leftMargin = params.leftMargin
rightMargin = params.rightMargin
detachAndScrapAttachedViews(recycler)
layoutItem(recycler)
}
private fun layoutItem(recycler: RecyclerView.Recycler) {
if (itemCount > 9) {
throw IllegalArgumentException("${javaClass.simpleName}最多支持9个item布局, 请检查你的item个数是否正确")
}
mScreenWidth = Resources.getSystem().displayMetrics.widthPixels
val itemSize = if (itemCount > 4) {
mScreenWidth / 3
} else {
mScreenWidth / 2
}
if (itemCount <= 4) {
if (itemCount == 3) {
for (i in 0 until itemCount) {
val view = recycler.getViewForPosition(i)
addView(view) // 因为detach过所以重新添加
measureChildWithMargins(view, 0, 0)
when (i) {
0 -> layoutDecoratedWithMargins(view, 0, 0, itemSize, itemSize)
1 -> layoutDecoratedWithMargins(view, itemSize, 0, itemSize * 2, itemSize)
else -> layoutDecoratedWithMargins(
view,
itemSize / 2,
itemSize,
itemSize + itemSize / 2,
itemSize * 2
)
}
}
} else {
for (i in 0 until itemCount) {
val view = recycler.getViewForPosition(i)
addView(view) // 因为detach过所以重新添加
measureChildWithMargins(view, 0, 0)
if (i % 2 == 0) {
layoutDecoratedWithMargins(view, 0, i / 2 * itemSize, itemSize, i / 2 * itemSize + itemSize)
} else {
layoutDecoratedWithMargins(
view,
itemSize,
i / 2 * itemSize,
2 * itemSize,
i / 2 * itemSize + itemSize
)
}
}
}
} else {
var currentWidth = 0
for (i in 0 until itemCount) {
val view = recycler.getViewForPosition(i)
addView(view) // 因为detach过所以重新添加
measureChildWithMargins(view, 0, 0)
if (i % 3 == 0) {
currentWidth = 0
layoutDecoratedWithMargins(view, 0, i / 3 * itemSize, itemSize, i / 3 * itemSize + itemSize)
} else {
layoutDecoratedWithMargins(
view,
currentWidth + itemSize,
i / 3 * itemSize,
currentWidth + 2 * itemSize,
i / 3 * itemSize + itemSize
)
currentWidth += itemSize
}
}
}
}
//因为这个布局不需要有滚动,所以直接将横竖两个方向的滚动全部取消了
override fun canScrollHorizontally(): Boolean {
return false
}
override fun canScrollVertically(): Boolean {
return false
}
}
以上就是本文的全部内容,希望对大家的学习有所帮助,也希望大家多多支持。
以上是 Android仿微信多人音视频通话界面 的全部内容, 来源链接: utcz.com/p/241971.html