ubuntu环境下反编译android apk的方法
使用ApkTool反编译Apk
下载 apktool1.4.3.tar.bz2 、apktool-install-linux-r04-brut1.tar.bz2 两个包,并解压到统一个目录中,解压后得到aapt apktool apktool.jar 。解压安装完成后输入以下命令解压:
<span>$ ./apktool d apk/xgd_android_test.apk
I: Baksmaling...
I: Loading resource table...
I: Loaded.
I: Loading resource table from file: /home/yangyupeng/apktool/framework/1.apk
I: Loaded.
I: Decoding file-resources...
W: Cant find 9patch chunk in file: "drawable-mdpi/navbar.9.png". Renaming it to *.png.
I: Decoding values*/* XMLs...
I: Done.
I: Copying assets and libs...
</span>
显示如上,注意apktool的参数,d表示decode,b表示build,此时在当前目录生成apk的解压文件:
1/xgd_android_test$ ls
AndroidManifest.xml apktool.yml lib res smali
这里有apk的源码(smali)、图片、xml配置和语言配置等等信息。
使用dex2jar和JD-JUI这两个工具查看java源码
下载dex2jar、JD-JUI 两个包,解压。
把apk的后缀名改成zip,并解压得到classes.dex文件,在dex2jar目录中输入如下命令得到.jar文件:
<span>$ ./dex2jar.sh classes.dex
this cmd is deprecated, use the d2j-dex2jar if possible
dex2jar version: translator-0.0.9.9
dex2jar classes.dex -> classes_dex2jar.jar
Done.
</span>
再使用JD-JUI打开该文件就能查看源代码:
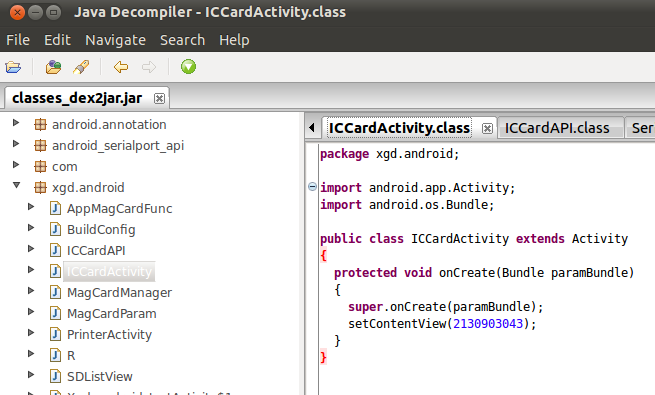
与源代码对比:
package xgd.android;
import android.app.Activity;
import android.os.Bundle;
public class ICCardActivity extends Activity{
@Override
protected void onCreate(Bundle savedInstanceState) {
// TODO Auto-generated method stub
super.onCreate(savedInstanceState);
setContentView(R.layout.iccard);
}
}
总结
以上就是这篇文章的全部内容了,希望本文的内容对大家的学习或者工作具有一定的参考学习价值,谢谢大家对的支持。如果你想了解更多相关内容请查看下面相关链接
以上是 ubuntu环境下反编译android apk的方法 的全部内容, 来源链接: utcz.com/p/241750.html