详解Xamarin.Android 利用Fragment实现底部菜单
本篇文章主要介绍了详解Xamarin.Android 利用Fragment实现底部菜单,分享给大家,具体如下:
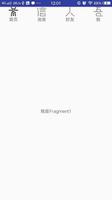
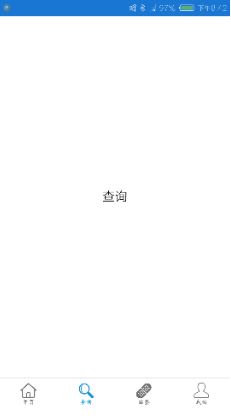
效果图:
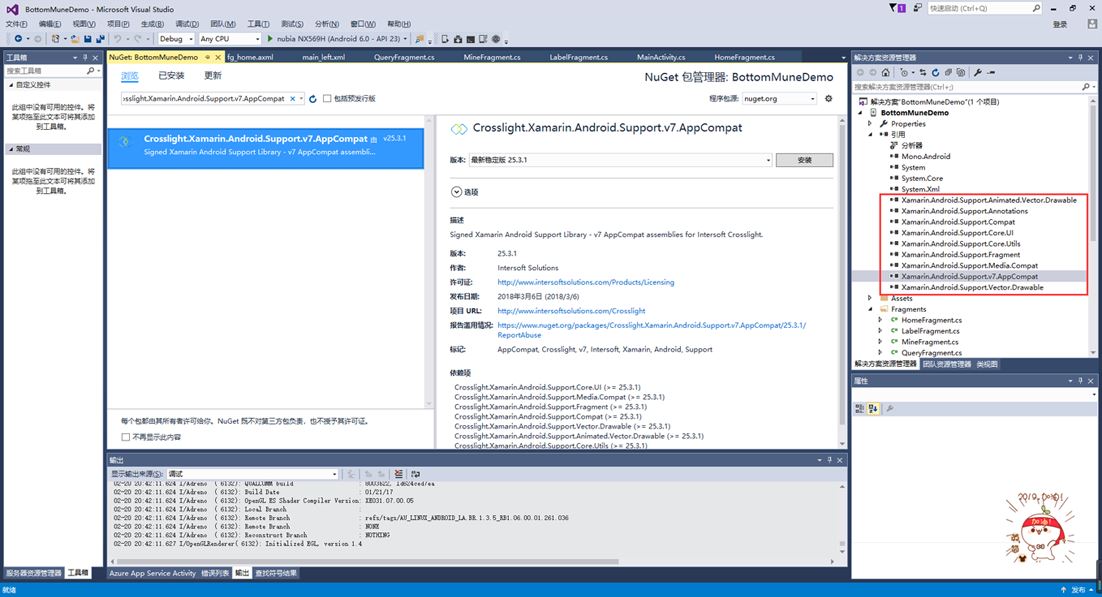
第一步:添加引用
引用 Crosslight.Xamarin.Android.Support.v7.AppCompat 这个包。
第二步:绘制Main和Fragment界面
fg_home.axml
<?xml version="1.0" encoding="utf-8"?>
<LinearLayout xmlns:android="http://schemas.android.com/apk/res/android"
android:orientation="vertical"
android:layout_width="match_parent"
android:layout_height="match_parent"
android:background="#FFFFFF">
<TextView
android:id="@+id/txt_content"
android:layout_width="match_parent"
android:layout_height="match_parent"
android:gravity="center"
android:text="首页"
android:textColor="#000000"
android:textSize="20sp" />
</LinearLayout>
fg_label.axml
<?xml version="1.0" encoding="utf-8"?>
<LinearLayout xmlns:android="http://schemas.android.com/apk/res/android"
android:orientation="vertical"
android:layout_width="match_parent"
android:layout_height="match_parent"
android:background="#FFFFFF">
<TextView
android:id="@+id/txt_content"
android:layout_width="match_parent"
android:layout_height="match_parent"
android:gravity="center"
android:text="贴签"
android:textColor="#000000"
android:textSize="20sp" />
</LinearLayout>
fg_mine.axml
<?xml version="1.0" encoding="utf-8"?>
<LinearLayout xmlns:android="http://schemas.android.com/apk/res/android"
android:orientation="vertical"
android:layout_width="match_parent"
android:layout_height="match_parent"
android:background="#FFFFFF">
<TextView
android:id="@+id/txt_content"
android:layout_width="match_parent"
android:layout_height="match_parent"
android:gravity="center"
android:text="我的"
android:textColor="#000000"
android:textSize="20sp" />
</LinearLayout>
fg_query.axml
<?xml version="1.0" encoding="utf-8"?>
<LinearLayout xmlns:android="http://schemas.android.com/apk/res/android"
android:orientation="vertical"
android:layout_width="match_parent"
android:layout_height="match_parent"
android:background="#FFFFFF">
<TextView
android:id="@+id/txt_content"
android:layout_width="match_parent"
android:layout_height="match_parent"
android:gravity="center"
android:text="查询"
android:textColor="#000000"
android:textSize="20sp" />
</LinearLayout>
Main.axml
<?xml version="1.0" encoding="utf-8"?>
<LinearLayout xmlns:android="http://schemas.android.com/apk/res/android"
xmlns:tools="http://schemas.android.com/tools"
android:layout_width="match_parent"
android:layout_height="match_parent"
android:orientation="vertical">
<include
layout="@layout/main_left" />
</LinearLayout>
main_left.xml
<?xml version="1.0" encoding="utf-8"?>
<android.support.v4.widget.DrawerLayout xmlns:android="http://schemas.android.com/apk/res/android"
android:id="@+id/dl_left"
android:layout_width="match_parent"
android:layout_height="match_parent"
android:background="#f0f0f0">
<!--主布局-->
<LinearLayout
android:layout_width="match_parent"
android:layout_height="match_parent"
android:orientation="horizontal">
<RelativeLayout
android:layout_width="match_parent"
android:layout_height="match_parent"
android:id="@+id/relativelayout1"
android:fitsSystemWindows="true">
<RelativeLayout
android:id="@+id/ly_top_bar"
android:layout_width="match_parent"
android:layout_height="48dp"
android:visibility="gone">
</RelativeLayout>
<LinearLayout
android:id="@+id/ly_tab_bar"
android:layout_width="match_parent"
android:layout_height="50dp"
android:layout_alignParentBottom="true"
android:background="#FFFFFF"
android:orientation="vertical">
<View
android:layout_width="match_parent"
android:layout_height="2px"
android:background="#cccccc" />
<LinearLayout
android:layout_width="match_parent"
android:layout_height="40dp"
android:orientation="horizontal"
android:layout_marginTop="5dp">
<ImageView
android:id="@+id/iv_home"
android:layout_width="25.6dp"
android:layout_height="37.6dp"
android:src="@drawable/icon_home1"
android:layout_weight="1"/>
<ImageView
android:id="@+id/iv_query"
android:layout_width="25.6dp"
android:layout_height="37.6dp"
android:src="@drawable/icon_query1"
android:layout_weight="1"/>
<ImageView
android:id="@+id/iv_label"
android:layout_width="25.6dp"
android:layout_height="37.6dp"
android:src="@drawable/icon_label1"
android:layout_weight="1"/>
<ImageView
android:id="@+id/iv_mine"
android:layout_width="25.6dp"
android:layout_height="37.6dp"
android:src="@drawable/icon_mine1"
android:layout_weight="1"/>
</LinearLayout>
</LinearLayout>
<View
android:id="@+id/div_tab_bar"
android:layout_width="match_parent"
android:layout_height="2px"
android:background="#FFFFFF"
android:layout_above="@id/ly_tab_bar" />
<FrameLayout
android:layout_width="match_parent"
android:layout_height="match_parent"
android:id="@+id/fy_home"
android:layout_below="@id/ly_top_bar"
android:layout_above="@id/div_tab_bar" />
<FrameLayout
android:layout_width="match_parent"
android:layout_height="match_parent"
android:id="@+id/fy_query"
android:layout_below="@id/ly_top_bar"
android:layout_above="@id/div_tab_bar"/>
<FrameLayout
android:layout_width="match_parent"
android:layout_height="match_parent"
android:id="@+id/fy_label"
android:layout_below="@id/ly_top_bar"
android:layout_above="@id/div_tab_bar"/>
<FrameLayout
android:layout_width="match_parent"
android:layout_height="match_parent"
android:id="@+id/fy_mine"
android:layout_below="@id/ly_top_bar"
android:layout_above="@id/div_tab_bar"/>
</RelativeLayout>
</LinearLayout>
</android.support.v4.widget.DrawerLayout>
第三步:在value文件下创建Style,并且自定义 BaseAppTheme 样式
<?xml version="1.0" encoding="utf-8" ?>
<resources>
<color name="primary">#1e89e7</color>
<color name="primaryDark">#1976d2</color>
<color name="red">#ff0000</color>
<color name="white">#ffffff</color>
<style name="BaseAppTheme" parent="Theme.AppCompat.Light.DarkActionBar">
<item name="windowActionBar">false</item>
<item name="windowNoTitle">true</item>
<item name="colorPrimary">@color/primary</item>
<item name="colorPrimaryDark">@color/primaryDark</item>
<item name="drawerArrowStyle">@style/AppTheme.DrawerArrowToggle</item>
</style>
<style name="AppTheme.DrawerArrowToggle" parent="Base.Widget.AppCompat.DrawerArrowToggle">
<item name="color">@android:color/white</item>
</style>
</resources>
第四步:编写每个Fragment的后台,这里只写一个。
using System;
using System.Collections.Generic;
using System.Linq;
using System.Text;
using Android.App;
using Android.Content;
using Android.OS;
using Android.Runtime;
using Android.Util;
using Android.Views;
using Android.Widget;
namespace BottomMuneDemo.Fragments
{
public class HomeFragment : Fragment
{
private string content { get; set; }
public HomeFragment(string content)
{
this.content = content;
}
public override void OnCreate(Bundle savedInstanceState)
{
base.OnCreate(savedInstanceState);
// Create your fragment here
}
public override View OnCreateView(LayoutInflater inflater, ViewGroup container, Bundle savedInstanceState)
{
View view = inflater.Inflate(Resource.Layout.fg_home, container, false);
TextView txt_content = (TextView)view.FindViewById(Resource.Id.txt_content);
txt_content.Text = "首页";
return view;
}
}
}
第五步:在Main活动中进行设置。
using Android.App;
using Android.Widget;
using Android.OS;
using Android.Support.V7.App;
using BottomMuneDemo.Fragments;
using Android.Views;
namespace BottomMuneDemo
{
[Activity(Label = "BottomMuneDemo", MainLauncher = true, Theme = "@style/BaseAppTheme")]
public class MainActivity : AppCompatActivity
{
private ImageView iv_home;
private ImageView iv_query;
private ImageView iv_label;
private ImageView iv_mine;
private FrameLayout fy_home;
private FrameLayout fy_query;
private FrameLayout fy_label;
private FrameLayout fy_mine;
HomeFragment fg1;
QueryFragment fg2;
LabelFragment fg3;
MineFragment fg4;
protected override void OnCreate(Bundle savedInstanceState)
{
base.OnCreate(savedInstanceState);
SetContentView(Resource.Layout.Main);
fy_home = (FrameLayout)FindViewById(Resource.Id.fy_home);
fy_query = (FrameLayout)FindViewById(Resource.Id.fy_query);
fy_label = (FrameLayout)FindViewById(Resource.Id.fy_label);
fy_mine = (FrameLayout)FindViewById(Resource.Id.fy_mine);
iv_home = (ImageView)FindViewById(Resource.Id.iv_home);
iv_query = (ImageView)FindViewById(Resource.Id.iv_query);
iv_label = (ImageView)FindViewById(Resource.Id.iv_label);
iv_mine = (ImageView)FindViewById(Resource.Id.iv_mine);
bindViews();
iv_home.PerformClick();
}
#region 底部菜单选项卡
//ui组件初始化与事件绑定
private void bindViews()
{
iv_home.Click += (s, e) => { onClick(iv_home); };
iv_query.Click += delegate { onClick(iv_query); };
iv_label.Click += delegate { onClick(iv_label); };
iv_mine.Click += delegate { onClick(iv_mine); };
}
//隐藏所有Fragment
private void hideAllFragment(FragmentTransaction fragmentTransaction)
{
if (fg1 != null) fragmentTransaction.Hide(fg1);
if (fg2 != null) fragmentTransaction.Hide(fg2);
if (fg3 != null) fragmentTransaction.Hide(fg3);
if (fg4 != null) fragmentTransaction.Hide(fg4);
iv_home.SetImageResource(Resource.Drawable.icon_home1);
iv_query.SetImageResource(Resource.Drawable.icon_query1);
iv_label.SetImageResource(Resource.Drawable.icon_label1);
iv_mine.SetImageResource(Resource.Drawable.icon_mine1);
}
//重置所有文本的选中状态
private void setSelected()
{
iv_home.Selected = false;
iv_query.Selected = false;
iv_label.Selected = false;
iv_mine.Selected = false;
}
//单击事件
public void onClick(View v)
{
FragmentTransaction fTransaction = FragmentManager.BeginTransaction();
hideAllFragment(fTransaction);
switch (v.Id)
{
case Resource.Id.iv_home:
setSelected();
iv_home.Selected = true;
iv_home.SetImageResource(Resource.Drawable.icon_home2);
if (fg1 == null)
{
fg1 = new HomeFragment("首页");
fTransaction.Add(Resource.Id.fy_home, fg1);
}
else { fTransaction.Show(fg1); }
break;
case Resource.Id.iv_query:
setSelected();
iv_query.Selected = true;
iv_query.SetImageResource(Resource.Drawable.icon_query2);
if (fg2 == null)
{
fg2 = new QueryFragment("查询");
fTransaction.Add(Resource.Id.fy_query, fg2);
}
else { fTransaction.Show(fg2); }
break;
case Resource.Id.iv_label:
setSelected();
iv_label.Selected = true;
iv_label.SetImageResource(Resource.Drawable.icon_label2);
if (fg3 == null)
{
fg3 = new LabelFragment("贴签");
fTransaction.Add(Resource.Id.fy_label, fg3);
}
else { fTransaction.Show(fg3); }
break;
case Resource.Id.iv_mine:
setSelected();
iv_mine.Selected = true;
iv_mine.SetImageResource(Resource.Drawable.icon_mine2);
if (fg4 == null)
{
fg4 = new MineFragment("我的");
fTransaction.Add(Resource.Id.fy_mine, fg4);
}
else { fTransaction.Show(fg4); }
break;
}
fTransaction.Commit();
}
#endregion
}
}
到这里就结束了,亲测代码有效,如有问题请留言。
以上就是本文的全部内容,希望对大家的学习有所帮助,也希望大家多多支持。
以上是 详解Xamarin.Android 利用Fragment实现底部菜单 的全部内容, 来源链接: utcz.com/p/241643.html