Android仿微信标签功能
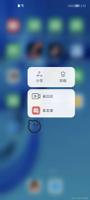
微信中有对联系人添加标签的功能,如下图所示。
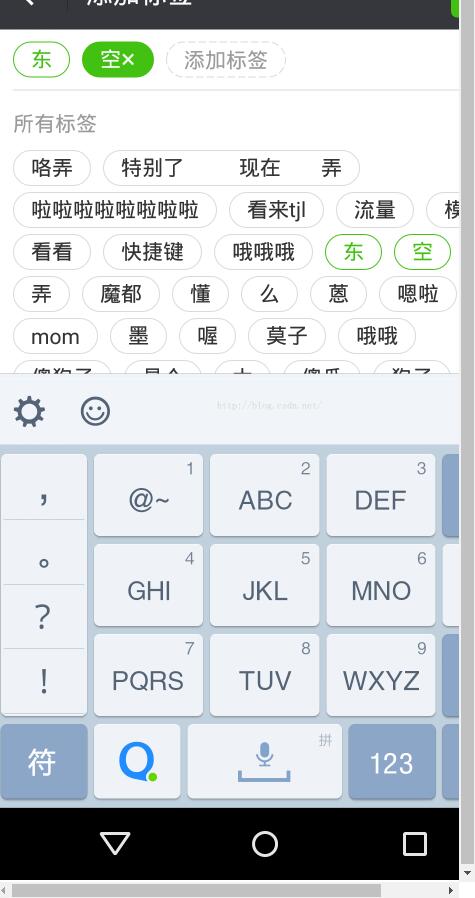
这里有三种状态的标签,分别的未选择,选中,编辑中,由于前两种标签不需要提供输入,所以用TextView实现即可,编辑中的标签用EditText来实现。而标签的形状就用Shape来实现。
在drawable下新建xml文件,这里先上Shape的xml文件。
tag_normal.xml
<?xml version="1.0" encoding="utf-8"?>
<shape xmlns:android="http://schemas.android.com/apk/res/android"
android:shape="rectangle" >
<corners
android:bottomLeftRadius="10dp"
android:bottomRightRadius="10dp"
android:topLeftRadius="10dp"
android:topRightRadius="10dp" />
<stroke android:width="1dp" android:color="#66CDAA" />
<padding
android:bottom="4dp"
android:left="8dp"
android:right="8dp"
android:top="4dp" />
</shape>
tag_selected.xml
<?xml version="1.0" encoding="utf-8"?>
<shape xmlns:android="http://schemas.android.com/apk/res/android"
android:shape="rectangle" >
<corners
android:bottomLeftRadius="10dp"
android:bottomRightRadius="10dp"
android:topLeftRadius="10dp"
android:topRightRadius="10dp" />
<stroke android:width="1dp" android:color="#66CDAA" />
<padding
android:bottom="4dp"
android:left="8dp"
android:right="8dp"
android:top="4dp" />
</shape>
tag_edit.xml
<?xml version="1.0" encoding="utf-8"?>
<shape xmlns:android="http://schemas.android.com/apk/res/android"
android:shape="rectangle" >
<corners
android:bottomLeftRadius="10dp"
android:bottomRightRadius="10dp"
android:topLeftRadius="10dp"
android:topRightRadius="10dp" />
<!-- 这里实现虚线边框-->
<stroke android:dashWidth="5dp" android:dashGap="2dp" android:width="1dp" android:color="#e0e0e0" />
<padding
android:bottom="4dp"
android:left="8dp"
android:right="8dp"
android:top="4dp" />
</shape>
接着在在布局文件中新建一个LinearLayout用以存放标签(如果要实现多行标签自适应添加,用自定义的FlowLayout,代码网上很多。)
activity_main.xml
<?xml version="1.0" encoding="utf-8"?>
<LinearLayout xmlns:android="http://schemas.android.com/apk/res/android"
xmlns:tools="http://schemas.android.com/tools"
android:id="@+id/tag_container"
android:layout_width="match_parent"
android:layout_height="match_parent"
android:orientation="horizontal"
tools:context="com.qtree.tagdemo.MainActivity">
</LinearLayout>
根据对微信标签的分析,这里可以这样实现,创建一个EditText,对其软键盘的Enter和Delete按键进行监听,当输入完成后按下Enter则生成一个标签,添加到LinearLayout中。然后如果当标签内文字为空时,按下删除键,就将它前一个标签的状态修改为选中状态。同样地,当点击未选择的标签也可以选中该标签进行删除。
详细实现如下
package com.qtree.tagdemo;
import android.graphics.Color;
import android.support.v7.app.AppCompatActivity;
import android.os.Bundle;
import android.text.Editable;
import android.text.TextWatcher;
import android.util.Log;
import android.view.KeyEvent;
import android.view.View;
import android.view.ViewGroup;
import android.widget.EditText;
import android.widget.LinearLayout;
import android.widget.TextView;
import java.util.ArrayList;
import java.util.List;
public class MainActivity extends AppCompatActivity {
private LinearLayout layout;
private LinearLayout.LayoutParams params;
@Override
protected void onCreate(Bundle savedInstanceState) {
super.onCreate(savedInstanceState);
setContentView(R.layout.activity_main);
layout=(LinearLayout)findViewById(R.id.tag_container);
params=new LinearLayout.LayoutParams(ViewGroup.LayoutParams.WRAP_CONTENT, ViewGroup.LayoutParams.WRAP_CONTENT);
params.setMargins(30,30,0,0);
//存放标签和标签选择状态
final List<TextView> tagView=new ArrayList<>();
final List<Boolean> tagViewState=new ArrayList<>();
//创建编辑中的标签
final EditText editText=new EditText(getApplicationContext());
editText.setHint("添加标签");
//设置固定宽度
editText.setMinEms(4);
editText.setTextSize(12);
//设置shape
editText.setBackgroundResource(R.drawable.tag_edit);
editText.setHintTextColor(Color.parseColor("#b4b4b4"));
editText.setTextColor(Color.parseColor("#000000"));
editText.setLayoutParams(params);
//添加到layout中
layout.addView(editText);
//对软键盘的Enter和Del键监听
editText.setOnKeyListener(new View.OnKeyListener() {
@Override
public boolean onKey(View v, int keyCode, KeyEvent event) {
if (KeyEvent.ACTION_DOWN == event.getAction()) {
switch (keyCode) {
case KeyEvent.KEYCODE_ENTER:
String editTextContent = editText.getText().toString();
//判断输入是否为空
if (editTextContent.equals(""))
return true;
//判断标签是否重复添加
for(TextView tag:tagView){
String tempStr=tag.getText().toString();
if(tempStr.equals(editTextContent)) {
Log.e("tag","重复添加");
editText.setText("");
editText.requestFocus();
return true;
}
}
//添加标签
final TextView temp = getTag(editText.getText().toString());
tagView.add(temp);
tagViewState.add(false);
//添加点击事件,点击变成选中状态,选中状态下被点击则删除
temp.setOnClickListener(new View.OnClickListener() {
@Override
public void onClick(View v) {
int curIndex = tagView.indexOf(temp);
if (!tagViewState.get(curIndex)) {
//显示 ×号删除
temp.setText(temp.getText() + " ×");
temp.setBackgroundResource(R.drawable.tag_selected);
temp.setTextColor(Color.parseColor("#ffffff"));
//修改选中状态
tagViewState.set(curIndex, true);
} else {
layout.removeView(temp);
tagView.remove(curIndex);
tagViewState.remove(curIndex);
}
}
});
layout.addView(temp);
//让编辑框在最后一个位置上
editText.bringToFront();
//清空编辑框
editText.setText("");
editText.requestFocus();
return true;
case KeyEvent.KEYCODE_DEL:
int lastIndex = tagView.size() - 1;
//没有添加标签则不继续执行
if (lastIndex < 0)
return false;
//获取前一个标签
TextView prevTag = tagView.get(lastIndex);
//第一次按下Del键则变成选中状态,选中状态下按Del键则删除
if (tagViewState.get(lastIndex)) {
tagView.remove(prevTag);
tagViewState.remove(lastIndex);
layout.removeView(prevTag);
} else {
String te = editText.getText().toString();
if (te.equals("")) {
prevTag.setText(prevTag.getText() + " ×");
prevTag.setBackgroundResource(R.drawable.tag_selected);
prevTag.setTextColor(Color.parseColor("#ffffff"));
tagViewState.set(lastIndex, true);
}
}
break;
}
}
return false;
}
});
//监听编辑标签的输入事件
editText.addTextChangedListener(new TextWatcher() {
@Override
public void beforeTextChanged(CharSequence s, int start, int count, int after) {
}
@Override
public void onTextChanged(CharSequence s, int start, int before, int count) {
//输入文字时取消已经选中的标签
for (int i = 0; i < tagViewState.size(); i++) {
if (tagViewState.get(i)) {
TextView tmp = tagView.get(i);
tmp.setText(tmp.getText().toString().replace(" ×", ""));
tagViewState.set(i, false);
tmp.setBackgroundResource(R.drawable.tag_normal);
tmp.setTextColor(Color.parseColor("#66CDAA"));
}
}
}
@Override
public void afterTextChanged(Editable s) {
}
});
}
/**
* 创建一个正常状态的标签
* @param tag
* @return
*/
private TextView getTag(String tag){
TextView textView=new TextView(getApplicationContext());
textView.setTextSize(12);
textView.setBackgroundResource(R.drawable.tag_normal);
textView.setTextColor(Color.parseColor("#66CDAA"));
textView.setText(tag);
textView.setLayoutParams(params);
return textView;
}
}
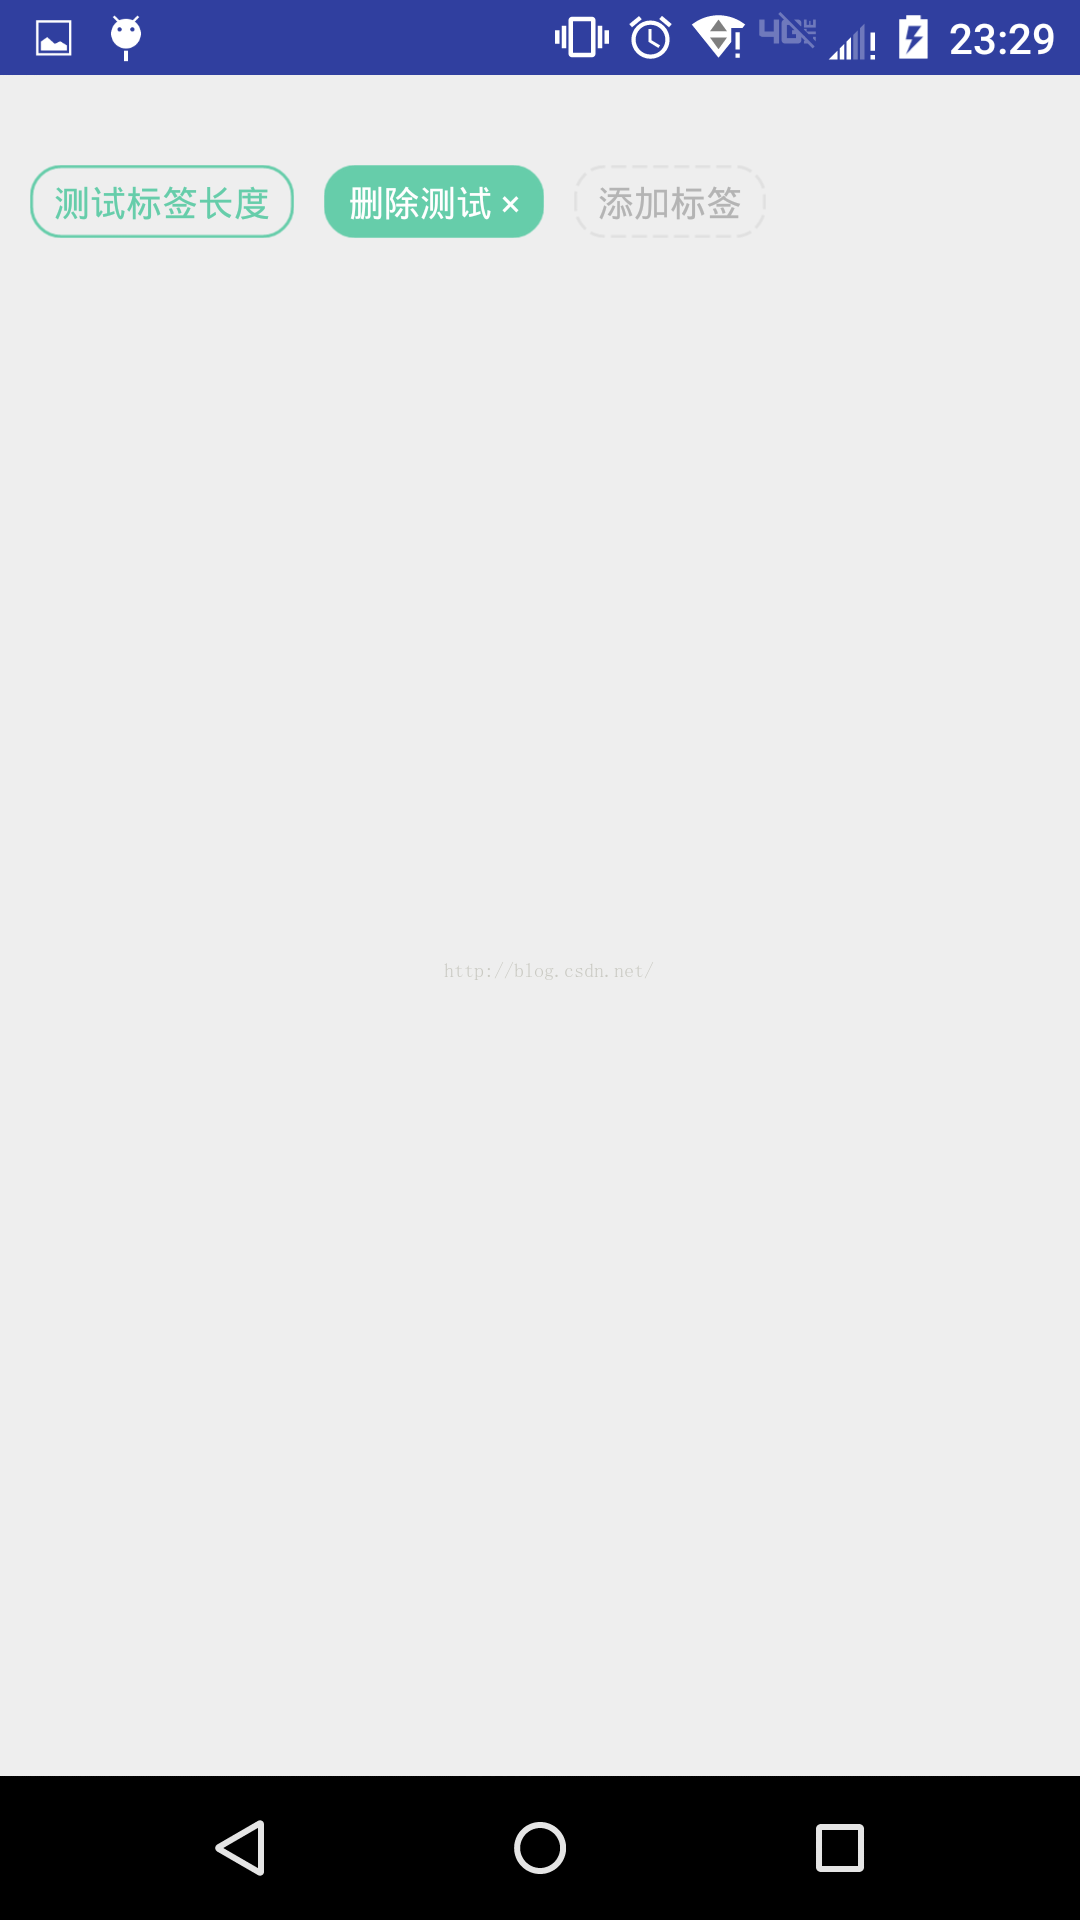
效果挺好。
以上就是本文的全部内容,希望对大家的学习有所帮助,也希望大家多多支持。
以上是 Android仿微信标签功能 的全部内容, 来源链接: utcz.com/p/241394.html